

Danish dough is the ultimate bakery staple that looks fancy but is surprisingly simple to master! This laminated dough creates those gorgeous, flaky layers you see in croissants, pain au chocolat, and Danish pastries. The secret? Patience and proper butter folding. Once you understand the technique, you’ll be impressing everyone with homemade Danish pastries that rival your local bakery.
The beauty of Danish dough lies in its versatility. You can shape it into simple breakfast pastries, fill it with fruit, chocolate, or cream cheese, or layer it with rich creamy fillings. This recipe walks you through the entire process step-by-step, from creating your base dough to executing the perfect butter lamination that gives Danish pastries their signature crispy-yet-tender texture.
What makes this recipe different is the emphasis on proper temperature control and technique rather than complicated ingredients. You likely have everything in your pantry already! The key is understanding why each step matters and taking your time with the folding process. Many home bakers rush this step and end up with dense pastries instead of the light, airy layers that make Danish dough so special.
For detailed lamination guidance and troubleshooting tips, check out Serious Eats’ pastry guides. If you want inspiration for Danish fillings, Bon Appétit’s pastry section has hundreds of creative ideas. You can also reference New York Times Cooking for classic Danish variations and savory applications beyond traditional sweet pastries.
Once you’ve mastered the basic technique, experiment with fresh fruit toppings and creative flavor combinations. The dough itself is neutral enough to pair with both sweet and savory elements, making it an incredibly useful technique to have in your baking arsenal.
Ingredients
- 2 1/4 cups (280g) all-purpose flour
- 1 tablespoon (12g) instant yeast
- 1/4 cup (50g) granulated sugar
- 1 teaspoon salt
- 1/2 cup (120ml) whole milk, warmed
- 1 large egg
- 2 tablespoons (30g) unsalted butter, softened
- 1 cup (227g) cold unsalted butter, for lamination
- 2 tablespoons (16g) all-purpose flour, for dusting
- 1 egg, beaten, for egg wash
- Sea salt and pearl sugar (optional, for topping)
Instructions
- In a large mixing bowl or the bowl of a stand mixer, combine flour, instant yeast, sugar, and salt. Whisk together to distribute the yeast evenly throughout the dry ingredients.
- Add the warmed milk and egg to the dry mixture. Using the dough hook attachment on low speed, mix until a shaggy dough forms, about 2-3 minutes. The dough will look rough and sticky at this stage.
- Add the 2 tablespoons of softened butter and continue mixing on low speed for another 5-7 minutes until the dough becomes smooth and elastic. The dough should be soft and slightly sticky but hold together.
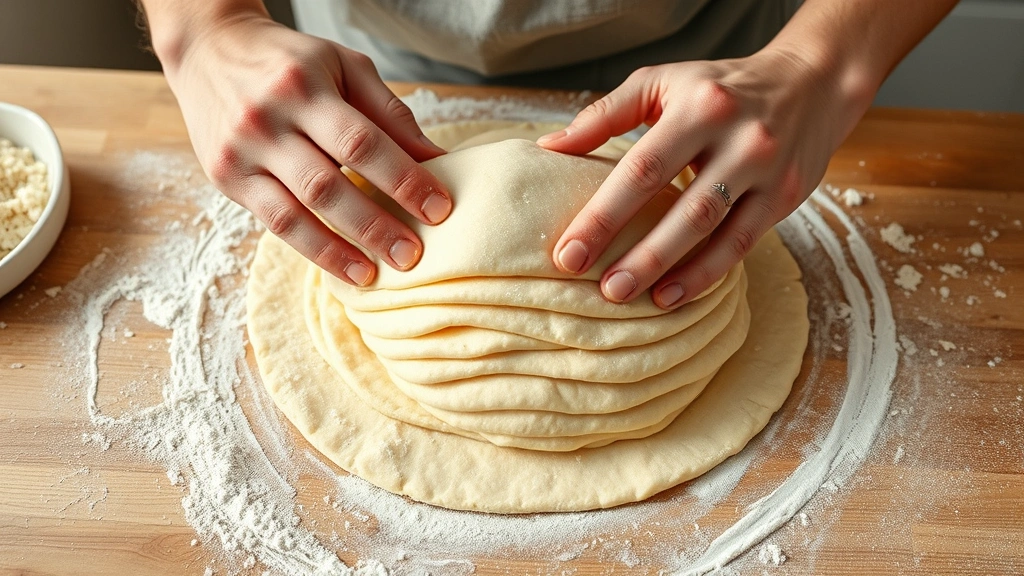
- Turn the dough out onto a lightly floured surface and shape it into a rough rectangle about 1/2-inch thick. Place on a parchment-lined baking sheet, cover with plastic wrap, and refrigerate for at least 1 hour or up to overnight. This resting period is crucial for gluten development.
- While the dough chills, prepare your butter block for lamination. Take the 1 cup of cold butter and place it between two sheets of parchment paper. Using a rolling pin, pound and roll the butter into a thin rectangle approximately 6×8 inches. Keep it cold and set aside.
- Remove the chilled dough from the refrigerator and place on a lightly floured surface. Roll the dough into a rectangle approximately 8×12 inches, about 1/4-inch thick. The dough should be cold and firm.
- Place your prepared butter block in the center of the dough rectangle. Fold the top third of the dough down over the butter, then fold the bottom third up and over, creating a letter-fold. You should now have a rectangular package with butter sealed inside.
- Rotate the dough 90 degrees so the open ends face you. Roll out gently to a 1/4-inch thick rectangle again, working carefully to avoid breaking through the dough and exposing the butter.
- Perform another letter-fold: fold the top third down and the bottom third up. Wrap in plastic wrap and refrigerate for at least 30 minutes. This completes your first double-fold.
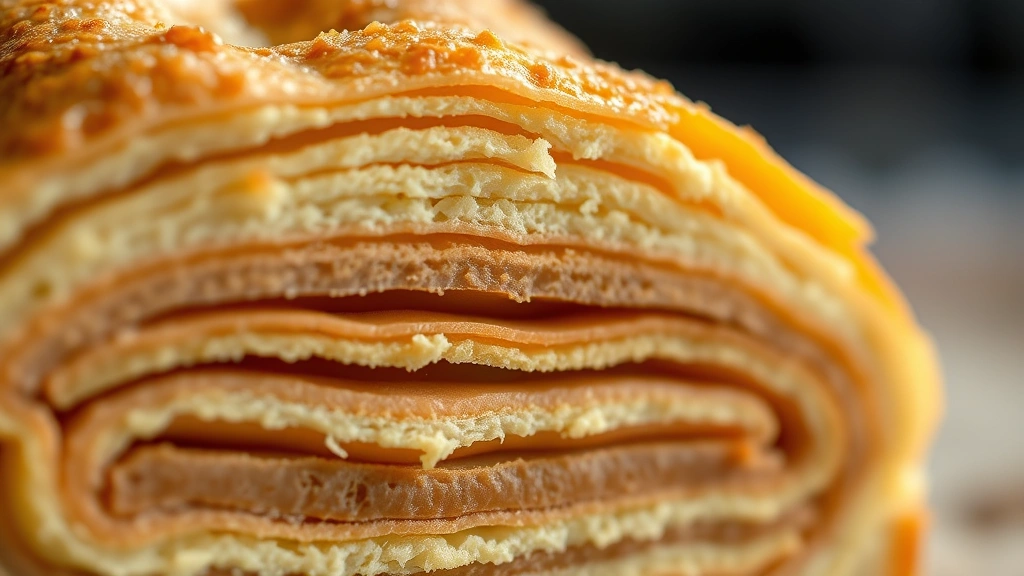
- Repeat the rolling and folding process two more times, chilling for at least 30 minutes between each fold. After the third fold, wrap the dough and refrigerate for at least 2 hours or up to overnight. These multiple folds create the signature 729 layers of Danish pastry.
- Remove the dough from the refrigerator and let it sit at room temperature for 10-15 minutes to become slightly more pliable. Roll out to approximately 1/4-inch thickness on a lightly floured surface.
- Using a sharp knife or pastry wheel, cut the dough into your desired shapes: rectangles for classic Danishes, triangles for pain au chocolat-style pastries, or 3-inch squares for individual pastries.
- Place cut pastries on parchment-lined baking sheets, spacing them at least 2 inches apart. Cover loosely with plastic wrap and let proof at room temperature for 45 minutes to 1 hour until visibly puffed.
- Preheat your oven to 400°F (200°C). Just before baking, brush each pastry with beaten egg wash for a beautiful golden finish.
- Bake for 20-25 minutes until the pastries are deeply golden brown and crispy. The internal layers should be visible on the sides, showing off those beautiful flaky layers.
- Remove from the oven and let cool on the baking sheet for 5 minutes, then transfer to a wire rack to cool completely. Serve warm or at room temperature.
Pro Tips
- Temperature control is absolutely critical when working with Danish dough. If your butter gets too warm and melts into the dough, you won’t achieve proper lamination. If the dough gets too warm, it becomes difficult to handle. Work in a cool kitchen and chill between folds.
- The multiple letter-folds create exponentially more layers with each fold. After one fold you have 3 layers, after two folds you have 9 layers, and after three folds you have 27 layers. Some bakers do up to 6 folds for even more layers, but 3 double-folds creates excellent results.
- You can prepare Danish dough up to 3 days in advance. After the final fold, wrap tightly and refrigerate. You can also freeze the dough for up to 2 months. Thaw overnight in the refrigerator before shaping and proofing.
- Don’t skip the final proof! This step allows the dough to rise and become puffy, which creates that airy crumb structure. Under-proofed Danishes will be dense; over-proofed ones may collapse during baking.
- Feel free to add fillings before the final proof. Classic options include chocolate bars, jam, pastry cream, cheese, or fruit. Place fillings in the center before folding or rolling into shape.
- If you notice butter breaking through the dough during rolling, immediately dust with flour, wrap it up, and refrigerate for 15-20 minutes before continuing.
- Pearl sugar sprinkled on top before baking creates a delightful crunchy texture and beautiful appearance. Sea salt pairs wonderfully with both sweet and savory versions.
- Store baked Danish pastries in an airtight container at room temperature for up to 2 days. They’re best enjoyed fresh but can be gently reheated in a 300°F oven for 5 minutes to restore crispiness.
- This dough is essentially a simplified croissant dough, so once you master it, you’ll be able to make croissants, pain au chocolat, and other laminated pastries using the same technique.