
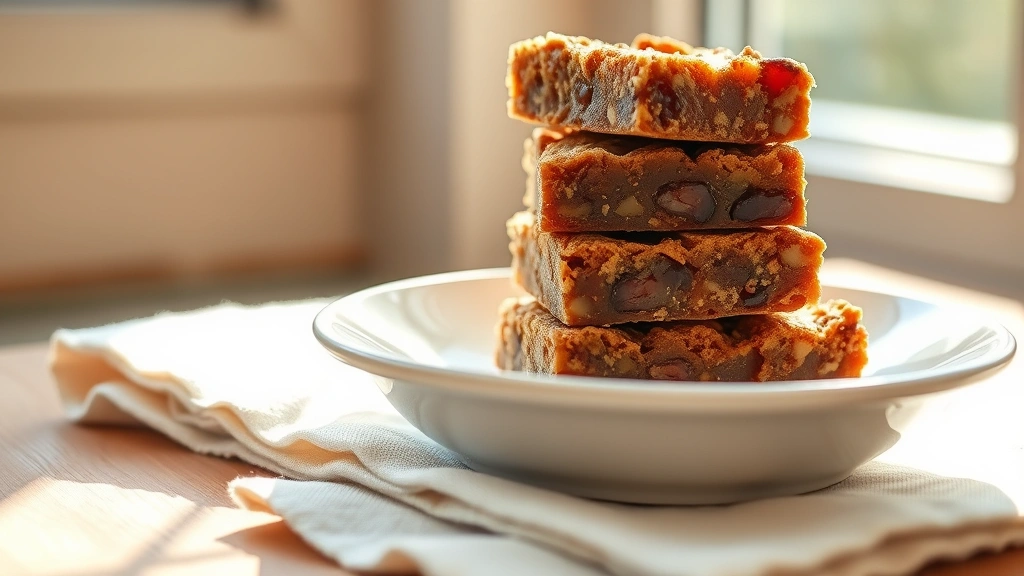
Date bars are the ultimate sweet treat that combines chewy, caramel-like dates with a buttery oat crust and topping. These little squares of heaven have been a beloved classic for generations, and for good reason! They’re the perfect balance of textures—crispy, buttery edges with that signature gooey date filling that just melts in your mouth. What I adore most about date bars is their versatility; they’re fancy enough for a dinner party yet simple enough for a weeknight dessert. Plus, they make an absolutely stunning addition to any holiday cookie platter.
I’ve been making date bars since I was a young girl watching my grandmother work her magic in the kitchen. There’s something so special about that aroma wafting through your home as these beauties bake. The combination of wholesome oats and natural date sweetness makes them feel almost virtuous, even though they’re absolutely indulgent. Whether you’re a seasoned baker or just starting your culinary journey, this classic dessert recipe is one you’ll want to bookmark immediately.
These date bars are perfect for so many occasions. Serve them alongside your morning coffee, pack them in lunchboxes, gift them to neighbors, or enjoy them as an after-dinner treat. They also keep beautifully in an airtight container for up to a week, making them ideal for meal prep. I often make a double batch and freeze half for those moments when I need a quick homemade dessert that tastes like it took hours to prepare.
The beauty of this recipe lies in its simplicity. You don’t need any fancy equipment or hard-to-find ingredients. Just good quality dates, butter, oats, and a few pantry staples create something truly magical. For best results, I always recommend using soft, fresh dates—they blend beautifully and create that luxurious filling texture. If your dates are a bit dry, simply soak them in warm water for a few minutes before processing.
One of my favorite things about making date bars is how forgiving they are. The oat crust is nearly impossible to mess up, and the date filling comes together in minutes. Even if your bars aren’t perfectly uniform (mine never are!), they taste absolutely delicious. This is the kind of recipe that celebrates imperfection and rewards home bakers with incredible results. Check out my guide on measuring ingredients correctly to ensure your bars turn out perfectly.
I love experimenting with this base recipe too. Sometimes I add a pinch of cardamom to the filling, or swap in brown sugar for a deeper molasses flavor. You can also press some dark chocolate chips into the top before serving for an elegant twist. Visit date bar flavor variations for more creative inspiration.
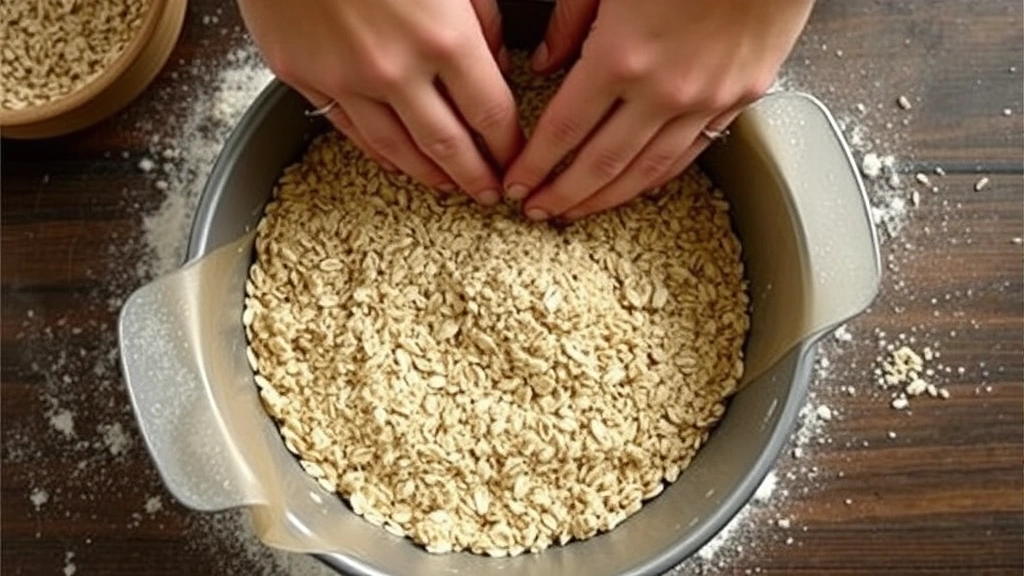
For the finest baking results, I recommend investing in a quality 9×13 inch baking pan and parchment paper for easy removal. Having a food processor makes quick work of the dates, but you can also chop them finely by hand if needed. Some bakers prefer using a pastry cutter for the oat mixture, while others use their fingertips—both methods work beautifully.
These date bars have become a signature recipe in my household, and I’m thrilled to share it with you today. They’re the kind of dessert that makes people ask for the recipe, and the kind that keeps you coming back for just one more square. Whether you’re baking for your family or preparing a gift, these bars are sure to impress. Learn more about storing baked goods to keep your bars tasting fresh all week long.
For additional inspiration and techniques, check out Serious Eats’ dessert guide and Bon Appétit’s baking tips. You can also explore New York Times Cooking for more classic dessert recipes that pair beautifully with date bars.
Ingredients
- 2 cups rolled oats (old-fashioned)
- 1½ cups all-purpose flour
- ¾ cup granulated sugar
- ½ teaspoon salt
- ¾ cup butter, softened
- 2 cups pitted dates, tightly packed
- ¾ cup water
- 2 tablespoons granulated sugar (for filling)
- 1 tablespoon butter (for filling)
- ½ teaspoon vanilla extract
- ¼ teaspoon salt (for filling)
Instructions
- Preheat your oven to 350°F. Line a 9×13 inch baking pan with parchment paper, allowing the paper to overhang slightly on the sides for easy removal later.
- In a large mixing bowl, combine the rolled oats, all-purpose flour, granulated sugar, and salt. Whisk these dry ingredients together until well combined and evenly distributed.
- Add the softened butter to the dry mixture and use a pastry cutter, two knives, or your fingertips to work the butter into the oat mixture until it resembles coarse breadcrumbs with some pea-sized pieces remaining.
- Press about two-thirds of the oat mixture firmly into the prepared baking pan, creating an even layer across the bottom. Use the bottom of a measuring cup to help compress it evenly.
- Place the pitted dates in a food processor along with the water, 2 tablespoons sugar, 1 tablespoon butter, vanilla extract, and ¼ teaspoon salt.
- Process the date mixture until it becomes a smooth, spreadable paste, stopping to scrape down the sides of the food processor as needed. This should take 1-2 minutes.
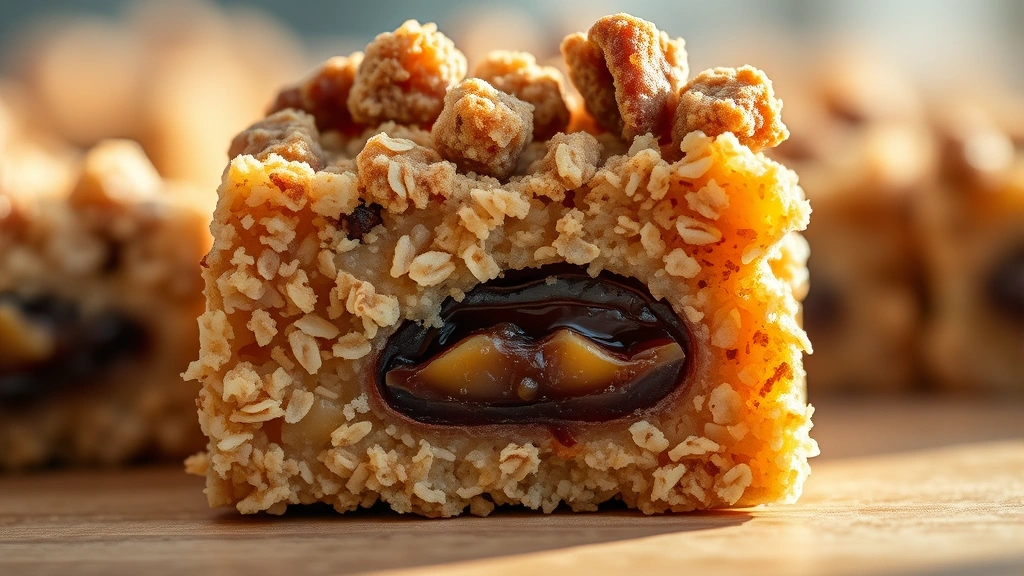
- Spread the date filling evenly over the oat base layer, using an offset spatula or the back of a spoon to create an even thickness.
- Sprinkle the remaining oat mixture over the date filling, distributing it as evenly as possible across the surface.
- Gently press the top layer down with the bottom of a measuring cup or your hands, being careful not to compress it too heavily or the bars will become dense.
- Bake in the preheated oven for 30-35 minutes, until the top is light golden brown and the edges are slightly darker.
- Remove from the oven and allow the bars to cool completely in the pan on a wire rack, about 1-2 hours. Do not cut while warm, as they will fall apart.
- Once completely cooled, use the parchment paper overhang to lift the entire baked rectangle from the pan onto a cutting board.
- Using a sharp knife dipped in hot water and wiped clean between cuts, cut the cooled bars into 16 equal squares.
- Store the date bars in an airtight container at room temperature for up to 7 days, or freeze for up to 3 months.
Pro Tips
- **Selecting Quality Dates**: Use soft, fresh dates for the best results. Medjool dates are my preferred choice due to their natural sweetness and creamy texture. If your dates seem dry, soak them in warm water for 5-10 minutes before processing to ensure a smooth filling.
- **Oat Selection**: Old-fashioned rolled oats work best for this recipe, as they provide better texture than quick oats. Steel-cut oats are too coarse and won’t create the desired crumbly topping.
- **Butter Temperature**: Ensure your butter is softened but not melted for the best crumbly texture in the oat layers. If your kitchen is warm, you can refrigerate the butter for 15 minutes before using.
- **Pan Preparation**: Using parchment paper with overhang makes removal incredibly easy and prevents sticking. If you don’t have parchment paper, you can butter the pan generously, but parchment is highly recommended.
- **Achieving Even Layers**: For perfectly uniform bars, use a ruler to lightly mark cutting lines in the cooled mixture before slicing. A sharp knife heated under hot water produces cleaner cuts with less crumbling.
- **Flavor Variations**: Add ½ teaspoon of ground cardamom, cinnamon, or ginger to the date filling for Middle Eastern-inspired flavors. You can also stir in 2 tablespoons of orange zest or ¼ teaspoon of almond extract.
- **Storage Recommendations**: These bars keep beautifully in an airtight container at room temperature for one week. For longer storage, layer them between parchment paper in a freezer-safe container and freeze for up to 3 months. Thaw at room temperature for 30 minutes before serving.
- **Make-Ahead Friendly**: You can prepare both the oat mixture and date filling the day before. Store separately in airtight containers and assemble just before baking.
- **Cooling is Essential**: Resist the urge to cut the bars while warm. They need adequate cooling time to set properly and cut cleanly. Warm bars will crumble, but cooled bars will slice beautifully.
- **Serving Suggestions**: These bars are delicious on their own but can be served with vanilla ice cream, whipped cream, or alongside a cup of coffee. They also make an impressive homemade gift when wrapped in parchment paper and tied with twine.