
There’s something absolutely magical about biting into a warm, pillowy donut hole – that perfect combination of a tender, fluffy interior and a delicate, slightly crispy exterior. Whether you’re hosting a brunch, looking for a special weekend treat, or simply craving something homemade and utterly delicious, this donut hole recipe is guaranteed to become your go-to.
What I love most about making donut holes at home is how much better they taste compared to store-bought versions. There’s no comparison to the warmth and freshness of a homemade donut hole, still slightly warm from the oil, dusted with cinnamon sugar or glazed to perfection. Plus, your kitchen will smell absolutely incredible – the kind of aroma that brings everyone running to the kitchen wondering what you’re making.
This recipe is surprisingly approachable, even for bakers who consider themselves beginners. The dough comes together quickly, and you don’t need any fancy equipment. I’ve designed this recipe to be foolproof, with detailed instructions to help you achieve perfect results every single time. The key is using quality ingredients, keeping your oil at the right temperature, and not overmixing your dough. Follow along, and you’ll be enjoying café-quality donut holes in your own home within the hour.
One of the best things about this recipe is its versatility. You can coat them in classic cinnamon sugar, dip them in a silky glaze, fill them with jam or Nutella, or even top them with sprinkles for a more festive appearance. I’ve included several topping suggestions in the notes section, so you can customize them to match your mood or occasion. Whether you’re making these for a special breakfast, a party, or just because, they’re sure to impress everyone who tries them. For more inspiration on sweet treats, check out our Best Heavy Cream Alfredo Sauce Recipe for savory ideas, or explore our Delicious Heavy Cream Pasta Recipe collection.
The beauty of homemade donut holes is that they’re best enjoyed fresh and warm, preferably within a few hours of frying. However, I’ve included storage tips to help you keep them fresh for a couple of days if needed. You can also prepare the dough ahead of time and fry them when you’re ready to serve, which makes this recipe perfect for entertaining. For more baking inspiration and techniques, check out Serious Eats, where they dive deep into the science of baking.
Making donut holes is also a wonderful activity to do with family or friends. Kids especially love watching the transformation from dough to golden-brown treats, and everyone enjoys the taste-testing phase. It’s the kind of recipe that creates memories and traditions. The combination of simple ingredients – flour, sugar, eggs, milk, and a touch of vanilla – transforms into something that tastes like pure indulgence. Once you master this basic recipe, you’ll find yourself making these regularly, experimenting with different glazes and toppings. Your loved ones will thank you, and you’ll love the satisfaction of creating something so delicious from scratch.
Ingredients
- 2 cups all-purpose flour
- 1/2 cup granulated sugar
- 2 teaspoons baking powder
- 1/2 teaspoon salt
- 1/4 teaspoon nutmeg
- 2 large eggs
- 1/2 cup whole milk
- 2 tablespoons melted butter
- 1 teaspoon vanilla extract
- Oil for frying (vegetable or canola oil)
- For coating: 1/4 cup granulated sugar mixed with 1 teaspoon ground cinnamon
Instructions
- In a large mixing bowl, whisk together the flour, sugar, baking powder, salt, and nutmeg until fully combined and no lumps remain.
- In a separate bowl, beat the eggs together, then add the milk, melted butter, and vanilla extract, stirring until well combined.
- Create a well in the center of your dry ingredients and pour in the wet ingredients, folding gently with a spatula until just combined. Do not overmix – the batter should be slightly lumpy and not smooth. Overmixing will result in tough, dense donut holes.
- Fill a deep pot, Dutch oven, or heavy-bottomed saucepan with about 3-4 inches of oil. Attach a candy or deep-fry thermometer to the side of the pot.
- Heat the oil to 350°F. This temperature is crucial – if the oil is too hot, the donut holes will brown too quickly outside while remaining raw inside. If it’s not hot enough, they’ll absorb too much oil and become greasy.
- While the oil heats, prepare a baking sheet lined with paper towels for draining the fried donut holes. Have your cinnamon sugar mixture ready in a shallow bowl or plate.
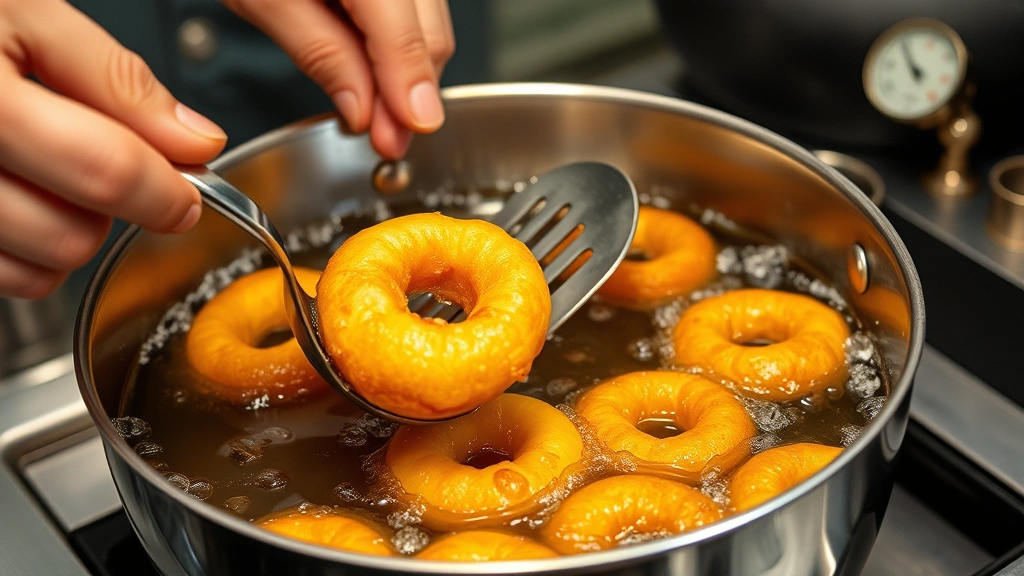
- Once the oil reaches 350°F, use a small cookie scoop or two teaspoons to carefully drop balls of dough into the hot oil. Work in small batches to avoid crowding the pot – you should be able to fit about 5-7 donut holes at a time without them touching.
- Fry for approximately 1-2 minutes on the first side until golden brown, then carefully flip each donut hole using tongs or a slotted spoon.
- Fry the second side for another 1-2 minutes until evenly golden brown and cooked through.
- Using a slotted spoon or spider strainer, carefully remove the donut holes from the oil and transfer them to the paper towel-lined baking sheet to drain.
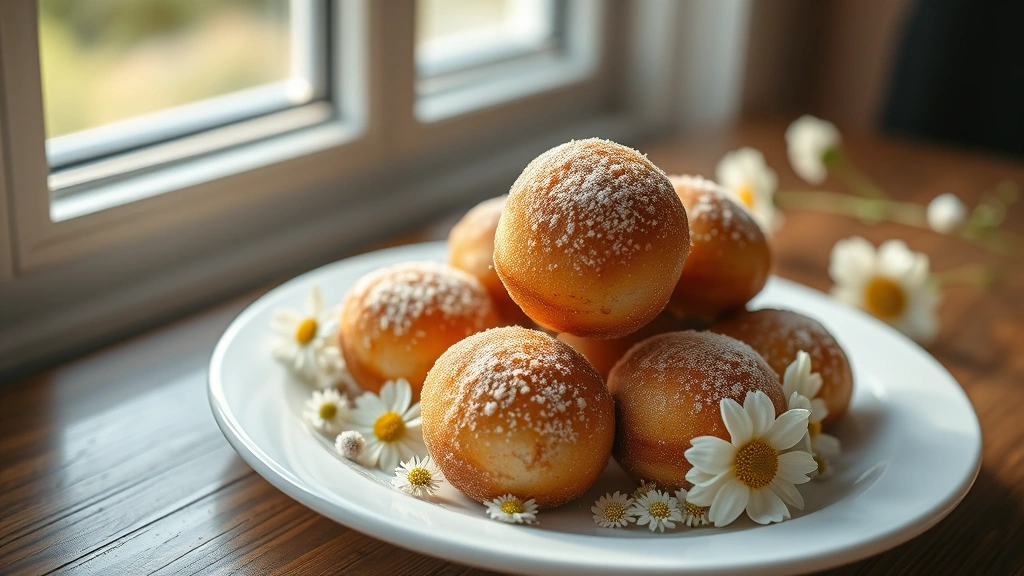
- While the donut holes are still warm, roll them in the cinnamon sugar mixture, coating all sides evenly. Work quickly while they’re warm so the coating adheres properly.
- Repeat the frying process with remaining batter in batches, maintaining the oil temperature at 350°F throughout.
- Allow the donut holes to cool for a few minutes before serving. They’re best enjoyed warm and fresh, but can be stored in an airtight container for up to two days.
Pro Tips
Don’t Overmix Your Batter: This is a common mistake that results in tough, dense donut holes. Mix your wet and dry ingredients until just combined – it’s perfectly fine if there are a few small lumps remaining. The lumps will incorporate as the batter rests and fries.
Use Fresh Ingredients: Fresh baking powder is crucial for achieving the light, fluffy texture that makes these donut holes special. If your baking powder has been sitting in your cabinet for years, it’s time to replace it.
Variation Ideas: Once you master the basic recipe, try these topping and filling options. For a glazed version, whisk together 1 cup powdered sugar, 2-3 tablespoons milk, and 1/2 teaspoon vanilla extract to create a smooth glaze. Dip warm donut holes into the glaze and let excess drip off. For chocolate lovers, add 2 tablespoons cocoa powder to the glaze for a chocolate version. You can also fill donut holes with jam, Nutella, or pastry cream using a small piping bag – inject the filling while the donut holes are still warm.
Storage Tips: Donut holes are best enjoyed immediately while still warm, but they can be stored in an airtight container at room temperature for up to two days. Do not refrigerate, as this will dry them out faster. If you want to make these ahead, prepare the batter up to 2 hours in advance and store it in the refrigerator, bringing it back to room temperature for 15 minutes before frying. You can also freeze cooled donut holes for up to one month – reheat them in a 325°F oven for about 5-8 minutes to restore their warmth and texture.
Oil Selection Matters: Use a neutral oil with a high smoke point such as vegetable oil, canola oil, or peanut oil. Avoid olive oil or coconut oil, as these have lower smoke points and will impart unwanted flavors. Fresh oil produces the best results, so if you’ve been reusing the same oil, consider starting with fresh oil for optimal flavor.
Safety Considerations: Always use caution when working with hot oil. Keep a fire extinguisher nearby, never leave hot oil unattended, and never add wet ingredients to hot oil. If oil begins to smoke, remove it from heat immediately and allow it to cool. Never use water to extinguish an oil fire – use a Class B fire extinguisher or cover with a metal lid.
Scaling the Recipe: This recipe doubles easily if you need to feed a crowd. Simply multiply all ingredients by two and fry in batches. The batter will keep for up to 2 hours at room temperature, making this recipe perfect for entertaining.
For additional inspiration and baking techniques, check out Bon Appétit or New York Times Cooking for more advanced pastry techniques. Our Easy Chicken Alfredo Recipe offers more cooking inspiration, while our Best Chickpea Salad Recipe and Best Shishito Peppers Recipe provide additional culinary ideas.