
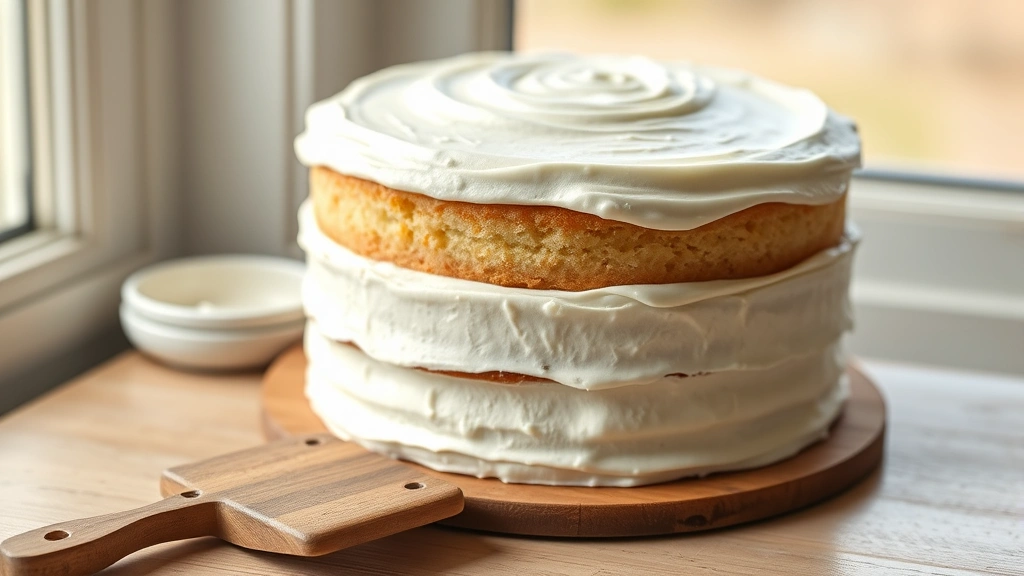
There’s nothing quite like the satisfaction of spreading a silky, perfectly smooth icing over a freshly baked cake or cupcake. This easy icing recipe has been a staple in my kitchen for years, and I’m thrilled to finally share it with you! Whether you’re decorating a simple layer cake for a weeknight dessert or creating an elaborate three-tiered masterpiece for a special celebration, this versatile frosting is absolutely foolproof.
What makes this icing truly special is its incredible simplicity combined with its professional-quality results. With just a handful of pantry staples and a few minutes of mixing, you’ll have a frosting that’s creamy, spreadable, and absolutely delicious. The best part? It tastes homemade because it IS homemade, with no artificial ingredients or complicated techniques required.
I’ve tested this recipe countless times, tweaking it here and there until I landed on the perfect ratio of ingredients. The key to success is using room temperature butter and taking your time during the mixing process. This simple icing pairs beautifully with virtually any cake flavor—from classic vanilla to rich chocolate to creative flavors like lemon or almond. You can even tint it with gel food coloring to match your party theme or seasonal celebration.
If you love easy baking projects, you’ll also want to check out my Best Heavy Cream Alfredo Sauce Recipe, which uses similar fundamental techniques for achieving that perfect creamy texture. And for more cake inspiration, don’t miss my collection of Easy Chicken Alfredo Recipe and other crowd-pleasing desserts.
This icing recipe yields enough frosting to generously cover a two-layer 8 or 9-inch round cake, or approximately 24 cupcakes. The texture is smooth and pipeable, making it ideal for both casual rustic cakes and fancy decorated designs. Once you master this basic recipe, you’ll find yourself making it again and again for every special occasion and celebration.
For comprehensive frosting techniques and variations, I recommend checking out Serious Eats and Bon Appétit for additional inspiration. The New York Times Cooking section also features wonderful variations on classic buttercream recipes. I’m confident that once you try this easy icing recipe, it will become your go-to frosting for every baking project. Let me walk you through every step to ensure your success!
Ingredients
- 1 cup (2 sticks) unsalted butter, room temperature
- 3 cups powdered sugar, sifted
- 2-3 tablespoons heavy cream or whole milk
- 1 teaspoon vanilla extract
- Pinch of salt
- Gel food coloring (optional, for tinted icing)
Instructions
- Cut the butter into roughly equal pieces and allow it to sit at room temperature for 30-45 minutes until it’s soft enough to leave a slight impression when you press your finger into it. This is the most important step for achieving the right texture—cold butter won’t incorporate properly with the sugar, resulting in a grainy or lumpy icing.
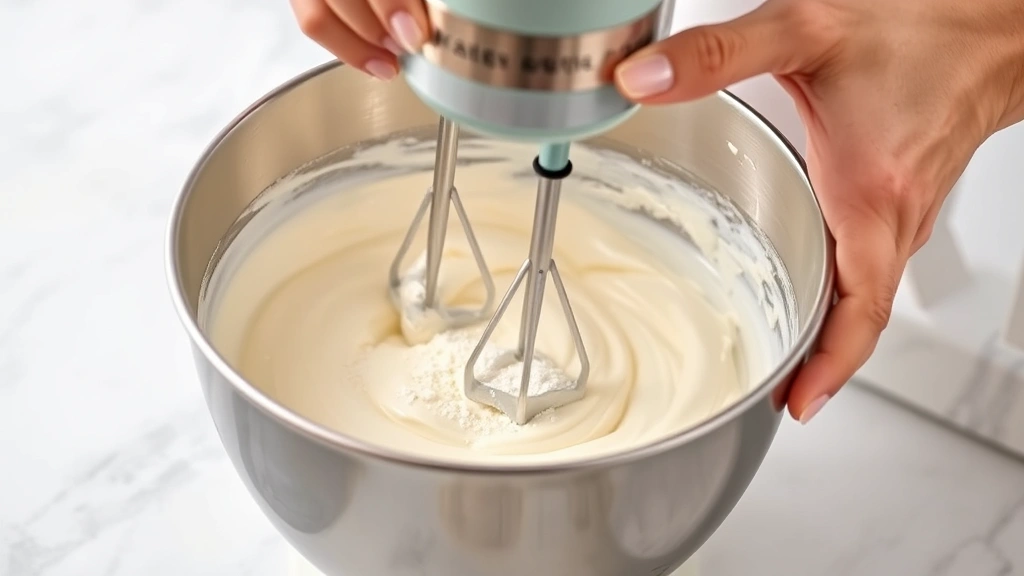
- Place the softened butter in the bowl of an electric mixer fitted with the paddle attachment. If you don’t have an electric mixer, you can use a hand mixer or even mix by hand with a wooden spoon, though it will require more elbow grease.
- Begin beating the butter on medium speed for about 1 minute, until it becomes light and fluffy. You should notice the color lightening slightly and the texture becoming whipped. This step aerates the butter and creates a light foundation for your icing.
- Reduce the mixer speed to low and gradually add the sifted powdered sugar, about 1 cup at a time. Wait until each addition is mostly incorporated before adding the next portion. This gradual process prevents powdered sugar from flying everywhere and ensures even distribution.
- Once all the powdered sugar has been added and the mixture looks thick and sandy, increase the mixer speed to medium and continue beating for another 2-3 minutes. The icing should transform into a thick, pale, and fluffy consistency.
- Add the vanilla extract and salt, then beat on medium speed for about 30 seconds to incorporate these flavoring ingredients evenly throughout the frosting.
- With the mixer running on low speed, begin adding the heavy cream or milk, starting with 2 tablespoons. The icing should gradually become smoother and more spreadable. Add the remaining milk or cream gradually, 1 teaspoon at a time, until you reach your desired consistency.
- If you’d like to tint your icing, add 1-2 drops of gel food coloring at this point and beat on medium speed for about 1 minute until the color is evenly distributed and consistent throughout. Gel coloring works better than liquid food coloring because it doesn’t thin out the frosting.
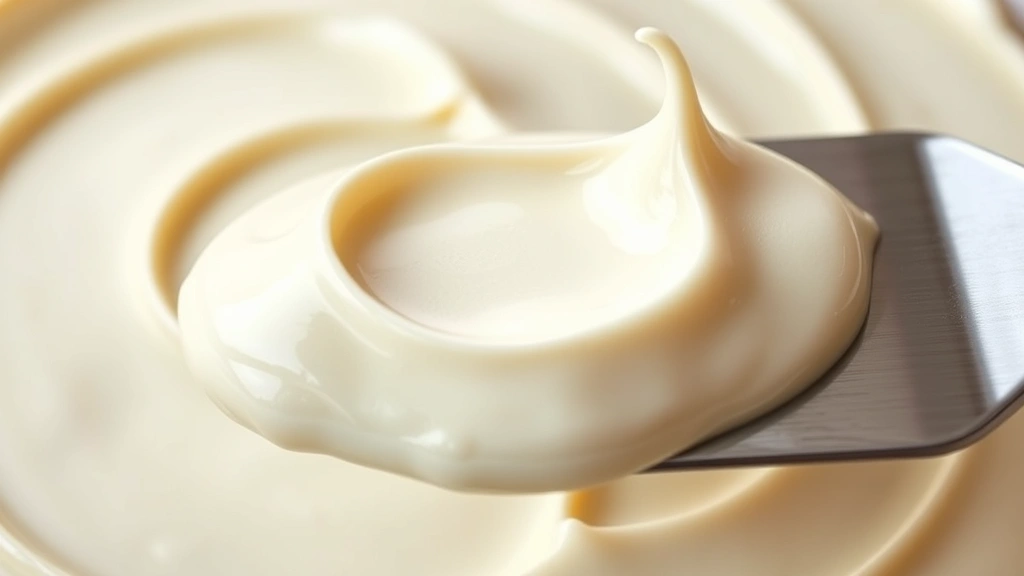
- Stop the mixer and use a rubber spatula to scrape down the sides and bottom of the bowl, ensuring all ingredients are fully incorporated and there are no streaks of unmixed butter or sugar.
- Give the icing a final 30-second beat on medium speed to ensure it’s smooth and creamy, then transfer it to a piping bag, frosting spreader, or bowl for immediate use on your cooled cakes or cupcakes.
Pro Tips
- This icing is best made with room temperature butter for optimal texture and consistency. If your kitchen is particularly cold, you can soften the butter by leaving it out for longer or briefly microwaving it in 5-second intervals.
- Sifting your powdered sugar is highly recommended to remove any lumps and create a smooth, lump-free icing. If you don’t have a sifter, place the sugar in a fine-mesh strainer and gently tap it over your mixing bowl.
- The consistency of your icing can be adjusted by adding more or less liquid. For a thicker consistency ideal for piping decorative designs, use less milk. For a thinner consistency better for smooth spreading, add slightly more milk.
- This icing can be made 1-2 days in advance and stored in an airtight container at room temperature. Before using stored icing, let it come to room temperature and give it a quick beat with the mixer to restore its fluffy texture.
- For chocolate icing, replace 3-4 tablespoons of powdered sugar with unsweetened cocoa powder and increase the milk to 3-4 tablespoons to achieve the right consistency.
- Gel food coloring is preferable to liquid food coloring because it won’t thin out your frosting. However, if using liquid coloring, start with just a few drops and add sparingly.
- This icing pairs beautifully with vanilla cake, chocolate cake, carrot cake, lemon cake, and almost any other flavor. It’s particularly lovely when paired with my Delicious Heavy Cream Pasta Recipe style of rich, indulgent desserts.
- If your icing becomes too soft during warm weather, refrigerate it for 15-20 minutes to firm it up before using. If it becomes too stiff, microwave it in 5-second intervals, stirring between each interval, until it reaches the right consistency.
- For the best results, apply this icing to completely cooled cakes. Warm cakes will cause the frosting to melt and slide off the sides.
- This recipe yields approximately 2 cups of icing, which is enough to generously frost a two-layer cake or 24 cupcakes. Double the recipe if you need more or if you want to practice your piping techniques.
- Consider adding complementary flavors like almond extract, lemon zest, or espresso powder to create custom icing variations that match your cake flavor.
Pingback: How to make the BEST Pokemon Sleep Curry Recipe! – Simple Recipe Finder
Pingback: How to make the BEST Italian Drunken Noodles Recipe! – Simple Recipe Finder
Pingback: How to make the BEST Pesto Chicken Pasta Recipe! – Simple Recipe Finder