
There’s something absolutely magical about a silky, luxurious egg yolk custard – it’s the foundation of so many beloved desserts and sauces, and once you master this classic technique, you’ll find yourself reaching for it again and again. This comprehensive guide will walk you through creating the most velvety, rich custard that will elevate your dessert game to professional-level results.
Egg yolk custard is one of those culinary essentials that every home cook should have in their repertoire. Whether you’re planning to use it as a base for luxurious cream sauces, or you want to create elegant standalone desserts, understanding the science and technique behind proper custard-making is absolutely crucial. The key to success lies in patience, the right temperature control, and understanding how to coax those precious egg yolks into silky submission.
What makes this recipe truly special is that it works beautifully with minimal ingredients, yet the results feel indulgent and restaurant-quality. I’ve tested this method countless times, and I’m thrilled to share my foolproof technique with you. The beauty of a well-made custard is that it transforms simple ingredients – just egg yolks, sugar, and cream – into something that tastes decadent and sophisticated.
The most common mistake people make when preparing custard is rushing the process or applying too much heat too quickly. This can result in scrambled eggs rather than the silky, pourable consistency you’re aiming for. Throughout this guide, I’ll share all my professional tips and tricks to help you avoid those pitfalls. You’ll learn exactly when to add ingredients, how to temper your eggs properly, and the exact temperature you should be aiming for. Once you’ve mastered this base recipe, you can explore variations like vanilla bean custard, bourbon-infused versions, or even applications in savory dishes.
I promise that with this straightforward method, you’ll create a custard so good that your family and guests will be asking for your secret. The technique is actually quite simple once you understand the principles, and I’ve included detailed instructions to ensure your success. This is a recipe worth mastering because it opens up a world of dessert possibilities.
For best results, I recommend using high-quality eggs with deep golden yolks, fresh cream, and real vanilla bean when possible – these premium ingredients really do make a noticeable difference in the final product. You’ll also want to make sure you have a reliable thermometer on hand, as temperature control is absolutely essential. This isn’t a recipe where you can eyeball it; precision matters when you’re working with eggs.
Whether you’re making this for a dinner party, a special family gathering, or simply because you want to impress yourself with what you can create in your own kitchen, this egg yolk custard recipe is going to become one of your most-requested desserts. The versatility of this base means you can dress it up or down depending on the occasion, and it stores beautifully in the refrigerator for several days.
I’ve included detailed notes below with troubleshooting tips, storage instructions, and serving suggestions. You’ll also find recommendations for how to use your custard in other applications – from creamy sauces to elegant plated desserts. Once you’ve made this custard successfully, you’ll understand why it’s such a beloved classic in professional kitchens and home cooking alike.
Ingredients
- 8 large egg yolks, from room temperature eggs
- 1/2 cup granulated sugar
- 2 cups heavy cream, cold
- 1 cup whole milk
- 1 vanilla bean, split lengthwise and seeds scraped, or 2 teaspoons pure vanilla extract
- 1/4 teaspoon fine sea salt
- 2 tablespoons cornstarch or tapioca starch (optional, for extra stability)
Instructions
- Start by gathering all your ingredients and setting up your workspace. You’ll want a heatproof bowl that fits snugly over a pot of simmering water without the bowl touching the water – this is your double boiler setup. Fill the pot with about 2 inches of water and bring it to a gentle simmer over medium heat.
- While the water heats, pour your cold heavy cream and whole milk into a separate saucepan. Add the scraped vanilla bean seeds and pod (or vanilla extract if using). Heat this mixture over medium heat, stirring occasionally, until it’s steaming and tiny bubbles form around the edges – you want it hot but not boiling. This usually takes about 5-7 minutes.
- Once the cream mixture is hot, remove it from the heat and let it sit for 5 minutes to allow the vanilla to infuse fully. If using vanilla extract instead of fresh beans, you can skip the infusing step and add it after the custard is cooked.
- In your heatproof bowl, whisk together the egg yolks and granulated sugar. Whisk vigorously for about 2-3 minutes until the mixture becomes pale yellow and slightly thickened – this ribboning effect indicates the sugar is partially dissolved and the yolks are well incorporated. The paler the mixture, the better your final custard will be.
- Add the fine sea salt to the egg and sugar mixture and whisk to combine. If you’re using cornstarch for extra stability (which is optional but recommended for beginners), whisk it together with the salt before adding to ensure no lumps form.
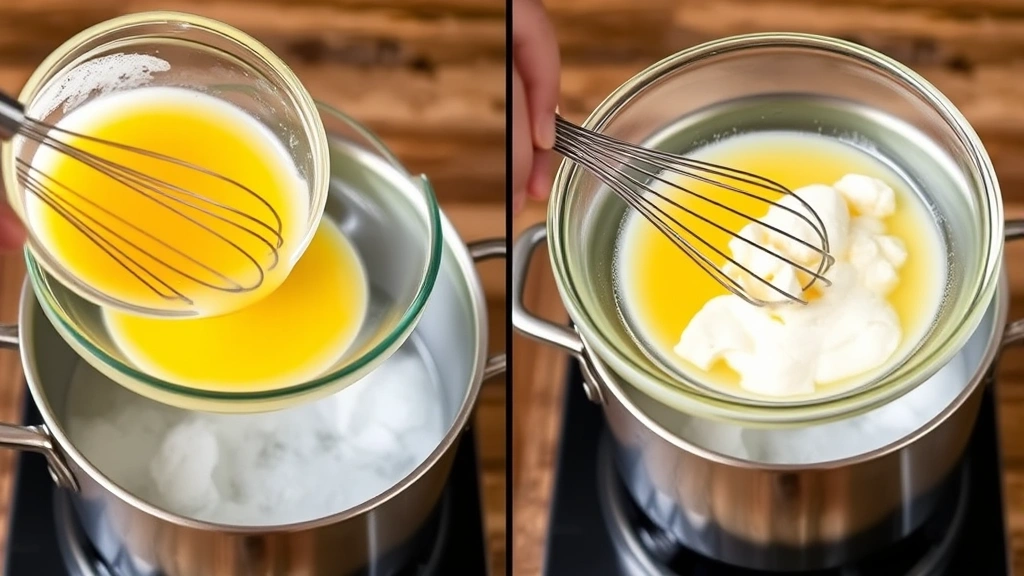
- Now comes the crucial tempering step – this prevents the eggs from scrambling. Slowly add about 1/4 of the hot cream mixture to the egg yolks while whisking constantly. The key here is to whisk continuously and add the cream slowly so the eggs gradually adjust to the heat.
- Once that first addition is incorporated and smooth, slowly add another 1/4 of the remaining hot cream while whisking constantly. The mixture should be smooth and homogeneous at this point.
- Continue adding the remaining hot cream in a slow, steady stream while whisking constantly. This final addition can be a bit faster than the first two, but don’t rush it. You’re aiming for a smooth, well-combined mixture with no lumps.
- Place the heatproof bowl over your pot of gently simmering water, making sure the bottom of the bowl doesn’t touch the water. Begin stirring the custard constantly with a heat-resistant spatula or wooden spoon, making sure to scrape the sides and bottom of the bowl.
- Continue cooking and stirring for 10-15 minutes. The custard will gradually thicken as you cook it. You’re looking for it to reach 160°F on an instant-read thermometer to ensure food safety from the raw eggs, though 170°F will give you a slightly thicker consistency.
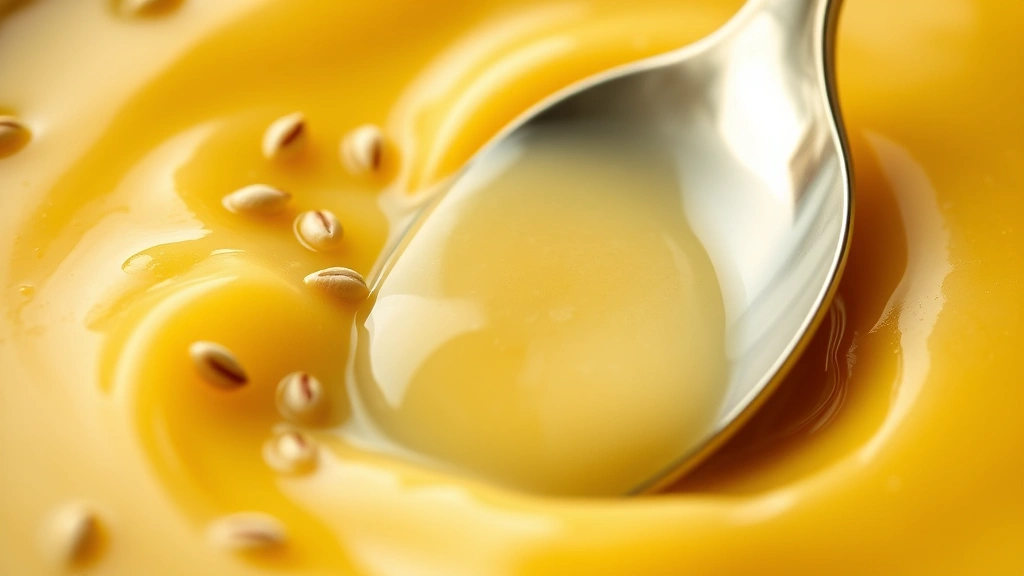
- To test without a thermometer, coat the back of a clean spoon with the custard and draw your finger across it – if the line stays clear and the custard doesn’t run back together, it’s ready. The mixture should coat the spoon and move slowly.
- Once the custard reaches the proper temperature and consistency, remove the bowl from the heat immediately. Pour the custard through a fine-mesh strainer into a clean bowl to remove any cooked egg bits or vanilla bean pieces. This step ensures a silky-smooth final product.
- If you used vanilla extract instead of fresh beans, stir it in now. Add any additional flavorings like brandy, bourbon, or liqueur if desired.
- To cool the custard quickly, you can place the bowl over an ice bath, stirring occasionally, or simply let it cool to room temperature on the counter for about 30 minutes, stirring occasionally to prevent a skin from forming on top.
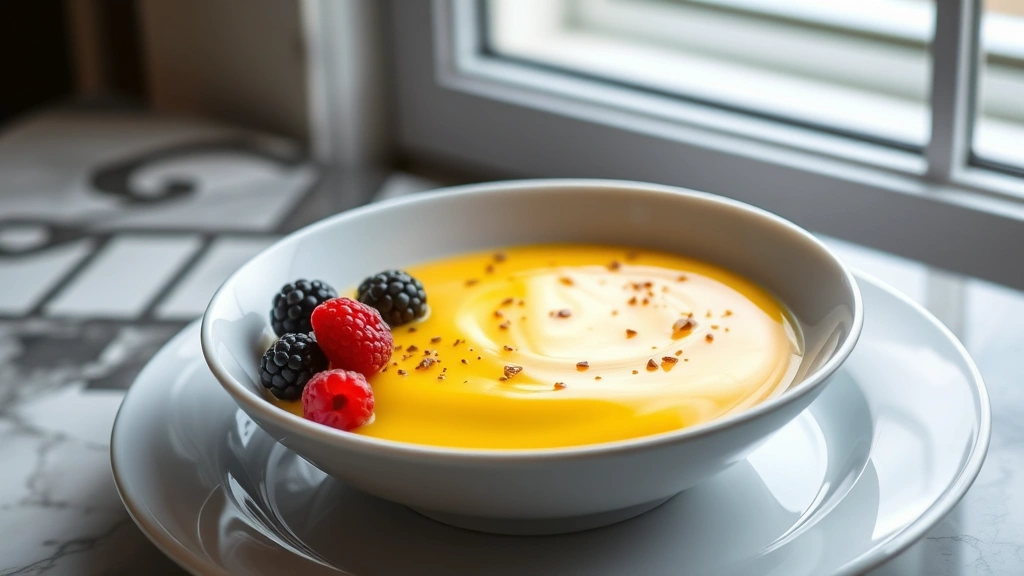
- Once cooled to your desired temperature, transfer the custard to a serving dish or individual glasses. Serve chilled or at room temperature, depending on your preference and the application.
Pro Tips
If your custard does break or become lumpy, don’t panic – strain it through a fine-mesh strainer and then blend it briefly with an immersion blender to restore smoothness. You can also try whisking it vigorously or passing it through a fine strainer again.
The optional cornstarch acts as an insurance policy, helping stabilize the custard and making it more forgiving for beginners. It won’t affect the flavor and creates a slightly thicker, more pudding-like consistency.
Fresh vanilla bean pods create a more elegant presentation with visible black seeds throughout the custard, but quality vanilla extract works beautifully and is more convenient. Skip the vanilla entirely for a plain custard base that you can flavor in different ways.
This custard keeps refrigerated in an airtight container for up to 5 days. For longer storage, you can freeze it for up to 3 months, though the texture may be slightly grainier after thawing.
Make sure all your equipment is impeccably clean – any fat residue can prevent proper incorporation and affect the final texture. Glass or stainless steel bowls work best; avoid aluminum.
Use pasteurized eggs if you’re concerned about food safety, or look for recipes using cooked egg yolks only. Always use fresh, high-quality eggs from a reliable source.
This custard pairs beautifully as a sauce for fruit tarts, fresh berries, poached pears, or brownies. You can also use it as a base for ice cream by churning it in an ice cream maker.
Varations worth trying: bourbon custard (add 2 tablespoons bourbon after cooking), espresso custard (whisk in 1 tablespoon instant espresso powder with the sugar), orange custard (add zest and 1/4 teaspoon orange extract), or lavender custard (infuse the cream with dried culinary lavender instead of vanilla).
The double boiler method is gentler than direct heat and allows for better temperature control. If you don’t have a proper double boiler setup, you can fashion one by placing a heatproof bowl over a pot with simmering water, ensuring the bowl doesn’t touch the water.
Leftover egg whites can be saved for meringues, angel food cake, or egg white omelets. Store them in the refrigerator in an airtight container for up to 4 days.