

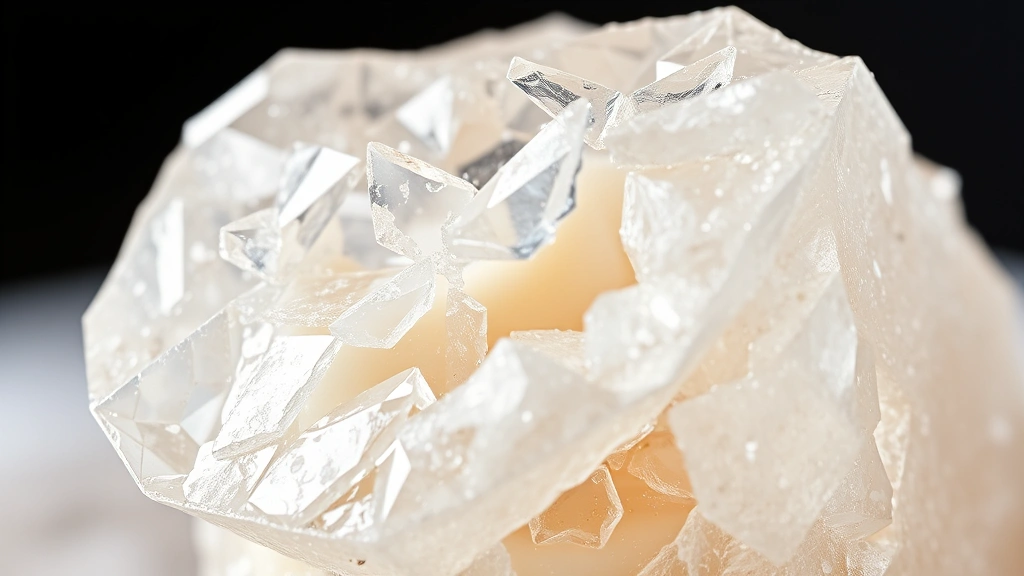
Ender Crystals are a stunning and elegant dessert that will absolutely wow your guests! These beautiful, jewel-like treats combine delicate layers of crystallized sugar with a silky smooth center, creating a show-stopping presentation that’s easier to make than you’d think. Perfect for special occasions or when you want to impress someone with your culinary skills, this recipe brings a touch of magic to any dessert table.
The beauty of making Ender Crystals at home is that once you understand the technique, you can customize them endlessly. Whether you prefer rich cream-based fillings or silky smooth ganache centers, these crystals are incredibly versatile. The technique involves creating a sugar shell through careful temperature control and crystallization, which gives these confections their signature sparkle and crunch.
I’ve been making these for years, and I absolutely love how they transform simple ingredients into something that looks like edible jewelry. The process is meditative and rewarding, and the results are truly spectacular. Whether you’re a seasoned candy maker or a curious beginner, this guide will walk you through every step to ensure your success. For more elegant dessert inspiration, check out my collection of show-stopping recipes.
What makes these so special is the combination of textures—the crispy, crystallized exterior contrasts beautifully with the creamy filling inside. The sugar work isn’t intimidating once you know the key temperatures and techniques. I recommend investing in a good candy thermometer, as precision is crucial for achieving that perfect crystal formation. This recipe serves about 12-16 pieces, depending on size, making it perfect for sharing or gifting. You can pair these with complementary flavors and textures for a complete dessert experience.
The magic really happens when you understand sugar crystallization. By controlling temperature and adding corn syrup, you’ll create those beautiful, faceted crystals that make these treats so visually striking. The filling can be as simple or elaborate as you’d like—I’ll share my favorite method here, but feel free to experiment. For additional inspiration on working with creamy textures, explore my other recipe collections.
Ingredients
- 2 cups granulated sugar
- ¾ cup light corn syrup
- ¾ cup water
- ¼ teaspoon cream of tartar
- ¼ teaspoon salt
- 1 teaspoon vanilla extract
- ½ teaspoon almond extract (optional)
- 1 cup heavy cream
- 4 ounces white chocolate, chopped
- 2 tablespoons butter
- Edible silver dust or pearl dust for garnish
- Food coloring in your choice of colors (optional)
- Gel food coloring for intensity (recommended over liquid)
- Powdered sugar for dusting

Instructions
- Prepare your workspace by lining a baking sheet with parchment paper and having all ingredients measured and ready. Place a candy thermometer in a glass of warm water nearby—this prevents it from cracking when you insert it into the hot sugar mixture.
- In a heavy-bottomed saucepan, combine 2 cups granulated sugar, ¾ cup light corn syrup, ¾ cup water, ¼ teaspoon cream of tartar, and ¼ teaspoon salt. Stir gently over medium heat until the sugar dissolves completely, about 3-4 minutes.
- Once the mixture is clear, stop stirring. Increase heat to medium-high and insert your candy thermometer. Let the mixture cook undisturbed—resist the urge to stir, as this can cause crystallization. Occasionally brush down the sides of the pan with a wet pastry brush to prevent sugar crystals from forming.
- Monitor the temperature carefully. The mixture will first reach the soft-ball stage (234-240°F), then the hard-ball stage (250-265°F). For Ender Crystals, you want to cook until it reaches 300-310°F—the hard-crack stage. This will take approximately 15-20 minutes.
- When the mixture reaches 305°F, remove it from heat immediately. The color should be pale amber. Carefully add 1 teaspoon vanilla extract and ½ teaspoon almond extract if using—it will bubble up, so pour slowly and carefully.
- Working quickly but safely, pour the hot sugar mixture onto your prepared parchment-lined baking sheet in crystal-like formations. You can drizzle it to create pointed shards or pour it more thickly for solid chunks. Sprinkle with edible silver dust or pearl dust while still warm.
- Allow the sugar to cool completely at room temperature for at least 2 hours. Once hardened, break into pieces of your desired size using your hands or a clean kitchen towel wrapped around the crystals.
- To make the filling, heat 1 cup heavy cream in a small saucepan over medium heat until it just begins to steam—do not boil. Pour the hot cream over 4 ounces chopped white chocolate and let sit for 1 minute.
- Stir the chocolate and cream together until completely smooth and glossy. Add 2 tablespoons butter and stir until fully incorporated. If desired, add 2-3 drops of gel food coloring to tint the ganache.
- Let the ganache cool for 10-15 minutes until it reaches a pipeable consistency. Transfer to a piping bag fitted with a small round tip or a small zip-top bag with the corner cut off.
- Once the sugar crystals are completely cool and hardened, pipe a small amount of ganache onto the base of each crystal. Press together gently if you’re creating sandwich-style pieces, or simply top single crystals with a dollop of filling.
- Dust lightly with powdered sugar or additional pearl dust for extra shimmer. Serve immediately or store in an airtight container at room temperature for up to 3 days.
Pro Tips
- Candy thermometer accuracy is essential—test yours beforehand by placing it in boiling water; it should read 212°F at sea level
- The corn syrup is crucial; it prevents large sugar crystals from forming during cooking, which would make the final candy grainy rather than clear and glassy
- Humidity is your enemy when making hard-crack candy—avoid making this on very humid or rainy days, as moisture can cause the finished crystals to become sticky
- If your sugar mixture crystallizes before reaching the proper temperature, you can start over—don’t try to salvage it by adding liquid, as this will just cause more problems
- Color variations: add gel food coloring to the warm ganache filling to create rainbow effects, or add it to the sugar mixture before cooking for colored crystals
- For a deeper flavor, use dark chocolate instead of white chocolate, or add espresso powder to the ganache for a mocha variation
- These make wonderful gifts when packaged in small boxes lined with tissue paper—they look absolutely luxurious
- If you don’t have edible dust, you can skip it, or brush the warm crystals with a little edible glitter mixed with clear piping gel
- Storage: keep in an airtight container away from humidity; they’ll last 3-4 days at room temperature
- Safety reminder: sugar reaches temperatures hot enough to cause severe burns—work carefully and keep children and pets away from the cooking area
- For variations, try filling the crystals with different flavored ganaches: raspberry, lavender, mint, or even salted caramel
- You can create larger statement pieces by pouring the sugar onto a silicone mat in a mold, then sandwiching a large dollop of ganache between two pieces