
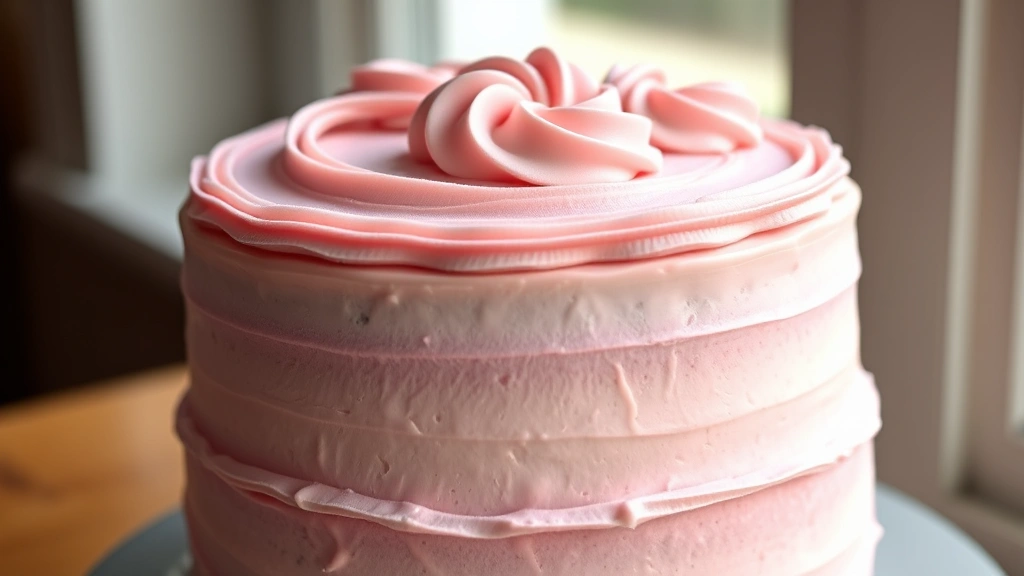
Ermine frosting is an absolutely divine and often overlooked frosting that deserves a permanent spot in your baking repertoire! This silky, stable frosting has been a beloved choice for decades, and once you master it, you’ll understand why bakers swear by it. Unlike buttercream, ermine frosting creates a frosting that’s less sweet, more stable in warm weather, and has the most luxurious, almost mousse-like texture that melts on your tongue.
Ermine frosting, also known as boiled milk frosting or cooked frosting, is made by cooking flour and milk into a paste, then beating it with butter and sugar. The result is a frosting that’s absolutely creamy, holds its shape beautifully, and won’t weep or separate like some other frostings can. It’s the perfect choice for layer cakes, cupcakes, and any dessert where you want a frosting that tastes as good as it looks.
What makes ermine frosting so special is its unique texture and flavor profile. The cooked flour and milk base creates a stable emulsion that can hold up to piping, decorating, and even warm weather. It has a delicate, almost subtle sweetness compared to American buttercream, which makes it perfect for pairing with rich cake flavors. Whether you’re frosting a classic vanilla cake or something more adventurous, ermine frosting is versatile enough to work beautifully.
I’ve been making ermine frosting for years, and I can confidently say that this is the frosting that gets the most compliments. People are always amazed by how smooth it is and how it tastes—not overly sweet, but rich and buttery. The key to success is understanding the science behind it and following a few simple rules. Temperature control is crucial, proper mixing technique will ensure a smooth, lump-free frosting, and using quality ingredients will elevate your final result.
If you’re looking to expand your frosting skills, ermine frosting is absolutely worth mastering. It’s not difficult, but it does require a bit of patience and attention to detail. Once you’ve made it a few times, it becomes second nature. I promise you’ll be making this frosting for every special occasion from here on out!
For more frosting inspiration and techniques, check out our guide on creating silky sauces and frostings. You might also enjoy exploring rich cream-based recipes that use similar techniques. And if you’re planning a special dinner, our elegant chicken alfredo pairs beautifully with frosted desserts.
For additional frosting techniques and comparisons, Serious Eats has excellent frosting guides, while Bon Appétit features innovative frosting variations. You can also find professional baking tips at New York Times Cooking for advanced frosting techniques.
Ingredients
- 2 cups whole milk, divided
- 1/4 cup all-purpose flour
- 1 cup (2 sticks) unsalted butter, softened to room temperature
- 1 cup granulated sugar
- 1 teaspoon vanilla extract
- 1/4 teaspoon salt
- Pinch of cream of tartar (optional, but recommended)
Instructions
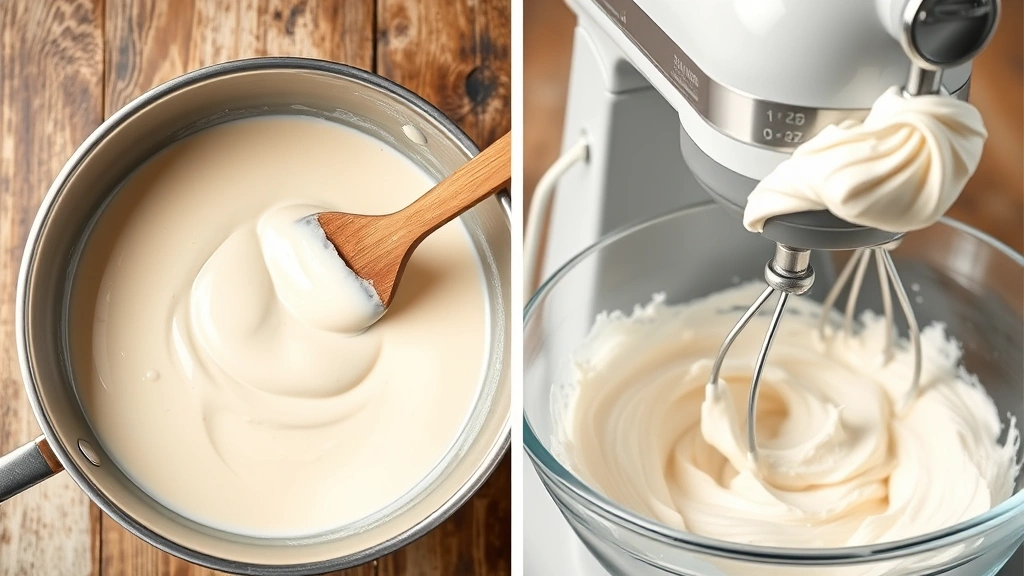
- In a small saucepan, whisk together 1/2 cup of the milk and the flour until completely smooth with no lumps. This is your flour paste and it’s crucial that there are no lumps, so take your time whisking thoroughly.
- Gradually add the remaining 1.5 cups of milk to the flour mixture while whisking constantly. Continue whisking until the mixture is completely smooth and homogeneous.
- Place the saucepan over medium heat and cook, stirring constantly with a wooden spoon or whisk, until the mixture thickens and comes to a gentle boil. This should take about 5-7 minutes. You’re looking for a pudding-like consistency that coats the back of a spoon.
- Once the mixture reaches a boil, continue cooking and stirring for 1-2 minutes more. The mixture should be thick and look like a smooth paste. Remove from heat and let cool to room temperature. This is very important—if you skip this step and add hot paste to your butter, you’ll end up with a greasy, separated frosting. Stir occasionally as it cools.
- While the paste cools, add the softened butter to the bowl of a stand mixer fitted with the paddle attachment. Beat on medium speed for 2-3 minutes until the butter is light and fluffy.
- Gradually add the sugar to the butter, a few tablespoons at a time, beating well after each addition. This should take about 5 minutes total. Scrape down the bowl as needed to ensure everything is well combined.
- Once the milk mixture has cooled to room temperature (this is non-negotiable), add it to the butter and sugar mixture along with the vanilla extract and salt.
- Beat on medium-high speed for 5-10 minutes until the frosting is light, fluffy, and pale in color. This is where the magic happens—the frosting should transform from a glossy mixture into a cloud-like, whipped frosting. If it seems to be taking too long or looks separated, don’t worry. Keep beating and it will come together. The key is patience and proper beating time.
- If the frosting still looks slightly separated or grainy after 10 minutes of beating, place a bowl of ice water under your mixing bowl to cool it slightly, then continue beating. Sometimes a brief chill helps the frosting emulsify properly.
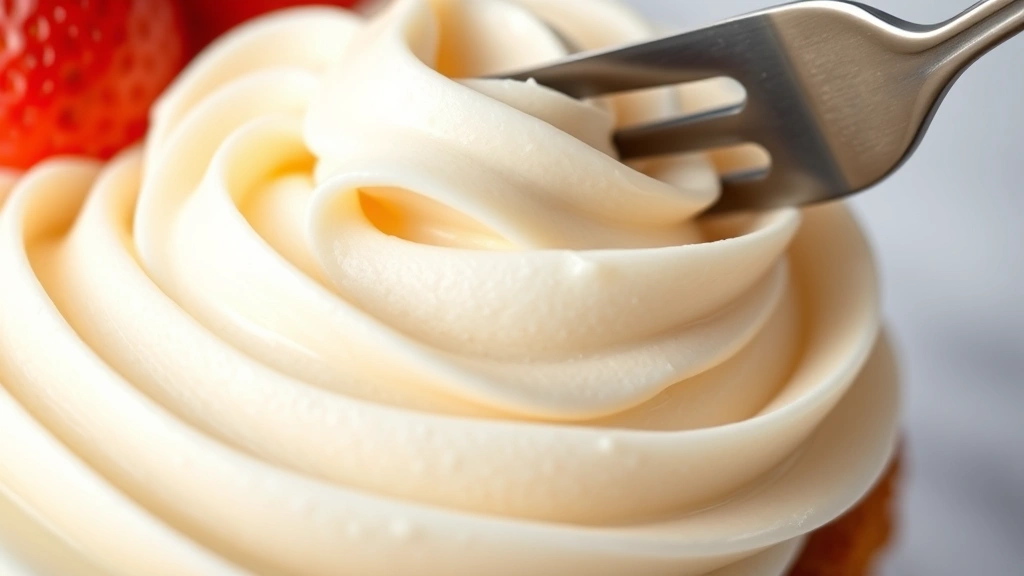
- Once the frosting reaches the desired consistency—light, fluffy, and spreadable—use immediately or store in an airtight container in the refrigerator for up to one week. If refrigerated, bring to room temperature and re-whip for 1-2 minutes before using to restore the fluffy texture.
Pro Tips
- Ermine frosting requires patience, especially during the cooling stage. Rushing this step by using warm paste will result in a separated, greasy frosting rather than a smooth, creamy one.
- Room temperature ingredients are absolutely essential for success. Both your butter and the cooled milk paste should be at approximately 70-72°F for the best emulsification.
- If your frosting breaks or looks separated, don’t panic! Place the bowl in the refrigerator for 15-20 minutes, then re-whip on medium speed. It should come together beautifully.
- The beating time is crucial. Don’t skip or rush this step. The longer you beat (up to 10-15 minutes), the lighter and fluffier your frosting will become. This creates the signature mousse-like texture that makes ermine frosting so special.
- For chocolate ermine frosting, add 1/2 cup unsweetened cocoa powder to the dry ingredients or fold in 6 ounces of melted chocolate at the end of beating.
- You can make flavored variations by adding almond extract, lemon zest, or coffee instead of vanilla. Keep the flavoring to 1 teaspoon or less so as not to overwhelm the delicate frosting.
- Ermine frosting is more stable than American buttercream and holds up well in warm weather, making it perfect for outdoor events or summer celebrations.
- Store any leftover frosting in an airtight container in the refrigerator for up to one week. You can also freeze it for up to three months, though you may need to re-whip it after thawing to restore the fluffy texture.
- This frosting pipes beautifully for decorating, holds swirls and rosettes well, and can be crumb-coated before final frosting application for a smooth, professional finish.
- Unlike some frostings, ermine frosting doesn’t require constant temperature adjustments while working. You can take your time decorating without worrying about it softening or melting.