
There’s something absolutely magical about homemade fluffy yogurt – it’s creamy, dreamy, and honestly easier to make than you’d think! This foolproof recipe will have you wondering why you ever bought store-bought yogurt again. The secret to achieving that cloud-like texture is all about using the right ratio of milk to starter culture and maintaining a consistent temperature throughout the culturing process.
I’ve been making yogurt at home for years now, and I can tell you that once you master this technique, you’ll be making it constantly. It’s the perfect base for creamy pasta dishes, smoothie bowls, and even fancy desserts. The beauty of homemade yogurt is that you control the ingredients – no weird additives or stabilizers, just pure, wholesome goodness.
The process is surprisingly simple: you heat milk to kill any competing bacteria, cool it down, add your starter culture (which contains live yogurt bacteria), and then keep it warm while it ferments. The longer you let it ferment, the tangier it becomes. For that perfect fluffy texture, I recommend using full-fat milk and Greek yogurt as your starter – the fat content is what gives you that luxurious mouthfeel.
What I love most about this recipe is its versatility. Once you’ve mastered the basic technique, you can experiment with different milk types, fermentation times, and even add flavors like vanilla or honey. Pair it with chicken alfredo for a Mediterranean-inspired meal, or use it as a base for garlic shrimp scampi marinades. The applications are endless!
Making yogurt at home is not only cost-effective but also incredibly satisfying. There’s something special about creating something from scratch that tastes better than anything you can buy. Plus, you’re supporting your gut health with all those beneficial probiotics. Let me walk you through my foolproof method for creating the fluffiest, most delicious yogurt you’ve ever tasted.
The key to success is investing in a good thermometer and being patient with the fermentation process. Don’t rush it! Some of my best batches have been the ones where I let them sit undisturbed for a full 12 hours. This recipe yields about 4 cups of gorgeous, spoonable yogurt that will have your family asking for seconds.
Whether you’re looking to impress guests or simply elevate your breakfast game, this fluffy yogurt recipe is your answer. It’s restaurant-quality yogurt made right in your own kitchen, and I promise you, once you start making it, you’ll never look back. Check out these amazing heavy cream alfredo sauce ideas to pair with your homemade yogurt creations!
For more inspiration on working with dairy products, explore this Bon Appétit yogurt guide, or check out Serious Eats’ yogurt techniques. You might also enjoy learning about New York Times yogurt recipes for additional flavor inspiration and serving suggestions.
Ingredients
- 1 quart (4 cups) whole milk, preferably not ultra-pasteurized
- ¼ cup plain Greek yogurt with live and active cultures (as starter)
- 2 tablespoons honey (optional, for sweetness)
- 1 teaspoon vanilla extract (optional, for flavor)
- Pinch of sea salt (optional, enhances flavor)
Instructions
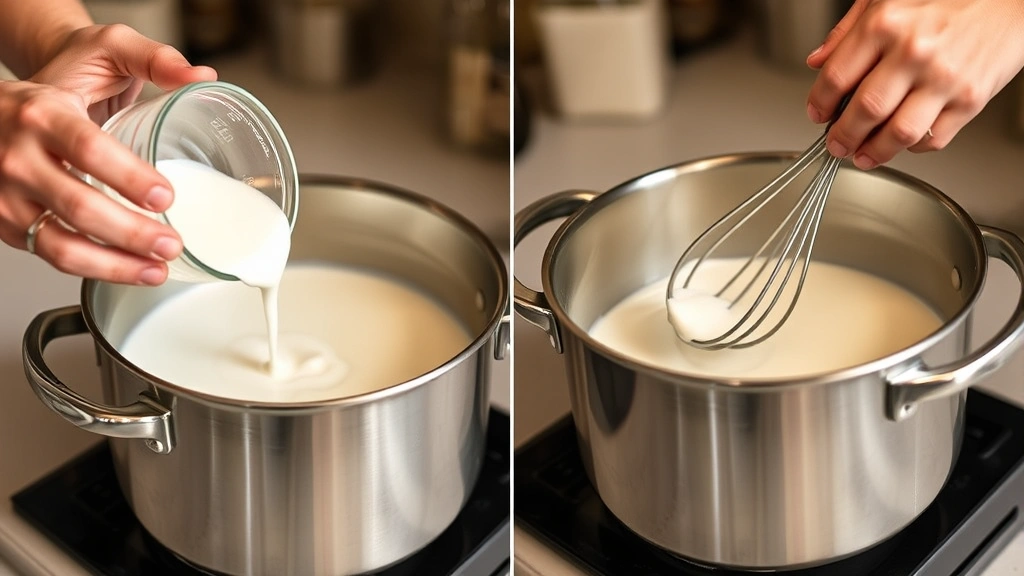
- Pour the whole milk into a heavy-bottomed saucepan and place it over medium heat. Insert a kitchen thermometer and heat the milk to 180°F (82°C), stirring occasionally to ensure even heating. This step pasteurizes the milk and kills any competing bacteria that might interfere with yogurt formation.
- Once the milk reaches 180°F, remove it from the heat and let it cool to exactly 110°F (43°C). This is the optimal temperature for the yogurt cultures to thrive. You can speed up this process by placing the saucepan in a bowl of ice water, stirring frequently. Be patient – this step is crucial for success.
- While the milk is cooling, place your starter yogurt (the Greek yogurt) in a small bowl. Add 2-3 tablespoons of the cooled milk to the starter yogurt and whisk vigorously until completely smooth. This tempers the starter culture and ensures it distributes evenly throughout the milk.
- Pour the starter yogurt mixture back into the cooled milk and whisk gently but thoroughly for about 1 minute, making sure the cultures are evenly distributed throughout. If using honey, vanilla, or salt, add them now and stir to combine.
- Pour the milk mixture into your yogurt maker, or if you don’t have one, into mason jars. If using a yogurt maker, follow the manufacturer’s instructions. If using the oven method, preheat your oven to 110°F, then turn it off.
- Place the mason jars in the warm oven with the light on, or use a cooler with warm water bottles to maintain the 110°F temperature. The goal is to keep the mixture at a consistent temperature between 105-110°F without disturbing it.
- Let the yogurt ferment undisturbed for 8-12 hours. The longer you ferment, the tangier the yogurt becomes. For a milder flavor, check at 8 hours. For a more tangy yogurt, let it go the full 12 hours or even longer.
- After fermentation, remove the jars carefully and refrigerate for at least 4 hours before serving. The yogurt will continue to set as it cools and will reach its final creamy texture.
- Once chilled, give the yogurt a gentle stir or whisk if you prefer a creamier consistency. If it seems too thin, you may have had temperature fluctuations during fermentation – this is a learning curve!
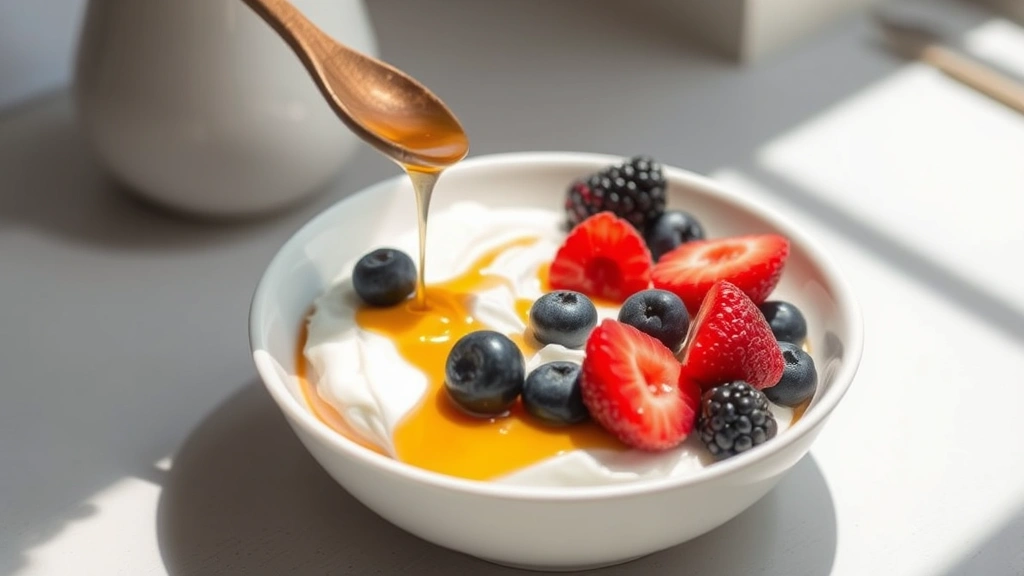
- Serve your fluffy yogurt in bowls topped with granola, fresh berries, honey drizzle, or use it as a base for smoothie bowls. Store in the refrigerator for up to 2 weeks, though it’s best consumed within the first week for optimal probiotic content.

Pro Tips
- **Temperature is Everything**: The most common mistake people make is not maintaining a consistent temperature. Invest in a reliable thermometer and check the temperature occasionally during fermentation without opening the container too much.
- **Milk Selection Matters**: Use milk that hasn’t been ultra-pasteurized, as the high heat can damage the milk proteins needed for yogurt formation. Whole milk creates the fluffiest, creamiest yogurt – don’t skip the fat!
- **Starter Culture Quality**: Make sure your Greek yogurt starter contains live and active cultures. Check the label before purchasing. You can use regular yogurt too, but Greek yogurt tends to produce thicker, fluffier results.
- **Equipment Options**: If you don’t have a yogurt maker, use an oven with the light on, a slow cooker on the lowest setting, an insulated cooler with hot water bottles, or even a heating pad set to low. The key is maintaining that 110°F temperature.
- **Whey Separation**: If your yogurt looks a bit watery with liquid on top (whey), this is normal! You can stir it back in or strain it through cheesecloth for thicker, Greek-style yogurt.
- **Fermentation Time Guide**: 8 hours = mild, creamy yogurt; 10 hours = balanced flavor and tang; 12+ hours = very tangy yogurt. Choose based on your preference!
- **Save Your Starter**: Once you’ve made a batch, you can use 2-3 tablespoons of your homemade yogurt as the starter for your next batch – up to 5-7 times before the cultures weaken and you need to refresh with store-bought starter.
- **Flavor Variations**: Add vanilla extract, honey, maple syrup, or fruit purees after fermentation for custom flavors. For fruit yogurt, layer fresh fruit on the bottom of jars before adding the yogurt mixture.
- **Troubleshooting**: If your yogurt doesn’t set, temperature fluctuations are usually the culprit. If it’s too thin, increase fermentation time or use a higher milk fat content. If it’s too sour, reduce fermentation time.
- **Probiotic Power**: Homemade yogurt contains beneficial probiotics that support digestive health. The longer you ferment, the more lactose is consumed by the cultures, making it easier to digest for lactose-sensitive individuals.
Pingback: How to make the Perfect Shrimp Bisque Recipe (So Easy!) – Simple Recipe Finder