

There’s nothing quite like homemade fried chicken fingers—golden, crispy on the outside, and impossibly tender on the inside. This recipe is an absolute game-changer for weeknight dinners, meal prep, or feeding a crowd of hungry guests. I’ve perfected this technique over years of kitchen experimentation, and I’m thrilled to share my secrets with you today.
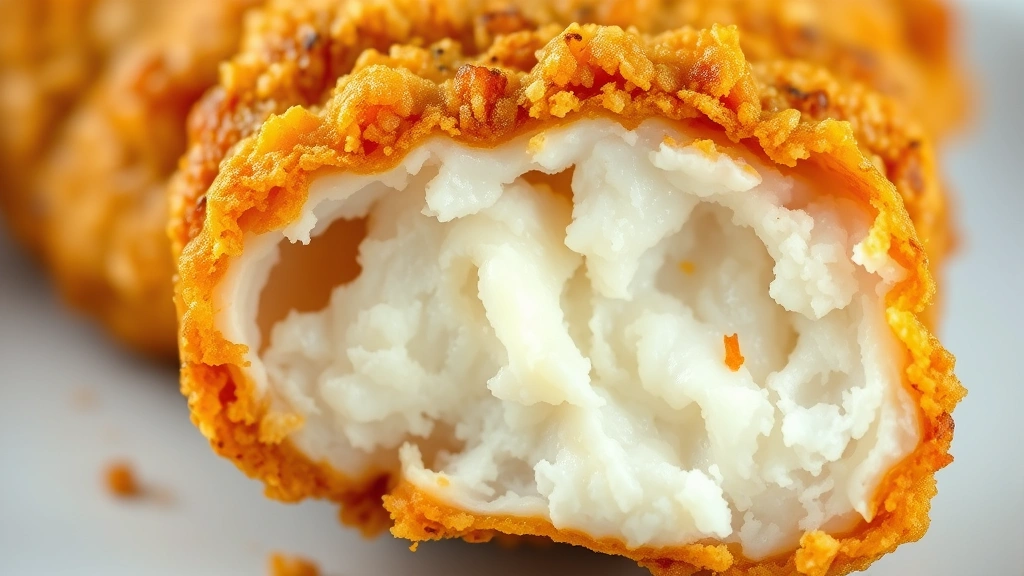
The key to achieving restaurant-quality fried chicken fingers at home lies in a few crucial steps: proper brining, the perfect seasoning blend, and maintaining the ideal oil temperature throughout cooking. Unlike store-bought frozen versions, homemade chicken fingers have an authentic flavor and texture that simply can’t be replicated. The meat stays juicy and succulent while the coating becomes incredibly crispy and crunchy.
What I absolutely love about this recipe is its versatility. You can serve these as a main course alongside your favorite sides, use them in pasta dishes, or even create gourmet sandwiches. They’re also perfect for meal prepping since they reheat beautifully in the air fryer or oven. The combination of buttermilk, spices, and panko breadcrumbs creates a coating that’s both flavorful and supremely crispy.
I recommend using high-quality chicken breasts for the best results. Pound them evenly so they cook uniformly and stay tender throughout. This homemade version puts those drive-thru versions to shame, and your family will be asking for this recipe on repeat. Pair them with a homemade dipping sauce like ranch or honey mustard, or get creative with pickled red onions for a gourmet twist.
The process is straightforward enough for beginners but sophisticated enough to impress dinner guests. Once you master this technique, you’ll have a reliable recipe in your arsenal that works for virtually any occasion. Whether you’re cooking for picky eaters or adventurous foodies, these crispy-on-the-outside, tender-on-the-inside chicken fingers will be devoured in minutes.
Ingredients
- 4 boneless, skinless chicken breasts (about 2 pounds)
- 1 cup buttermilk
- 1 tablespoon salt
- 1 teaspoon black pepper
- 1 teaspoon garlic powder
- 1 teaspoon onion powder
- 1 teaspoon paprika
- 1/2 teaspoon cayenne pepper (optional, for heat)
- 1 cup all-purpose flour
- 1 cup panko breadcrumbs
- 1/2 teaspoon salt (for coating)
- 1/4 teaspoon black pepper (for coating)
- Oil for frying (vegetable, canola, or peanut oil)
- 2 tablespoons cornstarch (optional, for extra crispiness)
Instructions
- Pat your chicken breasts dry with paper towels and place them on a cutting board. Using a sharp knife, carefully slice each breast lengthwise into strips about 1 inch wide. For more uniform cooking, gently pound each strip to an even thickness of about 1/2 inch using a meat mallet.
- In a shallow bowl, combine the buttermilk with 1 tablespoon of salt, 1 teaspoon of black pepper, garlic powder, onion powder, paprika, and cayenne pepper if using. Whisk these ingredients together until well combined.
- Place the chicken strips into the buttermilk mixture, making sure each piece is fully submerged. Cover the bowl with plastic wrap and refrigerate for at least 15 minutes, but ideally 2-4 hours. This brining process ensures incredibly moist and flavorful chicken.
- While the chicken brines, prepare your breading station. In one shallow bowl, combine the all-purpose flour with 1/2 teaspoon salt and 1/4 teaspoon black pepper. In another shallow bowl, mix together the panko breadcrumbs with the cornstarch if using (this adds extra crispiness) and season with a pinch of salt and pepper.
- Heat your oil in a heavy-bottomed pot or Dutch oven to 350°F (175°C). Use a reliable meat thermometer or kitchen thermometer to ensure accurate temperature. The oil temperature is absolutely critical for achieving that perfect golden-brown exterior without greasy results.
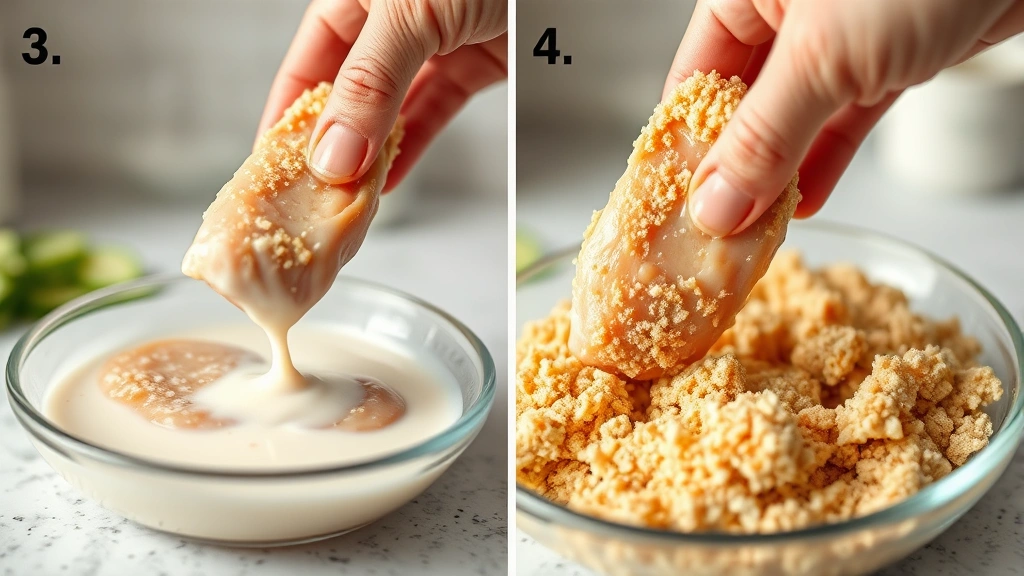
- Remove a chicken strip from the buttermilk and allow excess marinade to drip off. Coat it thoroughly in the flour mixture, shaking off any excess. Then dip it back into the buttermilk for just a moment before coating generously in the panko breadcrumb mixture, pressing gently so the coating adheres.
- Carefully place the breaded chicken strips into the hot oil, working in batches to avoid overcrowding the pot. Overcrowding will lower the oil temperature and result in greasy, soggy chicken. Fry for 3-4 minutes per side, or until the coating is deep golden brown and the internal temperature reaches 165°F (74°C).
- Using a slotted spoon or spider strainer, carefully remove the cooked chicken fingers from the oil and place them on a paper towel-lined plate or wire rack. This allows excess oil to drain away while the coating remains perfectly crispy.
- Allow the chicken fingers to rest for 2-3 minutes before serving. This resting period allows the exterior to firm up and the interior to redistribute its juices, ensuring maximum tenderness.
Pro Tips
Brining Makes a Difference: Don’t skip the buttermilk brining step. The acidic buttermilk breaks down the chicken proteins, resulting in incredibly tender, juicy pieces. Even just 15 minutes helps, but 2-4 hours is ideal for maximum flavor and moisture.
Double Dredging Technique: For an extra-crispy exterior, try the double-dredging method. After the first breadcrumb coating, briefly dip the chicken back in the buttermilk, then coat with breadcrumbs again. This creates an incredibly crunchy exterior.
Pounding for Uniform Cooking: Taking time to pound your chicken strips to even thickness ensures they cook uniformly. Thinner pieces cook faster and more evenly than thick, uneven pieces.
Panko vs Regular Breadcrumbs: Panko breadcrumbs are larger and airier than regular breadcrumbs, creating a lighter, crispier coating. Don’t substitute regular breadcrumbs unless absolutely necessary.
Cornstarch Secret: Adding cornstarch to your breadcrumb coating increases crispiness and helps achieve that perfect crunch factor. It’s completely optional but highly recommended.
Use a Thermometer: Invest in an instant-read meat thermometer to ensure your chicken reaches 165°F internally. This guarantees food safety without overcooking.
Wire Rack Draining: Using a wire rack instead of paper towels allows air circulation underneath the chicken, preventing the bottom from becoming soggy as it cools.
Reheating Instructions: Leftover chicken fingers reheat beautifully in a 375°F oven for about 8-10 minutes or in an air fryer at 350°F for 5-7 minutes. This maintains crispiness better than microwaving.
Dipping Sauce Pairings: Serve with classic ranch dressing, honey mustard, sriracha mayo, or creamy alfredo sauce for a gourmet twist.
Meal Prep Friendly: These freeze beautifully both cooked and uncooked. Freeze uncooked breaded strips on a baking sheet, then transfer to freezer bags for up to 3 months. Fry directly from frozen, adding just 1-2 minutes to cooking time.
Chicken Quality Matters: Purchase high-quality, fresh chicken breasts from a reputable source. Look for pieces without discoloration or off odors.
Oil Selection: Use neutral-flavored oils with high smoke points like vegetable, canola, or peanut oil. Avoid olive oil for frying.
Batch Cooking: Fry in batches to maintain oil temperature. Crowded pans drop the oil temperature significantly, resulting in greasy chicken.
Serving Suggestions: Create a chickpea salad on the side or serve over pasta with cream sauce for a complete meal.