

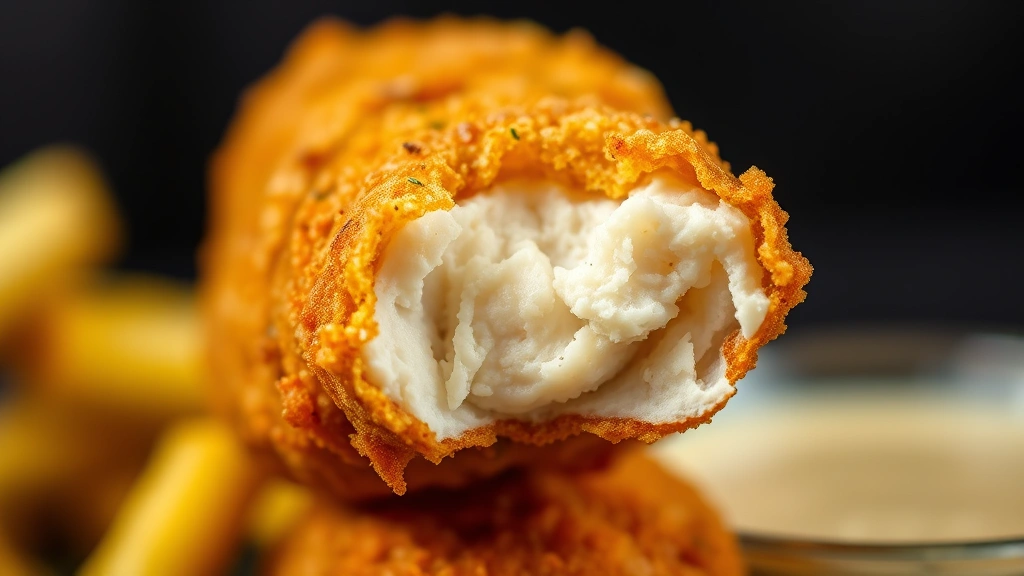
There’s something absolutely magical about crispy, golden fried chicken fries – they’re the perfect marriage of two beloved comfort foods that nobody knew they needed until now. These aren’t your ordinary potato fries or plain chicken strips; they’re seasoned, juicy chicken breast cut into fry-shaped pieces and fried until they achieve that irresistible golden-brown exterior while staying tender and juicy on the inside. Whether you’re looking for an impressive appetizer to serve at your next gathering or a fun twist on weeknight dinner, this fried chicken fries recipe is an absolute game-changer that will have everyone asking for seconds.
What makes this recipe truly special is the combination of a perfectly seasoned flour coating and the technique of double-dredging, which creates that signature crispy exterior that rivals any restaurant version. The secret lies in using buttermilk as your base – it not only tenderizes the chicken but also helps the coating adhere beautifully and creates an extra-crunchy texture when fried. I’ve tested this recipe countless times, and I can confidently say this is the best method for achieving restaurant-quality results right in your own kitchen.
These fried chicken fries pair beautifully with classic dipping sauces like honey mustard, ranch, or sriracha mayo. For a lighter meal, serve them alongside a fresh chickpea salad or with pickled red onions for brightness and tang. If you’re planning a fun dinner night with sides, these would be stunning served with roasted shishito peppers.
The beauty of this recipe is its versatility – you can customize the seasonings to match your preferences, make them ahead and reheat them, or even freeze the uncooked breaded fries for quick meals throughout the week. I’ve included detailed instructions on how to achieve maximum crispiness, troubleshooting tips, and storage guidelines to ensure your fried chicken fries turn out perfectly every single time. For more inspiration on achieving crispy, golden results, check out Bon Appétit’s classic fried chicken guide and Serious Eats’ fried chicken techniques.
Once you master this recipe, you’ll find yourself making these fried chicken fries regularly – they’re that good, that easy, and that addictive. Perfect for meal prep, party appetizers, or simply satisfying that craving for something crispy and comforting, this recipe delivers every single time. The combination of tender, flavorful chicken with an ultra-crispy coating is something your family will absolutely love, and honestly, it might just become your new go-to recipe for impressing guests or treating yourself to something special.
Ingredients
- 2 pounds boneless, skinless chicken breasts
- 1.5 cups buttermilk
- 2 tablespoons hot sauce (or milk if you prefer milder)
- 2 cups all-purpose flour
- 2 tablespoons paprika
- 1.5 tablespoons garlic powder
- 1.5 tablespoons onion powder
- 1 tablespoon cayenne pepper (adjust to taste)
- 2 teaspoons black pepper
- 1.5 teaspoons kosher salt (plus more for seasoning)
- 1 teaspoon dried thyme
- 1 teaspoon dried oregano
- Vegetable oil for frying (about 2-3 quarts)
- Optional: 1/2 teaspoon smoked paprika for extra depth
Instructions
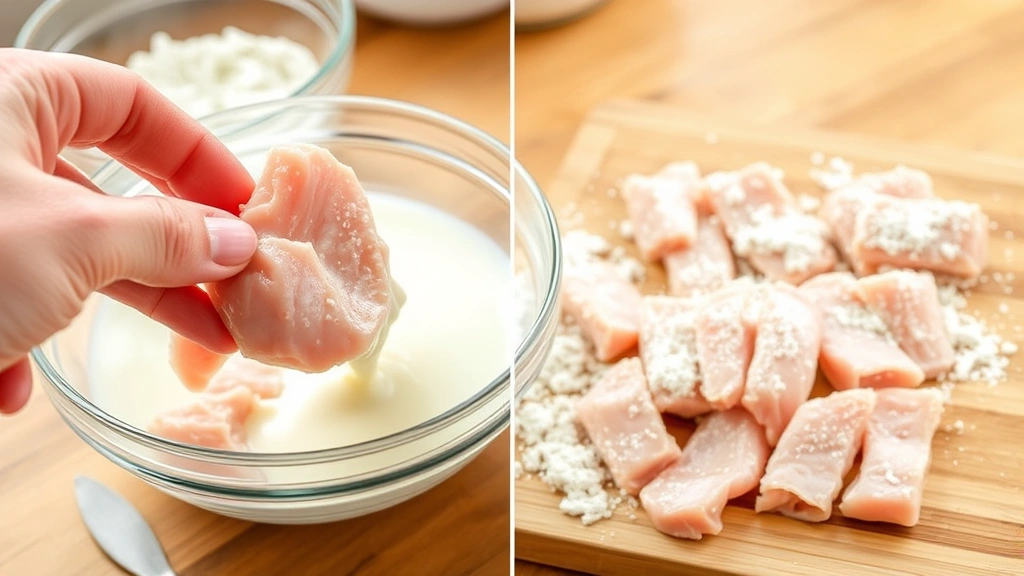
- Pat the chicken breasts dry with paper towels, then place them on a clean cutting board. Using a sharp knife or poultry shears, cut each breast into fry-shaped strips, approximately 1/2 inch thick and 3-4 inches long – think of them as thick-cut fries rather than thin strips.
- In a shallow bowl or dish, combine the buttermilk and hot sauce, stirring well to incorporate. Set this buttermilk mixture aside at room temperature while you prepare the coating.
- In a large shallow bowl or pie dish, whisk together all the dry ingredients: flour, paprika, garlic powder, onion powder, cayenne pepper, black pepper, kosher salt, dried thyme, dried oregano, and smoked paprika if using. Make sure all the spices are evenly distributed throughout the flour mixture by whisking thoroughly.
- Working with one chicken fry at a time, dip it into the buttermilk mixture, allowing excess to drip off but ensuring it’s well coated. This step is crucial – don’t rush it.
- Transfer the buttermilk-coated chicken fry to the flour mixture and coat it thoroughly on all sides, pressing gently so the coating adheres. Make sure you’re covering every inch of the chicken.
- For extra crispiness (the secret to restaurant-quality results), dip the coated chicken fry back into the buttermilk for just a quick second, then dredge it again in the flour mixture. This double-dredge technique creates those incredibly crispy layers.
- Place each double-coated chicken fry on a parchment paper-lined baking sheet. Once all the fries are coated, let them rest at room temperature for 10 minutes – this helps the coating set and adhere better during frying.
- Pour the vegetable oil into a large, heavy-bottomed pot or Dutch oven, filling it to about 2-3 inches deep. Using a deep-fry or candy thermometer, heat the oil to exactly 350°F. Maintaining the correct temperature is essential for crispy exteriors and juicy interiors.
- Carefully place 4-5 chicken fries into the hot oil, working in batches to avoid overcrowding the pot. Overcrowding will drop the oil temperature and result in greasy, soggy fries instead of crispy ones.
- Fry for approximately 5-7 minutes, turning the fries halfway through cooking, until they achieve a deep golden-brown color and a meat thermometer inserted into the thickest piece reads 165°F internally.
- Using a slotted spoon or spider strainer, carefully remove the fried chicken fries from the oil and transfer them to a wire rack set over a paper towel-lined baking sheet. The wire rack allows air to circulate underneath, keeping them crispy rather than soggy.
- Season the hot fried chicken fries with additional kosher salt immediately after frying while they’re still hot – this helps the salt adhere to the coating.
- Repeat the frying process with the remaining chicken fries, making sure to maintain the oil temperature at 350°F between batches. Allow the oil to return to temperature for about 2-3 minutes between batches.
- Serve the fried chicken fries while they’re still hot and crispy, with your choice of dipping sauces such as honey mustard, ranch dressing, sriracha mayo, or classic ketchup.
Pro Tips
o Temperature control is absolutely critical for perfect fried chicken fries. If your oil isn’t hot enough, the coating will absorb oil and become greasy. If it’s too hot, the exterior will brown too quickly before the inside cooks through. Invest in a good thermometer and use it.
o Don’t skip the buttermilk marinade – it serves multiple purposes: it tenderizes the chicken, it helps season the meat from the inside out, and it helps the coating adhere and crisp up properly. Never substitute with regular milk.
o For make-ahead convenience, you can coat the chicken fries up to 8 hours in advance, store them on the baking sheet covered loosely with plastic wrap in the refrigerator, and fry them right before serving. In fact, cold coated chicken often fries even crispier.
o These fried chicken fries freeze beautifully either before or after cooking. Freeze uncooked fries on a baking sheet, then transfer to a freezer bag for up to 3 months. You can fry them directly from frozen, just add 2-3 minutes to the cooking time. Cooked leftovers last up to 3 days in an airtight container.
o To reheat leftover fried chicken fries while maintaining crispiness, reheat them in a preheated 375°F oven for about 5-7 minutes rather than using a microwave, which will make them soggy.
o Feel free to customize the spice blend to your preferences – add more cayenne if you like heat, or reduce it if serving to children. You could also add dried dill, Italian seasoning, or even a bit of Old Bay seasoning.
o For an extra crispy coating, add 2 tablespoons of cornstarch to your flour mixture – this helps create an even crispier exterior.
o Never dispose of used frying oil down the drain – strain it through a fine-mesh strainer or cheesecloth and save it for up to 3 uses, or dispose of it properly according to your local regulations.
o If you don’t have a deep thermometer, use the wooden spoon test: if a wooden spoon handle inserted in the oil produces bubbles immediately, it’s ready for frying.