
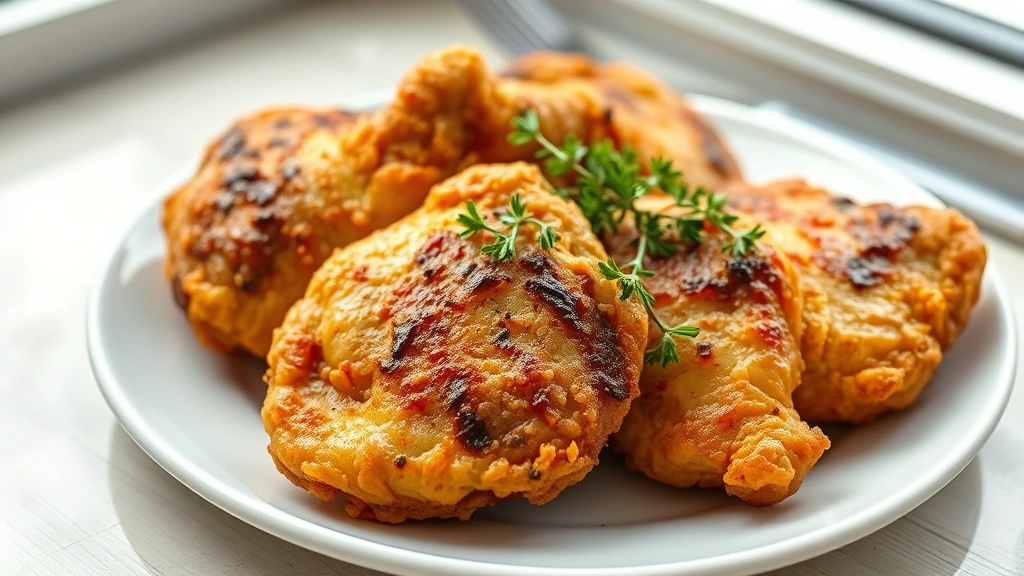
There’s nothing quite like biting into a perfectly fried chicken thigh—crispy, golden exterior giving way to juicy, tender meat that practically falls off the bone. This is the recipe that will absolutely transform your kitchen into a Southern comfort food haven.
I’ve spent years perfecting this fried chicken thighs recipe, and let me tell you, it’s truly the best version I’ve ever made. The secret lies in a few key techniques: a well-seasoned buttermilk brine that tenderizes the meat, a perfectly balanced dry coating with just the right amount of spice, and frying at the exact right temperature so you get that signature crunch without drying out the chicken.
Chicken thighs are honestly superior to breasts for frying. They have more fat content, which means they stay incredibly moist and flavorful even if you accidentally leave them in the oil a few minutes too long. The dark meat has such a rich, satisfying taste that pairs beautifully with the crispy coating.
What makes this recipe stand out is the combination of techniques. We’re using a buttermilk soak for tenderness, a double-dredging method for extra crispiness, and the perfect blend of seasonings that make each bite absolutely crave-worthy. You can serve this alongside Best Pickled Red Onion Recipe for a fresh contrast, or pair it with Best Chickpea Salad Recipe for a lighter meal option.
I’m sharing all my secrets with you today—from how to prepare the brine to exactly how to achieve that picture-perfect golden crust. This recipe has been tested countless times, and I guarantee it will become your go-to for fried chicken thighs. Whether you’re cooking for a family dinner or impressing guests at a gathering, this recipe delivers restaurant-quality results every single time.
For more inspiration on how to work with different cooking techniques, check out this Quick Tasty Bacon Carbonara Recipe to see how layering flavors can elevate simple ingredients. You’ll also find that understanding proper cooking methods is essential—much like how Best Heavy Cream Alfredo Sauce Recipe requires precise technique, so does perfectly fried chicken. The fundamentals of good cooking apply across all cuisines and methods.
I also recommend checking out Serious Eats’ comprehensive fried chicken guide for additional deep-dive information on the science behind frying. For more inspiration, Bon Appétit’s fried chicken collection offers creative variations. You might also enjoy New York Times’ classic fried chicken recipe for comparison. The Serious Eats best fried chicken breakdown is particularly helpful for understanding temperature control. And finally, Bon Appétit’s frying technique article provides excellent visual guidance.
Ingredients
- 2 cups buttermilk
- 2 tablespoons kosher salt, divided
- 1 tablespoon granulated garlic
- 1 tablespoon paprika
- 2 teaspoons black pepper
- 1 teaspoon cayenne pepper
- 1 teaspoon onion powder
- 8 bone-in, skin-on chicken thighs (about 3-4 pounds)
- 2 cups all-purpose flour
- 1 tablespoon cornstarch
- 1 teaspoon garlic powder
- 1 teaspoon paprika (for coating)
- ½ teaspoon cayenne pepper (for coating)
- ½ teaspoon black pepper (for coating)
- Oil for frying (vegetable or peanut oil, about 2-3 quarts)
- Fresh thyme sprigs for garnish (optional)
Instructions
- In a large bowl or container, whisk together buttermilk, 1½ tablespoons of kosher salt, granulated garlic, paprika, black pepper, cayenne pepper, and onion powder until well combined and all salt is dissolved.
- Pat the chicken thighs dry with paper towels, then place them in the buttermilk mixture, making sure they’re fully submerged. Cover and refrigerate for at least 8 hours, or preferably overnight. This brining step is crucial for tender, juicy chicken.
- When ready to fry, remove chicken from the refrigerator and let it sit at room temperature for about 20 minutes. This ensures even cooking throughout the meat.
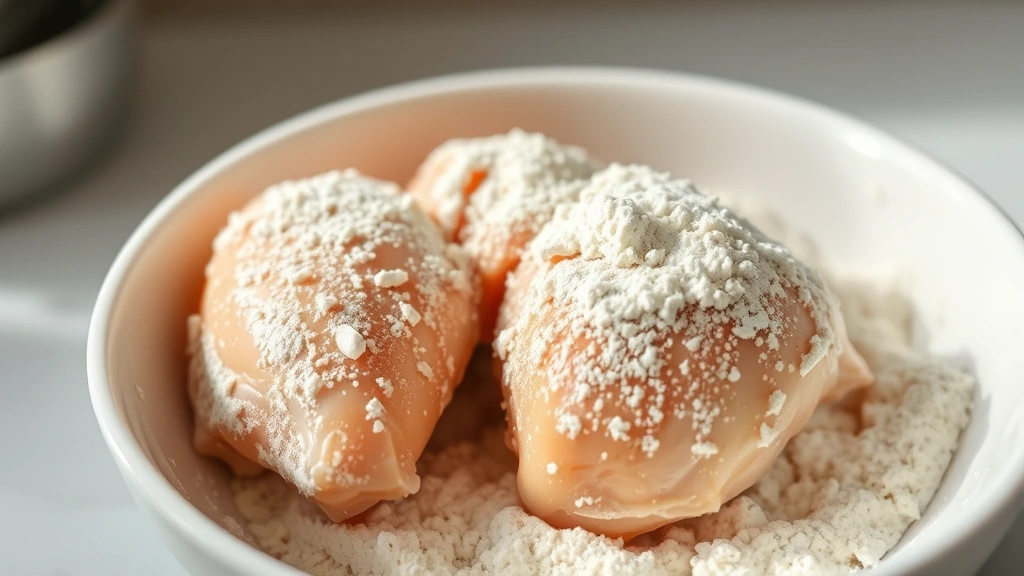
- In a large shallow bowl or pie dish, whisk together flour, cornstarch, remaining ½ tablespoon kosher salt, garlic powder, paprika, cayenne pepper, and black pepper.
- Set up your breading station: have the buttermilk mixture in one bowl and the seasoned flour mixture in another bowl or on a plate.
- Remove one chicken thigh from the buttermilk, allowing excess to drip back into the bowl. Dredge thoroughly in the seasoned flour, coating all sides evenly.
- Place the floured chicken thigh on a clean plate and repeat step 6 with remaining chicken thighs.
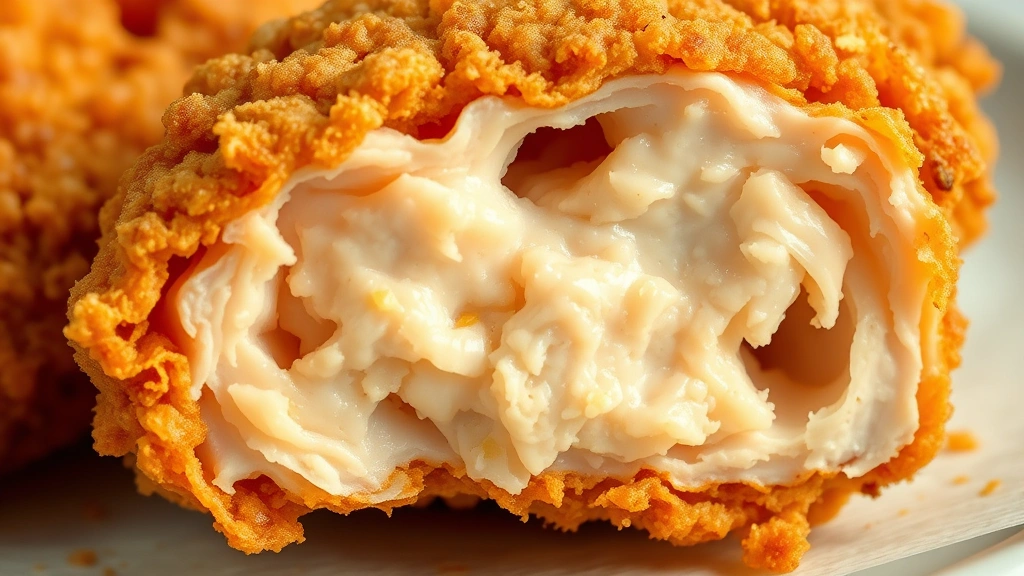
- For extra crispy coating, take each floured chicken thigh and dip it back into the buttermilk for just 2-3 seconds, then immediately dredge again in the flour mixture. This double-dredging technique creates the signature crunchy crust.
- Place all double-dredged chicken thighs on a clean plate and let them rest for 5-10 minutes. This helps the coating adhere better during frying.
- Heat oil in a large, heavy-bottomed pot or Dutch oven to 350°F. Use a reliable thermometer to monitor temperature throughout frying—this is absolutely essential for perfectly cooked chicken.
- Carefully place 3-4 chicken thighs skin-side down into the hot oil. Do not overcrowd the pot, as this will lower the oil temperature and result in greasy chicken.
- Fry for 12-15 minutes, maintaining oil temperature between 325-350°F. The chicken should be golden brown on the bottom before flipping.
- Using tongs, carefully flip each chicken thigh and fry for another 8-12 minutes until the second side is golden brown and the internal temperature reaches 165°F when measured with a meat thermometer in the thickest part of the thigh.
- Transfer fried chicken to a wire rack set over a baking sheet lined with paper towels. Do not stack the chicken, as this will trap steam and soften the crispy coating.
- Return oil temperature to 350°F and repeat frying process with remaining chicken thighs.
- Let chicken rest for 5 minutes before serving. Garnish with fresh thyme if desired, and serve immediately while still warm and crispy.
- Enjoy your perfectly fried chicken thighs with your favorite sides!
Pro Tips
Brining Time: While 8 hours is the minimum, overnight brining (up to 12 hours) yields even more tender, flavorful chicken. The buttermilk’s acidity breaks down proteins while the salt helps retain moisture during cooking. Don’t skip this step—it’s what separates good fried chicken from exceptional fried chicken.
Double-Dredging Technique: This is the secret to achieving that signature crunchy, crispy exterior. The second buttermilk dip and flour coating creates extra layers that fry up incredibly crispy. Make sure not to let the double-dredged chicken sit too long before frying, or the coating can become soggy.
Chicken Thigh Selection: Look for thighs that are similar in size so they cook evenly. Bone-in, skin-on thighs are best for this recipe because the skin crisps up beautifully and the bone provides flavor. If you must use boneless thighs, reduce cooking time by 3-5 minutes.
Oil Selection: Vegetable, peanut, or canola oil all work well for frying. Avoid olive oil, which has a lower smoke point. You can reuse the oil after straining it through a fine-mesh sieve or cheesecloth, but only if it hasn’t been used before. Store strained oil in a cool, dark place.
Cooking Temperature: The internal temperature of fully cooked chicken thigh should be 165°F. Using a meat thermometer ensures your chicken is safe to eat while still maintaining maximum juiciness. Check temperature in the thickest part of the thigh, away from bone.
Resting Period: Don’t skip the resting time after frying. This allows juices to redistribute throughout the meat. Cutting into the chicken immediately after frying will cause all those delicious juices to run out.
Serving Suggestions: Fried chicken thighs pair beautifully with classic sides like mashed potatoes, coleslaw, biscuits, or green beans. The pickled red onions add a fresh, tangy contrast to the rich, fried chicken.
Leftover Storage: Store cooled fried chicken in an airtight container in the refrigerator for up to 4 days. Reheat in a 350°F oven for 10-15 minutes to restore crispiness.
Make-Ahead: You can prepare the chicken through the double-dredging step up to 4 hours ahead. Cover and refrigerate until ready to fry.
Spice Level: Adjust cayenne pepper to your preference. Use less for milder chicken, or add more for extra heat and flavor.