

There’s something absolutely magical about crispy, golden fried ribs that makes them irresistible. Whether you’re planning a casual weeknight dinner or impressing guests at your next gathering, this fried ribs recipe delivers restaurant-quality results right from your own kitchen. The secret lies in the perfect combination of a well-seasoned dry rub, a light and crispy coating, and the ideal frying technique that keeps the meat tender and juicy on the inside while achieving that coveted crunch on the outside.
What I love most about this recipe is how versatile it is. You can serve these fried ribs as a main course alongside classic sides like coleslaw or cornbread, or you can make them ahead and enjoy them at room temperature for picnics and casual entertaining. The beauty of frying is that it happens quickly, so you can have dinner on the table in under an hour from start to finish.
I’ve tested countless methods and seasonings to bring you what I truly believe is the best fried ribs recipe. The key is starting with quality ribs, giving them enough time to absorb the flavors from the dry rub, and then achieving the perfect oil temperature for frying. This recipe produces ribs with a perfectly seasoned, crispy exterior and meat so tender it falls right off the bone. Once you master this technique, you’ll find yourself making these again and again.
For the best results, I recommend using baby back ribs or spare ribs, depending on your preference. Baby backs are more tender and cook faster, while spare ribs have a bit more meat and a richer flavor. Both work beautifully with this method. Pair these with easy pickled red onions for a fresh contrast, or serve alongside a hearty chickpea salad for a complete meal.
The dry rub is where the magic starts. I use a combination of brown sugar, paprika, garlic powder, onion powder, cayenne pepper, and a touch of black pepper to create a seasoning blend that’s both sweet and savory. The brown sugar caramelizes slightly during frying, creating that addictive crust that makes these ribs so special. Don’t skip the step of letting the ribs sit with the rub for at least two hours—this allows the flavors to penetrate the meat and develop complexity.
For more inspiration on flavor combinations, check out Serious Eats and Bon Appétit, both excellent resources for technique and seasoning ideas. When it comes to the coating, I use a simple mixture of flour, cornstarch, and the same dry rub seasonings. The cornstarch is essential—it creates an incredibly crispy exterior that stays crunchy even as the ribs cool slightly.
The frying temperature is absolutely crucial. You want your oil at exactly 350°F. Too cool, and your ribs will absorb too much oil and become greasy. Too hot, and the exterior will burn before the interior cooks through. I always use a reliable thermometer to ensure accuracy. Cast iron or a heavy-bottomed pot works best for maintaining consistent temperature throughout the cooking process.
One pro tip I’ve learned is to remove the membrane from the back of the ribs before cooking. This allows the dry rub to penetrate more evenly and helps the ribs cook more uniformly. Simply slide a butter knife under the membrane and peel it away—it only takes a minute and makes a noticeable difference in the final result.
These fried ribs are perfect for meal prep too. You can prepare the dry rub and apply it the night before, then fry them fresh when you’re ready to eat. They also reheat beautifully in a 350°F oven for about ten minutes if you need to make them ahead. For complementary sides, consider preparing a creamy pasta dish or homemade alfredo sauce for a more indulgent meal.
The versatility of this recipe extends to sauces too. While these ribs are delicious on their own, you can brush them with your favorite barbecue sauce, hot sauce, or even a glaze in the last few minutes of cooking. I’m partial to a simple honey-butter glaze or a spicy mustard-based sauce that complements the smoky, sweet flavors of the dry rub.
This recipe serves 4-6 people as a main course, though ribs are always popular, so you might find them disappearing faster than expected! The beauty of this method is that you can easily double or triple the recipe for larger gatherings. Just make sure you’re not overcrowding your frying vessel—the ribs need room to cook evenly and crisp up properly.
I promise that once you try these fried ribs, you’ll understand why they’re such a beloved comfort food. The combination of tender, flavorful meat with that irresistible crispy coating is simply unbeatable. Let me walk you through each step to ensure your success.
Ingredients
- 3-4 pounds baby back ribs or spare ribs
- 3 tablespoons brown sugar
- 2 tablespoons smoked paprika
- 1 tablespoon garlic powder
- 1 tablespoon onion powder
- 1 tablespoon black pepper
- 1 teaspoon cayenne pepper
- 1 teaspoon sea salt
- 1/2 teaspoon dry mustard powder
- 1/2 teaspoon dried thyme
- 1 cup all-purpose flour
- 1/2 cup cornstarch
- 2 tablespoons of the dry rub mixture reserved
- Vegetable oil for frying (approximately 3 quarts)
- Optional: barbecue sauce or honey-butter glaze for serving
Instructions
- Remove the membrane from the back of the ribs by sliding a butter knife under it and peeling it away. Pat the ribs dry with paper towels.
- In a small bowl, combine the brown sugar, smoked paprika, garlic powder, onion powder, black pepper, cayenne pepper, sea salt, dry mustard powder, and dried thyme to create the dry rub. Set aside 2 tablespoons of this mixture for the coating.
- Generously coat all sides of the ribs with the dry rub, making sure to get into all the crevices. Rub the seasonings firmly into the meat so they adhere well.
- Place the seasoned ribs on a large plate or baking sheet, cover with plastic wrap, and refrigerate for at least 2 hours, preferably overnight. This allows the flavors to penetrate the meat and develop complexity.
- Remove the ribs from the refrigerator about 30 minutes before frying to allow them to come to room temperature. This ensures more even cooking.
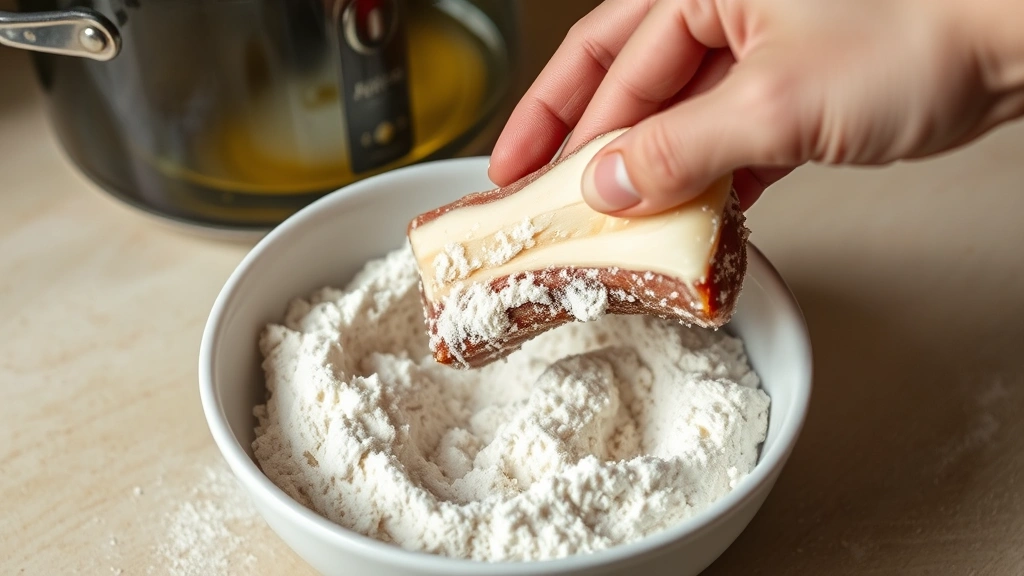
- In a shallow bowl, whisk together the all-purpose flour, cornstarch, and the reserved 2 tablespoons of dry rub mixture. This creates the coating for the ribs.
- Cut the ribs into individual bones, leaving a bit of meat attached to each bone for presentation and easier handling.
- Heat the vegetable oil in a large, heavy-bottomed pot or cast iron skillet to exactly 350°F. Use a reliable thermometer to monitor the temperature throughout cooking.
- Working in batches to avoid overcrowding, dredge each rib bone in the flour mixture, coating all sides evenly and shaking off any excess.
- Carefully place the coated ribs into the hot oil, frying only about 4-5 ribs at a time to maintain the oil temperature and allow them to crisp properly.
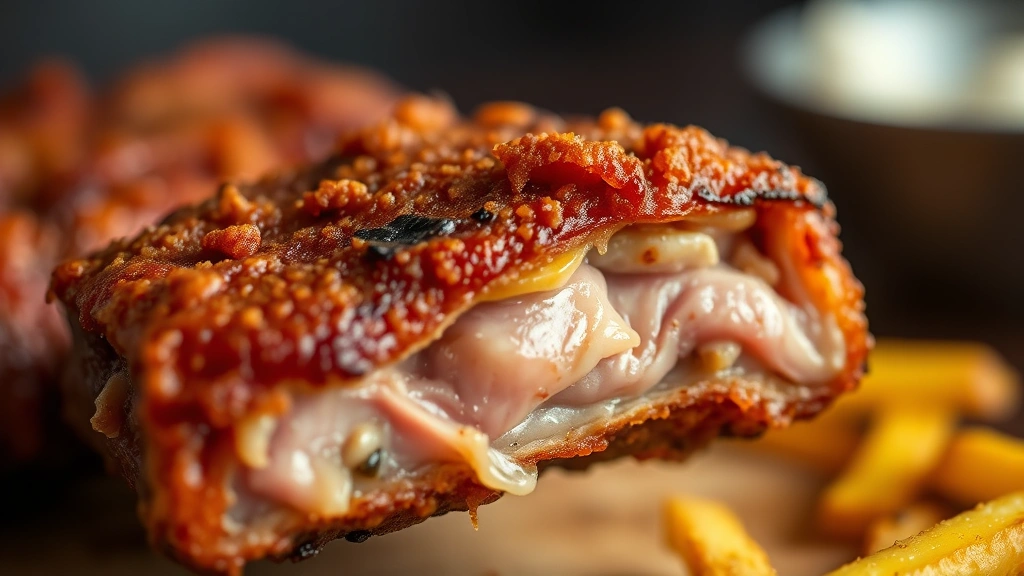
- Fry the ribs for 8-10 minutes, turning occasionally, until they are golden brown and crispy on all sides. The internal temperature should reach 195°F.
- Using a slotted spoon or tongs, remove the cooked ribs from the oil and transfer them to a paper towel-lined plate to drain any excess oil.
- Continue frying the remaining ribs in batches, maintaining the oil temperature at 350°F between batches.
- Once all ribs are cooked, arrange them on a serving platter and serve immediately while they’re still hot and crispy.
- Optional: brush the warm ribs with your favorite barbecue sauce or honey-butter glaze just before serving, or serve the sauce on the side for dipping.
Pro Tips
Do not skip removing the membrane from the back of the ribs. This thin layer prevents seasoning from penetrating the meat and can create an unpleasant texture when eating. It takes only a minute to remove and makes a noticeable difference.
Feel free to customize the dry rub seasonings to your taste. If you prefer spicier ribs, increase the cayenne pepper. For a sweeter profile, add an extra tablespoon of brown sugar. This recipe is very adaptable to personal preferences.
When selecting ribs at the market, look for ones that are pinkish in color with good marbling. Avoid any that look dry or discolored. Both baby back and spare ribs work beautifully with this recipe, though baby backs cook slightly faster.
These ribs are best served immediately after frying while the coating is at its crispiest. However, they can be kept warm in a 200°F oven for up to 20 minutes if needed. Reheat leftover ribs in a 350°F oven for about 10 minutes to restore some of the crispiness.
For frying oil, use a neutral oil with a high smoke point such as vegetable oil, canola oil, or peanut oil. Avoid olive oil as it has a lower smoke point and will burn at 350°F.
The coating mixture can be prepared ahead of time and stored in an airtight container for up to one week. The dry rub seasoning can also be made in larger batches and stored for future use.
If you don’t have cornstarch, you can use all flour for the coating, but the cornstarch is what creates that extra-crispy texture that makes these ribs special. It’s worth having on hand.
These fried ribs pair beautifully with classic sides like coleslaw, cornbread, mac and cheese, or simple green salads. They’re also excellent as party appetizers or game day food.
Safety tip: never leave hot oil unattended. Keep a fire extinguisher nearby when frying, and never use water to extinguish an oil fire.