

There’s nothing quite like homemade fudge, and this condensed milk fudge recipe is an absolute game-changer. It’s rich, creamy, and so decadent you won’t believe how easy it is to make! I’ve been making this fudge for years, and it never fails to impress. The secret? Using sweetened condensed milk creates the most velvety texture without any grittiness. This recipe is perfect for gift-giving, holiday treats, or just satisfying those intense chocolate cravings.
What I absolutely love about this fudge is how forgiving it is. Whether you’re a seasoned candy maker or completely new to fudge-making, this recipe delivers consistent, restaurant-quality results every single time. The condensed milk does all the heavy lifting for you, eliminating the need for a candy thermometer and all that temperature guessing. Plus, it comes together in under 15 minutes of active time!
I’ve tested this recipe with different cocoa powders, chocolate brands, and butter ratios, and I’m sharing my foolproof method that guarantees perfect fudge every time. The combination of butter, chocolate, and condensed milk creates a naturally smooth consistency that sets beautifully without any of that crystalline graininess that homemade fudge sometimes gets.
This fudge is incredibly versatile too. You can add vanilla extract for classic flavor, or get creative with espresso powder, sea salt, or even a hint of mint extract. I love making several batches with different mix-ins during the holiday season. It also makes an impressive homemade gift that looks far more complicated than it actually is. Package it in a pretty box with parchment paper between the layers, and you’ve got a gift that tastes expensive and feels personal.
One of my favorite things about this recipe is that you don’t need any special equipment. No candy thermometer required, no marble slab necessary. Just a simple saucepan, a baking pan, and your trusty wooden spoon. That’s the beauty of using condensed milk – it takes the guesswork out of fudge-making and lets you focus on enjoying the process and the delicious results.
If you’re looking for more indulgent treats, you might also enjoy making rich and creamy sauces that pair beautifully with desserts. For a complete dessert experience, consider pairing this fudge with coffee or serving it alongside other creamy dessert recipes. Speaking of versatile recipes, this same condensed milk technique can be adapted into creamy sauce applications. For serving suggestions, pair this fudge with complementary treats like fresh salads for balance or savory sides if you’re serving at a party.
For more candy-making inspiration, check out Bon Appétit’s classic fudge guide and Serious Eats’ comprehensive fudge collection. You can also explore New York Times’ chocolate fudge techniques for additional professional tips. Whether you’re a beginner or experienced candy maker, these resources combined with this recipe will elevate your fudge game.
Ingredients
- 1 cup (2 sticks) unsalted butter
- 2/3 cup unsweetened cocoa powder
- 1 can (14 ounces) sweetened condensed milk
- 1 teaspoon vanilla extract
- 1/4 teaspoon sea salt
- 2 cups powdered sugar, sifted
- Optional toppings: sea salt flakes, sprinkles, or chopped nuts
Instructions
- Line an 8×8 inch baking pan with parchment paper, leaving slight overhang on two sides for easy removal later.
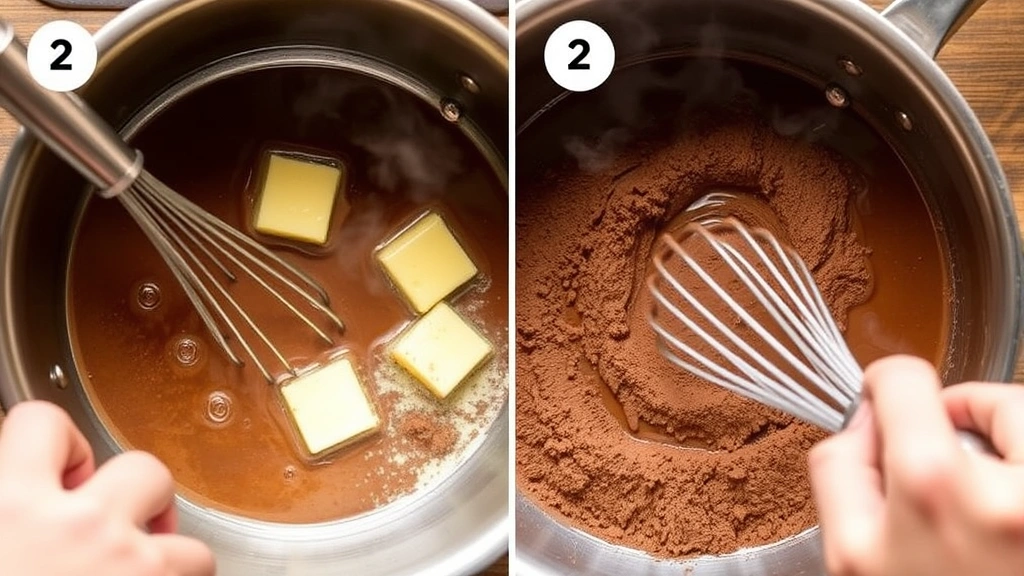
- Melt the butter in a medium saucepan over low heat, stirring occasionally until completely melted and smooth.
- Add the cocoa powder to the melted butter and whisk constantly for about 1-2 minutes until you have a smooth chocolate paste with no lumps.
- Remove the saucepan from heat and let it cool for 2 minutes so the mixture isn’t piping hot.
- Slowly pour the sweetened condensed milk into the chocolate mixture while whisking gently to combine, ensuring the mixture stays smooth and well incorporated.
- Add the vanilla extract and sea salt, stirring until everything is perfectly combined and the mixture has a glossy appearance.
- Gradually add the sifted powdered sugar in three additions, stirring well after each addition until fully incorporated and no lumps remain.
- Pour the fudge mixture into the prepared pan and use an offset spatula or the back of a spoon to smooth the top into an even layer.
- If desired, sprinkle your chosen toppings evenly across the surface of the warm fudge and gently press them in.
- Place the pan in the refrigerator for at least 4 hours, or preferably overnight, until the fudge is completely firm and set.
- Once set, remove the fudge from the pan using the parchment paper overhang and transfer to a cutting board.
- Using a sharp knife dipped in hot water and wiped clean between cuts, slice the fudge into 24 equal pieces.
- Store the fudge in an airtight container at room temperature for up to 2 weeks, or in the refrigerator for up to 4 weeks.
Pro Tips
- Sweetened condensed milk is the star ingredient here because it’s already been reduced and sweetened, which means you skip the crystallization problems that traditional fudge recipes sometimes face. This ingredient alone transforms a potentially complicated candy-making process into something foolproof and delicious.
- Make sure to sift your powdered sugar before adding it to the mixture. Unsifted powdered sugar can have lumps that won’t fully incorporate, leaving your fudge with a grainy texture. A simple mesh strainer works perfectly if you don’t have a sifter.
- The quality of your cocoa powder matters significantly in this recipe. Use unsweetened cocoa powder for the richest chocolate flavor. Dutch-processed cocoa gives a darker, more sophisticated taste, while natural cocoa provides a slightly brighter chocolate note. Both work beautifully.
- If your fudge seems too soft after 4 hours in the refrigerator, don’t panic. Simply return it to the fridge for another hour or two. Conversely, if it’s too hard and difficult to cut, let it sit at room temperature for 10-15 minutes before slicing.
- For perfectly clean cuts, dip your knife in hot water and wipe it clean with a paper towel between each cut. This prevents the fudge from sticking and ensures beautiful presentation.
- This recipe can be customized endlessly. Add 1 teaspoon of instant espresso powder for mocha fudge, 1/4 teaspoon of peppermint extract for peppermint fudge, or 1/4 teaspoon of sea salt mixed into the fudge before chilling for salted chocolate fudge.
- Store your fudge in an airtight container with parchment paper between layers to prevent sticking. It keeps beautifully at room temperature for up to 2 weeks, making it perfect for advance preparation and gift-giving.
- If you’re gifting this fudge, cut it into uniform pieces and arrange in a single layer in a small box lined with parchment paper. It looks incredibly professional and tastes absolutely divine.
- This recipe doubles easily if you want to make larger batches. Simply use two 8×8 pans or one 9×13 pan and adjust the chilling time accordingly.
- Avoid opening the refrigerator door frequently while the fudge is setting, as temperature fluctuations can affect the final texture. Set a timer and check it only once or twice.