
Creating the perfect gluten-free pizza base has been a game-changer for our kitchen, and I’m thrilled to share this foolproof recipe that delivers crispy edges, a tender crumb, and authentic pizza flavor without any of the heaviness you’d expect from GF baking. After years of experimenting with different flour blends and techniques, I’ve finally cracked the code to a pizza base that even non-gluten-free eaters will love.
The secret lies in using a carefully balanced blend of gluten-free flours combined with xanthan gum for structure, plus a touch of honey and olive oil for richness. This base works beautifully for both thin-crust and deep-dish styles, and it actually improves when you let it rest properly—something many GF recipes skip but shouldn’t.
What makes this recipe truly special is that it doesn’t require any special equipment or impossible-to-find ingredients. Everything you need is available at your local grocery store, and the technique is straightforward enough for beginners but satisfying enough for experienced bakers. I’ve made this base hundreds of times now, and it consistently delivers restaurant-quality results at home.
The dough comes together quickly, requires minimal kneading, and benefits from a slow rise that develops flavor and makes it easier to work with. Whether you’re making this for a casual weeknight dinner or impressing guests at a gathering, this gluten-free baking foundation will serve you well. I always recommend keeping the ingredients on hand because once you master this recipe, you’ll be making pizza constantly.
If you’re new to gluten-free baking, don’t worry—I’ve included detailed notes about why each ingredient matters and how to troubleshoot common issues. For more inspiration on what to top your pizza with, check out our pizza topping guide and explore different sauce options. You might also love our collection of easy weeknight dinners featuring this base. For additional gluten-free pizza inspiration, check out Serious Eats’ gluten-free pizza guide, Bon Appétit’s gluten-free pizza, and New York Times gluten-free pizza crust.
Ingredients
- 2 cups (280g) all-purpose gluten-free flour blend (with xanthan gum already included)
- 1/2 cup (70g) tapioca starch or cornstarch
- 1 teaspoon xanthan gum (if your flour blend doesn’t contain it)
- 1 1/2 teaspoons salt
- 1 teaspoon instant yeast or bread machine yeast
- 1 tablespoon honey or sugar
- 2 tablespoons extra virgin olive oil, plus more for oiling
- 3/4 cup (180ml) warm water (110°F or 43°C)
- 1 teaspoon apple cider vinegar or white vinegar
- Cornmeal or rice flour for dusting (optional but recommended)
- 1 teaspoon Italian seasoning (optional, for flavor)
Instructions
- In a large mixing bowl, whisk together the gluten-free flour blend, tapioca starch, xanthan gum (if needed), salt, instant yeast, and Italian seasoning if using. Creating a well-mixed dry blend ensures the yeast is evenly distributed and you won’t get dense pockets in your finished pizza.
- In a separate small bowl or measuring cup, combine the warm water, honey, olive oil, and apple cider vinegar. The vinegar helps activate the yeast and adds subtle flavor complexity to your dough.
- Pour the wet ingredients into the dry ingredients and mix using an electric mixer fitted with the paddle attachment, or mix by hand with a sturdy wooden spoon. Start on low speed for 1-2 minutes, then increase to medium speed.
- Continue mixing for 4-5 minutes total until the dough comes together and becomes thick and sticky. Gluten-free dough will have a batter-like consistency that’s much wetter than traditional pizza dough—this is completely normal and necessary for proper rise and texture.
- Generously oil a large bowl with olive oil and transfer the dough to it, turning it to coat all sides. Cover the bowl tightly with plastic wrap or a damp kitchen towel.
- Let the dough rise at room temperature for 1 hour to 1 hour 30 minutes until it has increased in volume by about 50 percent. Gluten-free dough rises more slowly than regular dough, so don’t panic if it takes the full time—this slow rise actually develops better flavor.
- While the dough rises, preheat your oven to 450°F (232°C). If you have a pizza stone or steel, place it in the oven to preheat as well. For best results with gluten-free pizza, using a preheated stone or steel makes a significant difference in crust quality.
- Prepare your pizza pans or pizza stone by lightly dusting with cornmeal or rice flour. This prevents sticking and adds a pleasant texture to the crust bottom.
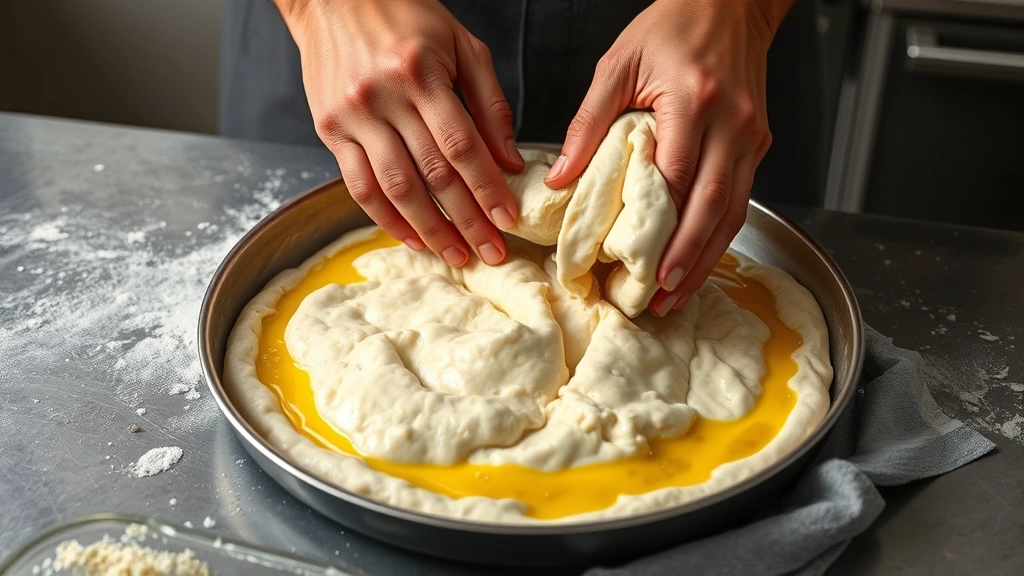
- Once the dough has risen, divide it in half for two large pizzas or into four portions for personal pizzas. Working with one portion at a time, gently transfer the dough to your prepared pan.
- Using wet or oiled hands (this prevents sticking much better than flour with gluten-free dough), gently stretch and press the dough toward the edges of your pan. Work slowly and deliberately—if the dough springs back, let it rest for 5 minutes and try again.
- Push the dough up the edges of the pan to create a slight lip or border, which will become your pizza crust. This step is crucial for achieving that satisfying crispy edge.
- Poke the surface of the dough gently with your fingertips to create small dimples, which help prevent large air bubbles from forming during baking and add to the rustic appearance.
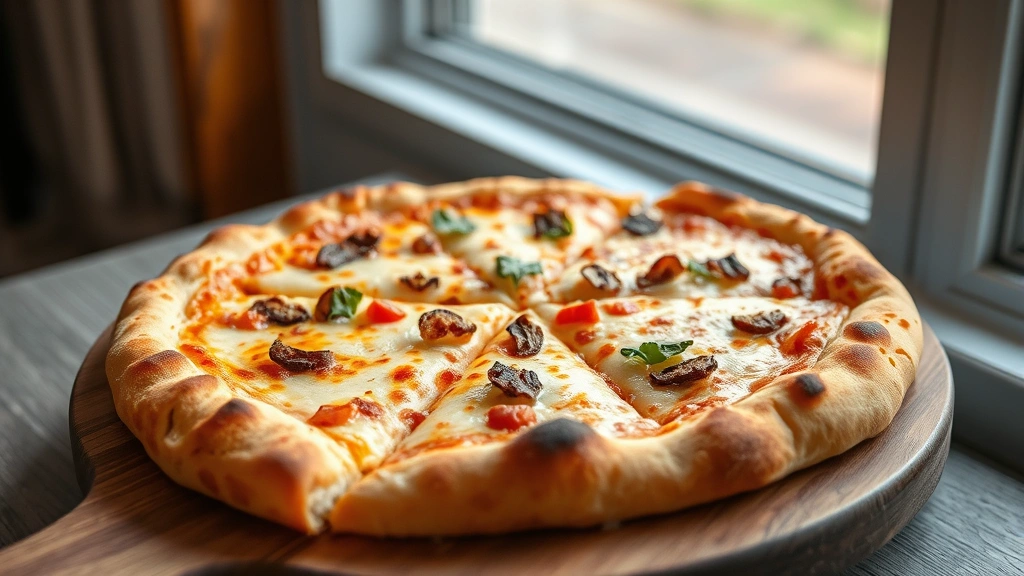
- Add your desired pizza sauce, cheese, and toppings. Don’t overload your pizza—more is not better with gluten-free bases, which are more delicate than traditional dough.
- Place the pizza on the preheated stone or steel, or place the pan directly in the oven. Bake for 12-15 minutes until the crust is golden brown and the cheese is melted and bubbly.
- Remove the pizza from the oven and let it rest on the pan for 2-3 minutes before slicing. This resting time allows the base to firm up slightly, making it easier to cut and serve without falling apart.
- Slice with a pizza wheel or sharp knife and serve immediately while the crust is still warm and crispy. Enjoy your homemade gluten-free pizza!
Pro Tips
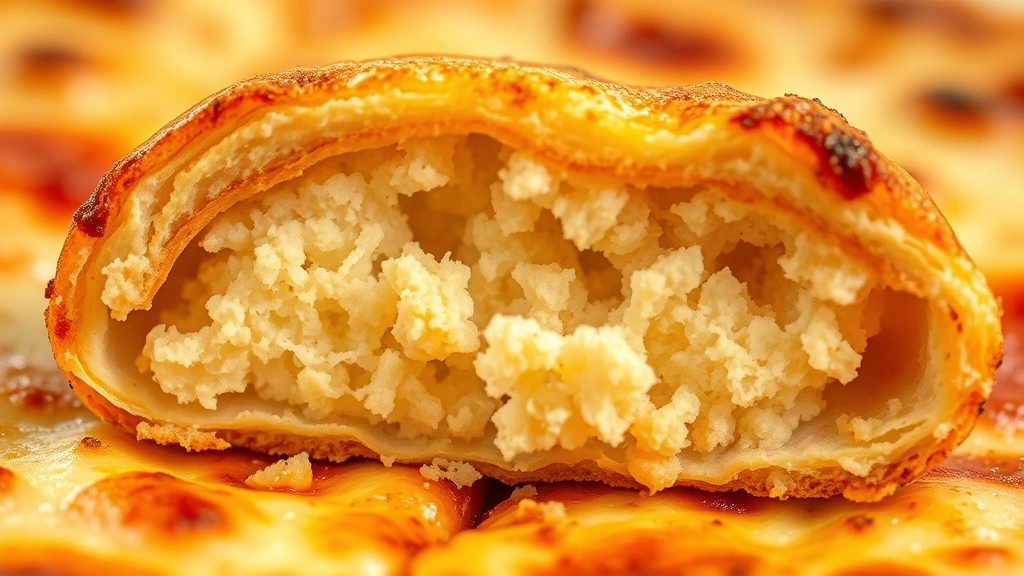
- This recipe produces a crust that’s crispy on the outside and tender on the inside, similar to New York-style pizza. The texture comes from the combination of gluten-free flour blend and tapioca starch, which provides structure and a pleasant crumb.
- Xanthan gum is essential in gluten-free baking because it replaces the binding properties of gluten. Most commercial gluten-free flour blends already contain it, but check your package to be sure. If yours doesn’t, add the full teaspoon.
- Water temperature matters significantly for yeast activation. Water that’s too hot (above 120°F) will kill the yeast, while water that’s too cool won’t activate it properly. Use a kitchen thermometer for best results, especially when you’re learning.
- The apple cider vinegar serves multiple purposes: it helps activate the yeast, adds subtle flavor depth, and improves the texture of the finished crust. Don’t skip this ingredient even though it seems minor.
- Gluten-free dough is naturally stickier than regular pizza dough, so using oiled or wet hands instead of flour for shaping prevents you from adding extra flour that would dry out the dough.
- If your dough seems too sticky to work with after rising, you can refrigerate it for 30 minutes, which makes it firmer and easier to handle without affecting the final product.
- For a thinner, crispier crust, divide the dough into four portions instead of two and use smaller pans. For a thicker, chewier crust, use just two portions in larger pans.
- This dough freezes beautifully. After the first rise, divide into portions, wrap tightly in plastic wrap and aluminum foil, and freeze for up to three months. Thaw overnight in the refrigerator before using.
- Don’t skip the resting period after shaping. This final rest helps the dough relax and rise slightly in the pan, resulting in a lighter, airier crust.
- If you notice the crust browning too quickly before the cheese is fully melted, tent the pizza loosely with aluminum foil for the remaining bake time.
- Leftover pizza keeps well in an airtight container in the refrigerator for up to three days. Reheat in a 350°F oven for about 8 minutes to restore crispiness.
- For a dairy-free version, use dairy-free cheese and ensure your sauce doesn’t contain dairy products. The dough itself is naturally dairy-free.
- The cornmeal dusting is optional but highly recommended—it prevents sticking and adds wonderful texture to the crust bottom.