
There’s nothing quite like a slice of homemade cake, and the good news is that you absolutely do not need gluten to create something absolutely spectacular. This gluten-free cake recipe has been perfected through countless tests and tweaks, and I’m thrilled to share it with you today. Whether you’re baking for someone with celiac disease, a gluten sensitivity, or simply want to explore new baking frontiers, this recipe delivers the tender crumb, rich flavor, and elegant presentation that will make everyone at your table ask for seconds.
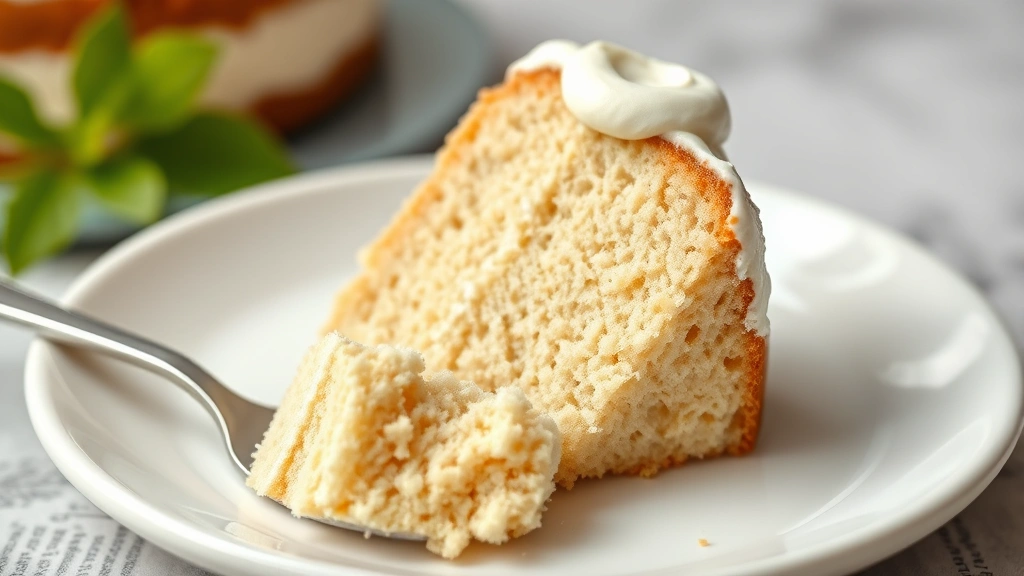
The secret to the best gluten-free cake lies in understanding how gluten-free flours behave differently than traditional wheat flour. Unlike all-purpose flour, gluten-free flour blends lack the protein structure that creates elasticity and chewiness. This means we need to approach our ingredient ratios and mixing techniques with intention. The key is using a high-quality gluten-free flour blend that already contains xanthan gum, or adding it ourselves for proper binding. We’ll also incorporate a touch of cornstarch and potato starch to achieve that delicate, almost silk-like crumb that makes people forget they’re eating gluten-free cake at all.
This recipe uses simple, accessible ingredients you likely already have in your pantry. We’re talking eggs, butter, sugar, and vanilla extract combined with our gluten-free flour blend. I’ve also added a small amount of almond flour for richness and moisture retention, which is a trick I learned from studying various baking techniques. The result is a cake that’s incredibly moist, tender, and flavorful—something that rivals any traditional cake recipe.
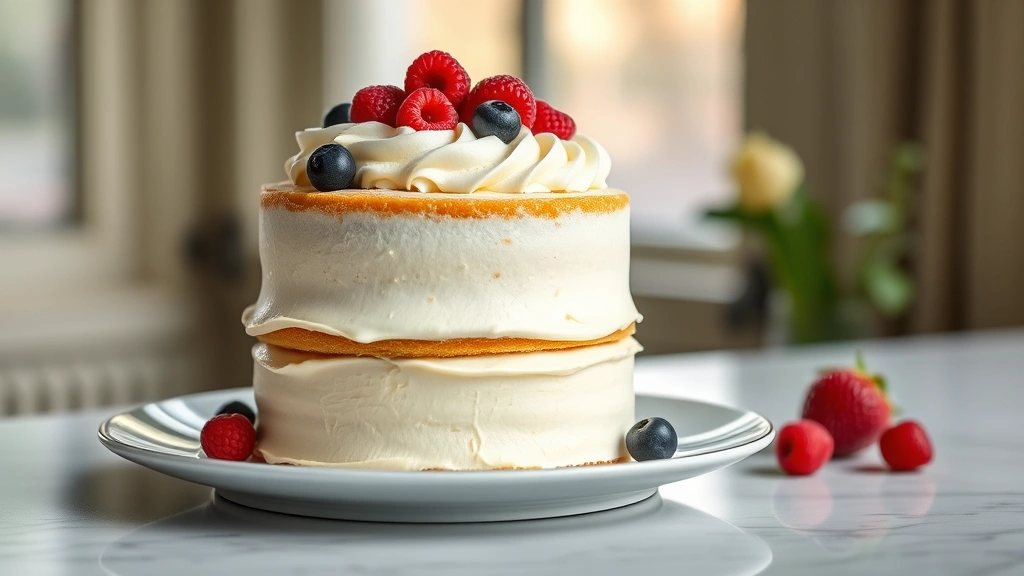
One thing I love about this gluten-free cake is its versatility. You can frost it with classic American buttercream, cream cheese frosting, or even a simple glaze. It works beautifully as a birthday cake, celebration cake, or simply as an afternoon treat with a cup of coffee. For those looking to pair it with other dishes, consider serving alongside complementary dessert sides or even as part of a brunch spread.
Baking gluten-free has taught me that it’s not about compromise—it’s about understanding the science and adjusting accordingly. This cake proves that delicious, beautiful, crowd-pleasing desserts are absolutely possible without gluten. Your guests won’t believe it’s gluten-free, and honestly, that’s the highest compliment.
For more baking inspiration and guidance on creating spectacular desserts, check out Bon Appétit’s dessert collection and Serious Eats’ baking science guides. I also recommend reviewing New York Times Cooking for classic cake techniques that you can adapt to gluten-free baking.
If you’re new to gluten-free baking, don’t worry—I’ve tested this recipe extensively, and the instructions are detailed to ensure success. We’ll walk through each step together, from preparing your pans to achieving that perfect golden exterior. Let’s create a cake that will make you proud and delight everyone who takes a bite. You’ve got this, and I’m here to guide you through every step of this delicious journey.
Ingredients
- 2 cups gluten-free all-purpose flour blend (with xanthan gum)
- 1/2 cup almond flour
- 1/4 cup cornstarch
- 1/4 cup potato starch
- 2 teaspoons baking powder
- 1/2 teaspoon baking soda
- 1/2 teaspoon salt
- 1/2 cup (1 stick) unsalted butter, softened to room temperature
- 1 cup granulated sugar
- 3 large eggs, room temperature
- 2 teaspoons vanilla extract
- 1/2 cup full-fat Greek yogurt or sour cream, room temperature
- 1/3 cup whole milk or unsweetened almond milk, room temperature
- 1 tablespoon apple cider vinegar or lemon juice
Instructions
- Preheat your oven to 350°F (175°C). Grease and flour two 9-inch round cake pans, or line the bottoms with parchment paper for easier removal. Set aside.
- In a medium mixing bowl, combine the gluten-free all-purpose flour blend, almond flour, cornstarch, potato starch, baking powder, baking soda, and salt. Whisk together thoroughly to combine all dry ingredients evenly. Set aside.
- In a large mixing bowl, cream together the softened butter and granulated sugar. Beat on medium-high speed for 3-4 minutes until the mixture is light, fluffy, and pale in color. This step is crucial for incorporating air into the batter.
- Add the eggs one at a time to the butter-sugar mixture, beating well after each addition. Make sure each egg is fully incorporated before adding the next. This should take about 1 minute per egg.
- Stir in the vanilla extract and mix until just combined.
In a small bowl, combine the milk with the apple cider vinegar or lemon juice. Let it sit for 5 minutes to create a buttermilk substitute.
- Alternate adding the dry ingredient mixture and the milk mixture to the butter-egg mixture, beginning and ending with the dry ingredients. Start by adding about 1/3 of the dry ingredients, mix on low speed until just combined.
Then add half of the milk mixture, mix until just combined.
Continue with another 1/3 of the dry ingredients, then the remaining milk mixture, and finish with the final 1/3 of the dry ingredients.
After each addition, mix only until just combined—overmixing will result in a tough cake.
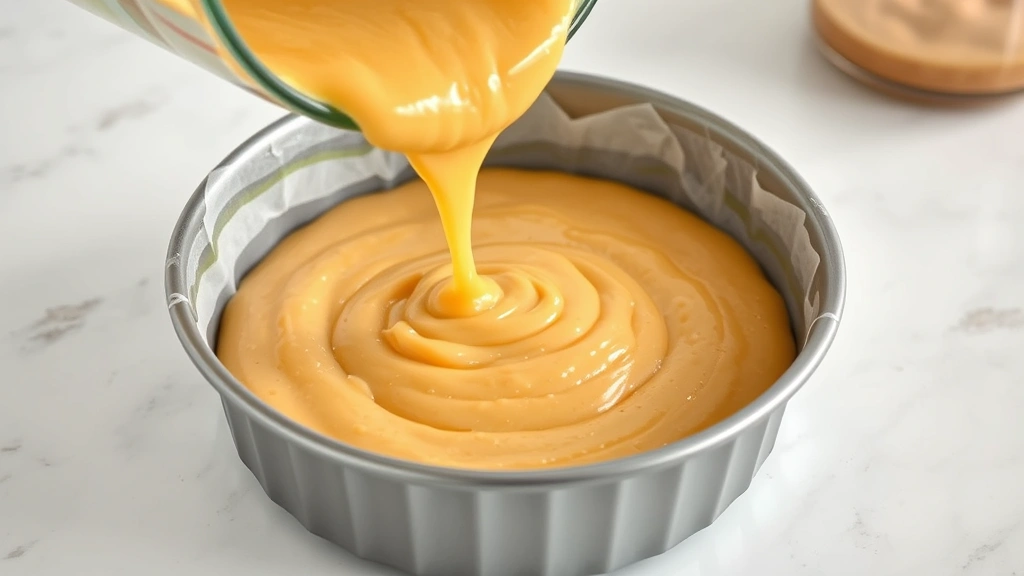
- Fold in the Greek yogurt or sour cream gently using a spatula, stirring just until the streaks of yogurt are no longer visible. The batter should be smooth and thick but still pourable.
- Divide the batter evenly between the two prepared cake pans. Smooth the tops with a spatula or the back of a spoon to ensure even baking.
- Place both pans in the preheated oven on the middle rack. Bake for 30-35 minutes, or until a toothpick inserted into the center of each cake comes out clean or with just a few moist crumbs. The tops should be lightly golden brown.
- Remove the cakes from the oven and let them cool in the pans for 10-15 minutes. During this time, the cakes will set slightly and be easier to remove.
- Turn each cake out onto a wire cooling rack and let cool completely, at least 1-2 hours, before frosting. It’s important that the cakes are completely cool to prevent the frosting from melting.
- Once cooled, you can frost with your favorite frosting, whether that’s buttercream, cream cheese frosting, or a simple glaze. For a beautiful presentation, you might want to level the tops of the cakes with a serrated knife before frosting.
Pro Tips
Gluten-free flour blends vary by brand, so make sure to use one that specifically contains xanthan gum. If your blend doesn’t include it, add 1/2 teaspoon of xanthan gum to your dry ingredients.
Don’t skip the apple cider vinegar or lemon juice step. This creates acidity that activates the baking soda and helps the cake rise properly.
The almond flour and Greek yogurt contribute to moisture retention, which is why gluten-free cakes can dry out quickly. This combination keeps the cake tender for several days.
If you notice the cake is browning too quickly on top but the center isn’t done, tent it loosely with aluminum foil for the remaining baking time.
This cake can be made a day ahead. Wrap the cooled layers tightly in plastic wrap and store at room temperature. Frost just before serving for the best presentation.
For a dairy-free version, substitute the butter with dairy-free butter, use a non-dairy yogurt, and use non-dairy milk. The results will be slightly less tender but still delicious.
Leftovers can be stored in an airtight container at room temperature for up to 3 days, or in the refrigerator for up to 5 days if frosted with cream cheese frosting.
This recipe doubles well if you’re baking for a larger crowd. Simply double all ingredients and bake in four pans, or bake in batches.