
There’s nothing quite like a slice of creamy, decadent cheesecake—and the best part? You don’t need gluten to make it absolutely spectacular. This gluten-free cheesecake recipe delivers that perfect balance of rich, velvety filling and a buttery crust that rivals any traditional version. Whether you’re baking for someone with celiac disease, following a gluten-free lifestyle, or simply want to expand your dessert repertoire, this showstopping dessert will have everyone asking for your secret.
The key to nailing gluten-free cheesecake lies in understanding your ingredients and taking your time with each component. A quality gluten-free flour blend or almond flour creates a sturdy crust that won’t crumble when you slice through it. The filling itself is where the magic happens—room-temperature cream cheese, perfectly beaten eggs, and a hint of vanilla create that signature creamy texture that makes cheesecake irresistible. I’ve baked dozens of these, and I’m thrilled to share my foolproof method with you.
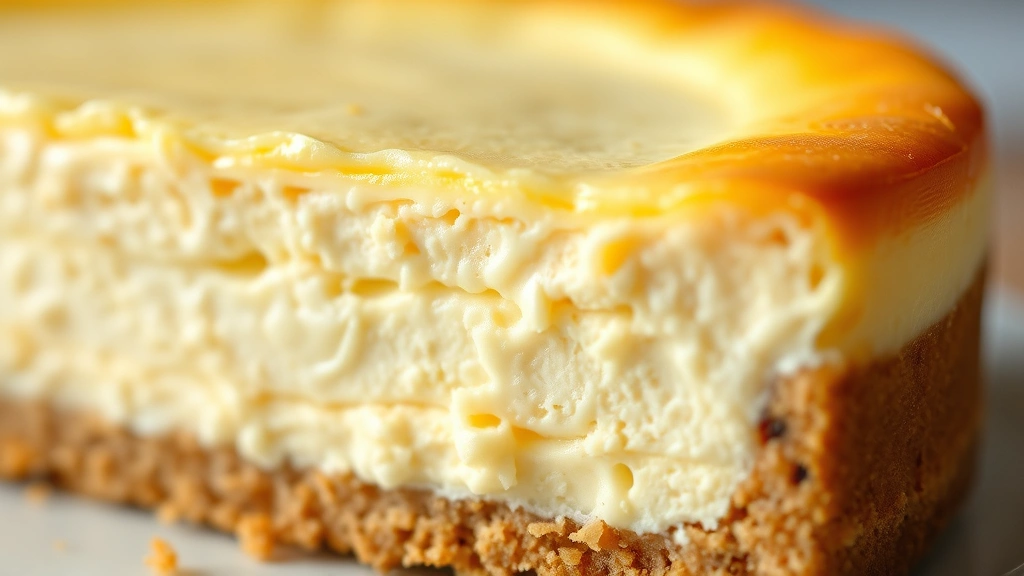
One of the most important things to remember when making cheesecake is patience. Rushing the process or opening the oven door too early can lead to cracks and an uneven texture. We’ll use a water bath to ensure gentle, even heat distribution, creating that silky-smooth filling that practically melts on your tongue. Don’t skip this step—it’s truly the secret to perfection.
This recipe is naturally adaptable too. You can add pickled elements for tartness or swap in different extracts for vanilla. Some people love adding a bright, fresh topping to balance the richness. The beauty of cheesecake is that once you master the base recipe, you can make it your own.
I always recommend using full-fat cream cheese and sour cream for the best results. Don’t reach for the low-fat versions—they simply don’t deliver the same luxurious mouthfeel. Room temperature is also crucial; cold cream cheese won’t blend smoothly with the other ingredients, potentially leading to lumps in your filling. Take the ingredients out of the fridge 30-45 minutes before you start baking.
The crust deserves special attention too. A gluten-free crust needs a binder to hold everything together. Melted butter mixed with crushed gluten-free cookies or a quality gluten-free flour blend creates the perfect foundation. Press it firmly into your springform pan, and don’t be shy about it—you want it compact enough to support the filling without being rock-hard.
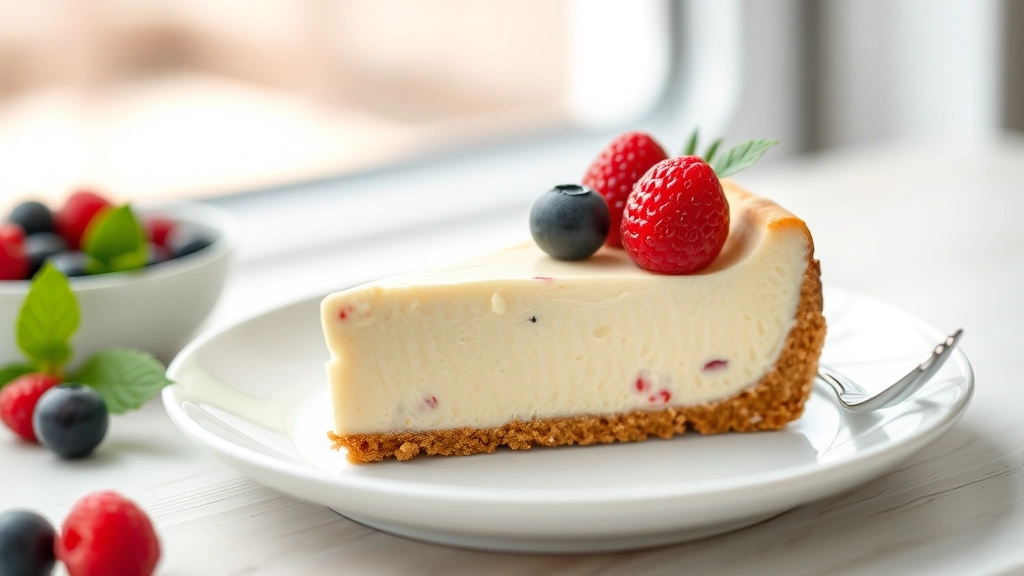
Once you’ve mastered this recipe, you’ll find yourself making it for every special occasion. Pair it with fresh berries, a homemade berry compote, or simply serve it plain with a cup of coffee. For more dessert inspiration, check out these classic techniques and flavor combinations.
The cooling process is just as important as the baking process. Allow your cheesecake to cool gradually in the turned-off oven with the door slightly ajar for about an hour. This prevents the dreaded temperature shock that causes cracking. Then refrigerate for at least 8 hours, preferably overnight, before serving. This resting time allows the flavors to meld and the texture to set perfectly.
With this recipe in your arsenal, you’ll never feel limited by a gluten-free diet. This cheesecake is elegant enough for dinner parties, simple enough for weeknight desserts, and absolutely delicious every single time. The combination of rich, creamy filling and buttery crust creates a dessert that anyone would be proud to serve. So grab your springform pan and let’s create something absolutely magnificent. Your taste buds—and your guests—will thank you.
Ingredients
- 1 1/2 cups gluten-free flour blend (or almond flour for lower carb option)
- 6 tablespoons granulated sugar
- 1/4 teaspoon salt
- 6 tablespoons unsalted butter, melted
- 2 pounds (four 8-oz packages) cream cheese, room temperature
- 3/4 cup granulated sugar
- 1/4 cup gluten-free all-purpose flour
- 1/4 teaspoon salt
- 4 large eggs, room temperature
- 1/2 cup sour cream, room temperature
- 2 teaspoons vanilla extract
- 1 tablespoon lemon zest (optional but recommended)
- Boiling water for water bath

Instructions
- Preheat your oven to 325°F (163°C). Wrap the outside of a 9-inch springform pan with heavy-duty aluminum foil, ensuring it covers the bottom and sides completely to prevent water from seeping in during the water bath.
- In a medium bowl, combine 1 1/2 cups gluten-free flour blend, 6 tablespoons sugar, and 1/4 teaspoon salt. Stir until well combined, then add the melted butter and mix until the mixture resembles coarse breadcrumbs with some larger clumps.
- Press the crust mixture firmly into the bottom of your prepared springform pan, using the bottom of a measuring cup to create an even layer. You want it compact but not overly dense. Set aside.
- Place the springform pan inside a larger roasting pan and set aside. You’ll add boiling water to the roasting pan later to create a water bath.
- In a large mixing bowl, add the room-temperature cream cheese. Using an electric mixer on low speed, beat the cream cheese for 2-3 minutes until it becomes smooth and creamy. Stop occasionally to scrape down the sides of the bowl with a spatula.
- In a separate small bowl, whisk together 3/4 cup sugar, 1/4 cup gluten-free flour, and 1/4 teaspoon salt until no lumps remain.
- Gradually add the sugar mixture to the cream cheese, mixing on low speed until just combined. Do not overmix, as this can incorporate too much air and cause cracks.
- Add the room-temperature eggs one at a time, mixing on low speed after each addition and scraping down the bowl between additions. Mix only until each egg is incorporated—overmixing at this stage can introduce air bubbles.
- In a small bowl, whisk together the sour cream and vanilla extract. Add this mixture to the batter and mix on low speed until just combined. Fold in the lemon zest if using.
- Pour the filling over the crust, smoothing the top with a spatula. Tap the pan gently on the counter a few times to release any air bubbles.
- Pour boiling water into the roasting pan until it reaches halfway up the sides of the springform pan. Carefully place the roasting pan (with the cheesecake inside) into the preheated oven.
- Bake for 55-60 minutes. The cheesecake is done when the edges are set but the center (about a 2-inch diameter circle in the middle) still jiggles slightly when you gently shake the pan. The internal temperature should be around 150°F when measured with an instant-read thermometer.
- Turn off the oven and crack the door open about 4 inches. Leave the cheesecake in the oven for 1 hour to cool gradually. This prevents the sudden temperature change that causes cracking.
- Remove the cheesecake from the oven and roasting pan. Run a thin knife around the edges of the cheesecake, between the filling and the pan, to loosen it. This allows the cheesecake to contract evenly as it cools.
- Allow the cheesecake to cool to room temperature on the counter for about 30 minutes, then transfer it to the refrigerator. Chill for at least 8 hours, preferably overnight, before serving.
- To remove the cheesecake from the pan, run a thin-bladed knife around the edges again, then carefully release the springform pan’s latch. Slice with a sharp knife that you dip in hot water and wipe clean between each slice for clean, beautiful cuts.
Pro Tips
Water Bath Is Non-Negotiable: The gentle, moist heat of a water bath ensures even cooking and prevents the dreaded cracks that can appear on the surface. Don’t skip this step no matter how tempting it is.
Gluten-Free Flour Selection: Use a quality gluten-free all-purpose flour blend that includes xanthan gum. Bob’s Red Mill and King Arthur are excellent brands. Alternatively, use almond flour for a lower-carb, nuttier crust.
Avoid Overmixing: Once you add the eggs and sour cream, mix only until just combined. Overmixing incorporates air, which causes cracks and an airy texture instead of the dense, creamy consistency we want.
The Jiggle Test: Your cheesecake filling should have a slight jiggle in the very center when done. It will continue to set as it cools. Overbaking results in a dry, grainy texture.
Cooling Matters: The gradual cooling in the turned-off oven is crucial. This prevents thermal shock that causes cracks. Don’t rush this process.
Storage: Wrap leftover cheesecake tightly and refrigerate for up to 5 days. You can also freeze it for up to 2 months. Thaw in the refrigerator before serving.
Crust Variations: If you prefer a more substantial crust, add crushed gluten-free cookies (like gingersnaps or vanilla wafers) to your flour mixture. This adds flavor and texture.
Flavor Additions: Add 1 teaspoon of almond extract, lemon extract, or even peppermint extract for different flavor profiles. You can also swirl in fruit purees or chocolate before baking.
Serving Suggestions: Top with fresh berries, homemade fruit compote, or a simple berry sauce. Serve with a cup of strong coffee or hot tea for the perfect pairing.
Pingback: How to make the Perfect Clear Soup Recipe – So Simple! – Simple Recipe Finder