

Crepes are one of those magical dishes that seem intimidating but are actually incredibly simple to master—and they’re even easier when you go gluten-free! This recipe proves that you don’t need wheat flour to create those delicate, paper-thin pancakes that are perfect for breakfast, dessert, or even a fancy brunch. The secret is using a combination of rice flour and tapioca starch, which creates the exact same tender texture as traditional crepes while keeping everything naturally gluten-free.
I’ve been making crepes for years, and honestly, the gluten-free version is just as impressive. Whether you’re serving them with fresh berries and whipped cream, Nutella and bananas, or savory fillings like ham and cheese, these crepes deliver restaurant-quality results every single time. The batter comes together in minutes, and the best part? You can make it ahead of time and store it in the fridge for up to 24 hours, making these perfect for entertaining.
What makes this recipe truly foolproof is understanding the science behind it. Rice flour provides structure and a delicate crumb, while tapioca starch adds elasticity—that crucial ingredient that prevents the crepes from tearing when you flip them. A touch of cornstarch ensures they have that signature thin, lacy edge that makes crepes so special. Combined with eggs, milk, and a pinch of salt, you’re looking at a batter that’s thinner than pancake batter but thicker than a simple sauce.
The technique matters just as much as the ingredients. Your pan temperature needs to be just right—hot enough to cook the crepe through but not so hot that it browns before you can spread the batter. I recommend using a non-stick crepe pan or a well-seasoned cast-iron skillet, and investing in a proper crepe spreader makes the process much easier (though a thin offset spatula or even the back of a wooden spoon works in a pinch). Once you nail the technique, you’ll be making crepes whenever the craving strikes, and your family will think you’ve secretly trained as a French pastry chef.
These crepes are naturally dairy-free friendly if you use a non-dairy milk alternative, and they’re perfect for anyone following a gluten-free diet due to celiac disease or gluten sensitivity. Serve them warm, fill them generously, and watch everyone at your table be amazed that these restaurant-quality crepes are completely gluten-free. Trust me, once you master this recipe, you’ll be making crepes for breakfast, dessert, and everything in between. Check out our Gluten-Free Breakfast Collection for more morning inspiration, or try pairing these with our Homemade Whipped Cream for the ultimate topping. For a savory twist, see our Guide to Crepe Fillings, and don’t miss our Essential Gluten-Free Baking Tips for more success in the kitchen. For inspiration on what to fill your crepes with, check out Bon Appétit’s Crepe Recipes, explore Serious Eats’ Crepe Technique Guide, or visit New York Times Cooking for more gluten-free breakfast ideas.
Ingredients
- 1 cup gluten-free all-purpose flour blend (with xanthan gum)
- ½ cup sweet rice flour
- ¼ cup tapioca starch
- 2 tablespoons cornstarch
- 3 large eggs, room temperature
- 1¼ cups whole milk (or non-dairy alternative)
- ¼ cup water
- 2 tablespoons melted butter, plus more for the pan
- 1 tablespoon granulated sugar
- ½ teaspoon vanilla extract
- ¼ teaspoon fine sea salt
- Pinch of nutmeg (optional but recommended)
Instructions
- Combine the gluten-free all-purpose flour, sweet rice flour, tapioca starch, cornstarch, sugar, and salt in a large mixing bowl, whisking together until completely combined and no lumps remain.
- In a separate bowl, whisk together the eggs, milk, water, melted butter, and vanilla extract until well combined and smooth.
- Pour the wet ingredients into the dry ingredients, whisking gently until you have a smooth, thin batter with the consistency of heavy cream—if it seems too thick, add a tablespoon of water at a time until you reach the right consistency.
- Let the batter rest for 5-10 minutes at room temperature, which allows the gluten-free flours to fully hydrate and creates more tender crepes.
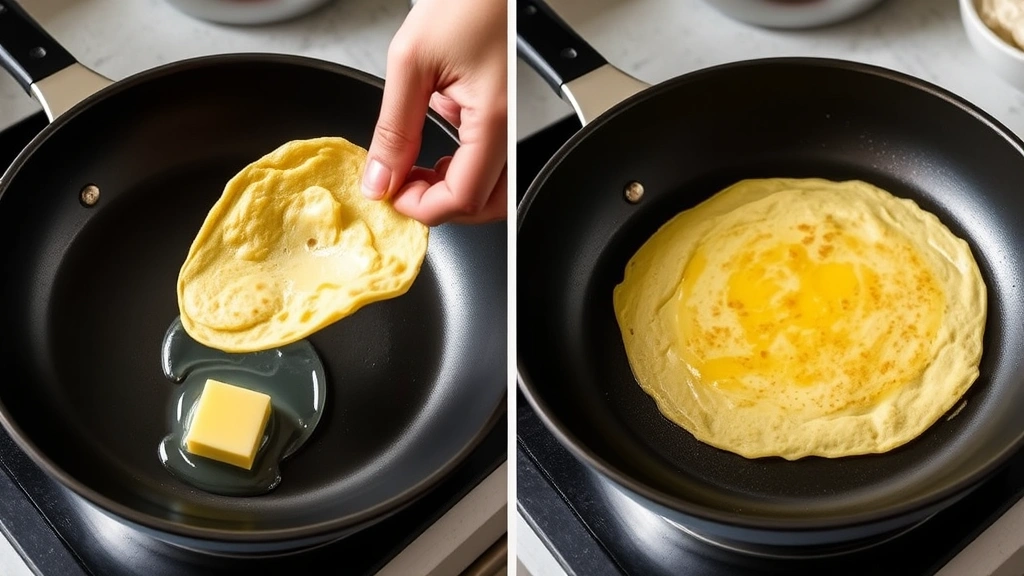
- Heat a non-stick crepe pan or 10-inch non-stick skillet over medium-high heat for about 2-3 minutes until it’s very hot but not smoking.
- Lightly butter the pan, wiping away excess with a paper towel so you have just a thin coating (too much butter makes crepes greasy).
- Pour about ¼ cup of batter into the center of the pan and immediately tilt and rotate the pan in a circular motion, spreading the batter evenly into a thin circle—work quickly as the batter will start to set.
- Cook for about 60-90 seconds until the bottom is light golden, then loosen the edges with a thin spatula and carefully flip the crepe over.
- Cook the second side for another 30-45 seconds until set but still tender, then transfer to a plate.
- Repeat steps 6-9 with the remaining batter, buttering the pan lightly between each crepe and stacking the finished crepes on the plate.
- Serve the crepes warm, filled with your choice of toppings such as fresh berries, whipped cream, Nutella, jam, or savory fillings like ham and cheese.

Pro Tips
- **Make-Ahead Magic**: Prepare the batter up to 24 hours in advance and store it in an airtight container in the refrigerator. Give it a gentle stir before using, and add a tablespoon of water if it’s thickened too much during storage.
- **Flour Blend Matters**: Not all gluten-free flour blends are created equal. Look for one that already contains xanthan gum, which helps bind the batter. King Arthur Baking Company and Bob’s Red Mill both make excellent blends specifically for recipes like this.
- **Sweet Rice Flour vs. Regular Rice Flour**: Sweet rice flour (also called glutinous rice flour) is essential here—it’s stickier than regular rice flour and creates the tender texture you need. Don’t substitute regular rice flour or your crepes will be gritty.
- **Temperature Control**: This is crucial for success. If your pan is too cool, the crepes will be thick and rubbery. If it’s too hot, they’ll brown too quickly before setting. Aim for that sweet spot where the first side takes about 60-90 seconds to turn light golden.
- **The Flip**: Flipping crepes confidently comes with practice. Use a thin, flexible spatula and loosen the edges completely before attempting the flip. If you’re nervous, you can cook them on just one side and fill them that way—they’re delicious either way.
- **Dairy-Free Option**: Substitute the milk with any non-dairy milk alternative (almond, oat, or coconut milk all work beautifully) and use dairy-free butter or coconut oil instead of regular butter.
- **Stacking and Storage**: Stack finished crepes between parchment paper to prevent sticking. Store cooled crepes in an airtight container in the refrigerator for up to 3 days, or freeze them for up to 1 month. Reheat gently in a skillet or microwave before serving.
- **Sweet vs. Savory**: This basic batter works for both sweet and savory crepes. For savory crepes, omit the sugar and vanilla, and reduce the milk to 1 cup for a slightly thicker batter that holds fillings better.
- **Common Issues**: If your crepes are tearing, your batter might be too thick or your pan too hot. If they’re too thick and rubbery, your batter might be too thin or your pan not hot enough. Adjust gradually and test with one crepe before continuing.
- **Xanthan Gum Sensitivity**: Some people are sensitive to xanthan gum. If you don’t have a blend that contains it, you can add ¼ teaspoon xanthan gum to your dry ingredients, or use a blend made with psyllium husk instead.