
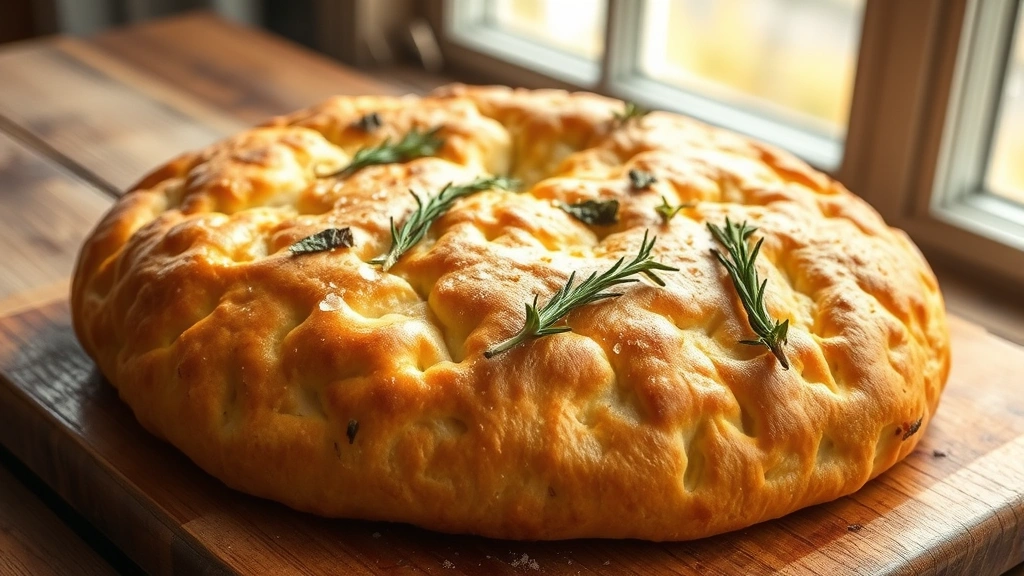
There’s something absolutely magical about warm, crispy focaccia fresh from the oven – and the wonderful news is that you don’t need gluten to achieve that bakery-quality result at home! This gluten-free focaccia recipe delivers all the pillowy softness, golden-brown crust, and herbaceous flavor you crave, without any of the wheat flour. Whether you’re new to gluten-free baking or a seasoned pro, this foolproof method will have you creating restaurant-worthy focaccia that rivals any traditional version.
I’ve been making focaccia for years, and when I first attempted a gluten-free version, I was skeptical. How could it possibly have that signature airy crumb and crispy exterior? But after experimenting with different flour blends and techniques, I’ve discovered the secret: it’s all about using the right combination of starches and binders, plus giving yourself enough time for proper fermentation. This recipe uses a carefully balanced gluten-free flour blend that mimics the structure of traditional wheat flour, ensuring your focaccia rises beautifully and develops that coveted crispy-yet-tender texture.
What makes this recipe truly the best is its flexibility and forgiving nature. The long, slow rise gives the dough time to develop flavor and structure, while the high hydration makes it easier to work with than you might expect. You’ll use simple, wholesome ingredients – most of which you likely already have in your pantry – and the result is a showstopping bread that’s perfect for entertaining or simply enjoying at home. The beauty of this focaccia is that it’s equally delicious served warm with good olive oil for dipping, topped with fresh rosemary and sea salt, or used as a base for sandwiches. Serve it alongside classic pasta carbonara for an authentic Italian experience, or pair it with homemade tomato basil soup for the ultimate comfort meal.
I’ve tested this recipe dozens of times, tweaking temperatures, rise times, and topping combinations to ensure you get perfect results every single time. Whether you’re avoiding gluten for dietary reasons or simply want to expand your baking repertoire, this focaccia will become a regular in your rotation. Let me walk you through every step, sharing my tips and tricks that I’ve learned along the way. By the end, you’ll have the confidence to make beautiful, delicious gluten-free focaccia that will impress everyone at your table – and they’ll be amazed when you tell them it’s gluten-free!
For more inspiration on gluten-free baking, check out Serious Eats’ comprehensive gluten-free baking guide, and for classic focaccia techniques, Bon Appétit’s traditional focaccia is always a great reference. You might also enjoy learning about our foundational gluten-free bread techniques and exploring New York Times’ focaccia variations for additional inspiration on toppings and flavor profiles.
Ingredients
- 2½ cups all-purpose gluten-free flour blend (with xanthan gum, or add ½ teaspoon separately)
- ¾ cup tapioca starch or cornstarch
- 1½ teaspoons instant yeast
- 1½ teaspoons sea salt
- 1¾ cups warm water (110°F)
- 3 tablespoons honey or sugar
- 3 tablespoons olive oil, plus more for the pan and topping
- 1 tablespoon apple cider vinegar or white vinegar
- 2 teaspoons Italian seasoning
- Fresh rosemary sprigs
- Coarse sea salt for topping
- Cracked black pepper (optional)
- Red pepper flakes (optional)
Instructions
- In a large mixing bowl or the bowl of a stand mixer, whisk together the gluten-free flour blend, tapioca starch, instant yeast, and sea salt. Make sure to break up any lumps in the flour.
- In a separate bowl, combine the warm water, honey, 3 tablespoons of olive oil, and apple cider vinegar. Stir well to combine.
- Pour the wet ingredients into the dry ingredients and mix on low speed using a stand mixer fitted with the paddle attachment for about 3 minutes, until a shaggy dough forms. The dough will be quite wet and sticky – this is exactly what you want!
- Continue mixing on medium-low speed for an additional 5-7 minutes. The dough should come together slightly but remain very sticky. Unlike traditional wheat dough, gluten-free dough won’t develop the same elasticity, so don’t expect it to pull away from the sides of the bowl.
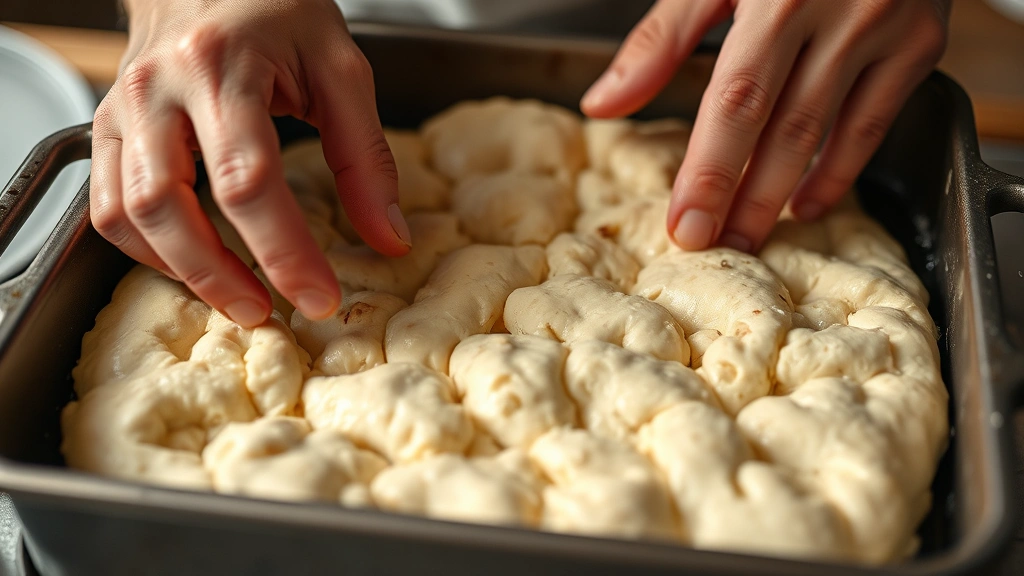
- Oil a 9×13-inch baking pan generously with olive oil. Using a spatula or wet hands, transfer the dough to the prepared pan. The dough will be sticky, so wet your hands frequently to prevent sticking.
- Using your fingertips or a rubber spatula, gently spread and press the dough to fill the pan evenly. Don’t be rough with it – gentle pressing works best. The dough should reach the edges and be roughly ½-inch thick.
- Cover the pan loosely with plastic wrap or a damp kitchen towel. Let the dough rise at room temperature for 2-3 hours, until it has increased in volume and looks puffy.
- After the initial rise, refrigerate the dough overnight (or for at least 8 hours, up to 24 hours). This long, cold rise develops incredible flavor and makes the dough easier to handle.
- Remove the focaccia from the refrigerator 30 minutes before baking to bring it to room temperature.
- Preheat your oven to 425°F (220°C).
- Using your fingertips, gently dimple the entire surface of the dough, creating shallow indentations about ½-inch apart. These dimples are the signature focaccia feature and help create pockets for oil and seasonings.
- Drizzle the top generously with olive oil – don’t be shy! Use about 3-4 tablespoons.
- In a small bowl, mix together the Italian seasoning with a pinch of sea salt. Sprinkle this mixture evenly over the surface of the focaccia.
- Top with fresh rosemary sprigs, pressing them gently into the dough. Sprinkle additional coarse sea salt over the entire surface.
- Add red pepper flakes and cracked black pepper if desired for extra flavor and visual appeal.
- Bake for 25-30 minutes, until the top is golden brown and the edges are deeply golden. The focaccia should smell absolutely amazing when it’s done!
- Remove from the oven and let cool in the pan for 5-10 minutes before turning out onto a wire rack.
- Serve warm or at room temperature. For the best texture, enjoy within 2-3 hours of baking, though it keeps well wrapped at room temperature for up to 2 days.

Pro Tips
- **Flour Blend Matters**: Use a high-quality gluten-free flour blend specifically designed for bread baking. Brands like Bob’s Red Mill 1-to-1, King Arthur Baking Company, or Simple Mills work beautifully. Make sure your blend contains xanthan gum or add ½ teaspoon separately for structure.
- **Hydration is Your Friend**: This dough is intentionally wet and sticky. Don’t be tempted to add extra flour! The high water content is what creates those beautiful air pockets and tender crumb.
- **Temperature Control**: Warm water (around 110°F) activates the yeast properly. Use a thermometer to get it right. Too cold and fermentation will be slow; too hot and you’ll kill the yeast.
- **The Overnight Rise**: This is crucial for flavor development and easier handling. The cold fermentation allows the dough to develop depth of flavor impossible in a quick rise, plus it firms up enough to dimple without tearing.
- **Vinegar Addition**: The small amount of vinegar helps strengthen the gluten-free dough structure and adds subtle complexity to the flavor.
- **Dimpling Technique**: Use gentle, consistent pressure when creating dimples. You want them deep enough to hold oil and toppings, but not so deep that you deflate all the rise. Practice makes perfect!
- **Oil Generously**: Focaccia is an oil-based bread. Don’t skimp on the olive oil – it’s essential for both flavor and texture.
- **Topping Variations**: Beyond the classic rosemary and salt, try caramelized onions, roasted garlic, sun-dried tomatoes, olives, or even a drizzle of balsamic vinegar for unique flavors.
- **Storage**: Keep baked focaccia wrapped in plastic wrap at room temperature for up to 2 days. For longer storage, freeze for up to 3 months. Reheat gently in a 350°F oven for 10 minutes to restore crispness.
- **Stand Mixer vs. Hand Mixing**: While a stand mixer makes this easier, you can absolutely make focaccia by hand. Just be prepared for vigorous mixing and don’t worry if it takes longer to come together.
- **Pan Selection**: A 9×13-inch metal baking pan works best. Glass pans can cause over-browning on the edges, so if using glass, reduce oven temperature by 25°F.
- **Troubleshooting**: If your focaccia spreads too thin and becomes dense, your dough may have been too warm during rise. If it doesn’t rise enough, ensure your yeast is fresh and your water temperature was correct. If the bottom burns before the top browns, move the pan to a higher rack position.