
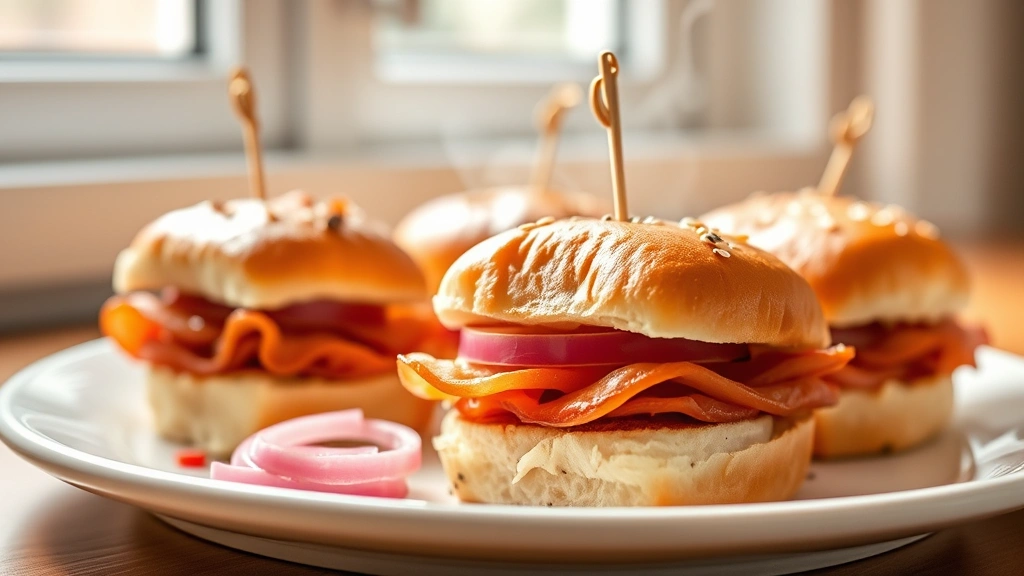
Ham sliders are the ultimate crowd-pleaser, whether you’re hosting a casual gathering, planning a party spread, or simply craving something delicious and satisfying. These little sandwiches pack big flavor into every bite, and the best part? They come together in minutes. What makes these ham sliders truly special is the combination of tender, quality ham, buttery toasted buns, and a perfectly balanced sauce that brings everything together beautifully.
I’ve been making sliders for years, and I’ve learned that the secret to perfection lies in a few key details. First, investing in good quality ham makes all the difference—avoid the ultra-thin deli slices and opt for thicker cuts that provide substance and real ham flavor. Second, don’t skip the toasting step; those buttery, golden buns create the perfect textural contrast to the tender meat. Finally, a simple glaze or sauce elevates these from good to absolutely irresistible.
These ham sliders work wonderfully for so many occasions. Serve them at game day parties, holiday gatherings, or weeknight dinners. They pair beautifully with pickled red onions for a tangy contrast, or alongside a fresh chickpea salad for a lighter meal. The versatility is endless, and once you master this basic recipe, you’ll find yourself making these constantly.
What I love most about this recipe is how customizable it is. You can keep them classic and simple, or dress them up with various toppings and condiments. Some of my favorite variations include adding a touch of creamy sauce for richness, or experimenting with different cheese options. The foundation remains the same—quality ingredients, proper technique, and a little love in the preparation.
I’ve also discovered that these sliders freeze beautifully, making them perfect for meal prep or last-minute entertaining. Simply assemble them, wrap individually in foil, and freeze for up to two weeks. When you’re ready to serve, just warm them through in the oven, and they taste just as fresh and delicious as the day you made them. This recipe truly is a game-changer for busy home cooks who refuse to compromise on taste.
For more inspiration on quick and delicious meals, check out this guide on Bon Appétit’s collection of slider recipes. If you’re interested in learning more about sandwich techniques and flavor combinations, Serious Eats has excellent resources on sandwich construction. And for additional ham preparation techniques, The New York Times Cooking section offers great ham recipes and tips.
Ingredients
- 12 slider buns or small dinner rolls
- 1 pound quality sliced ham (about 1/4 inch thick)
- 6 tablespoons butter, softened
- 2 tablespoons Dijon mustard
- 1 tablespoon honey
- 1 tablespoon apple cider vinegar
- 1 teaspoon brown sugar
- 6 slices Swiss cheese or provolone (optional)
- 1/4 cup diced pickled red onions
- 2 tablespoons fresh parsley, finely chopped
- 1 teaspoon garlic powder
- 1/2 teaspoon smoked paprika
- Salt and freshly ground black pepper to taste
- 1 tablespoon sesame seeds (optional, for topping)
Instructions
- Preheat your oven to 375°F. Line a large baking sheet with parchment paper or foil for easy cleanup.
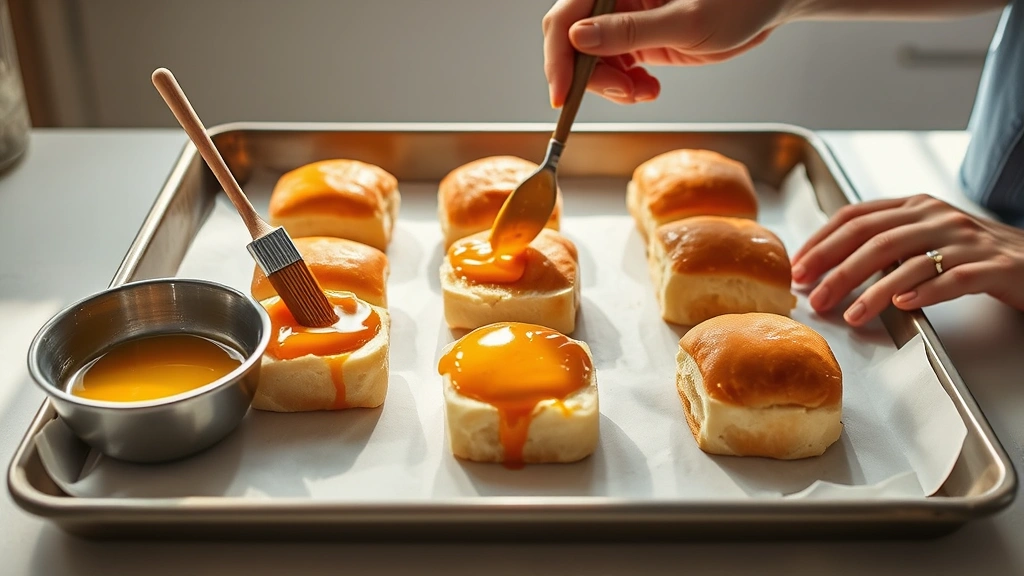
- While the oven heats, prepare your glaze by whisking together the softened butter, Dijon mustard, honey, apple cider vinegar, brown sugar, garlic powder, and smoked paprika in a small bowl. Season with a pinch of salt and black pepper. Set aside.
- Slice each slider bun horizontally, keeping the top and bottom intact. You should have 12 bottom halves and 12 tops.
- Arrange the bottom halves of all the slider buns cut-side up on your prepared baking sheet.
- Brush the cut sides of each bottom bun half with the prepared glaze mixture, using about half of it.
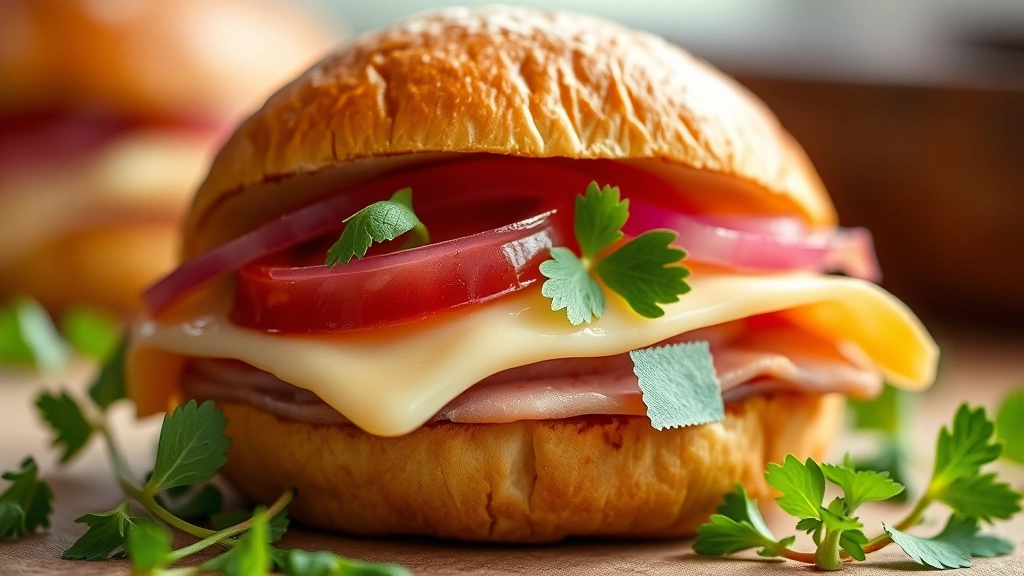
- Layer approximately 1.5 ounces of quality ham onto each bottom bun half, folding or layering it neatly.
- If using cheese, place one half slice of Swiss cheese or provolone on top of each ham layer. The cheese will melt slightly from the oven’s heat.
- Top each slider with a small spoonful of pickled red onions, distributing them evenly across all 12 sliders.
- Brush the cut sides of the top bun halves with the remaining glaze mixture.
- Place the top halves onto each slider, pressing down gently to secure them.
- Brush the tops of each slider with any remaining glaze, and sprinkle with sesame seeds if desired.
- Bake in the preheated oven for 10-12 minutes, until the buns are golden brown and the cheese is melted. The sliders should be heated through and smell absolutely delicious.
- Remove from the oven and sprinkle fresh parsley over the warm sliders for color and freshness.
- Allow to cool for 1-2 minutes, then serve immediately while warm and buttery.
Pro Tips
Mustard selection: Dijon mustard provides a sophisticated tang, but you can substitute whole grain mustard for a different texture and flavor profile.
Cheese options: While Swiss and provolone work beautifully, cheddar, American cheese, or even a smoked gouda can elevate these sliders in different directions.
Pickled red onions: These add brightness and acidity. You can make your own or purchase pre-made versions at most grocery stores.
Glaze flexibility: Feel free to adjust the glaze ingredients based on your preferences. Some prefer more honey for sweetness, while others like extra mustard for tang.
Toasting technique: Don’t skip the toasting step. It creates a barrier that prevents the buns from becoming soggy and adds crucial texture and flavor.
Make-ahead option: Assemble these sliders up to 4 hours before serving, wrap tightly in plastic wrap, and refrigerate. Bake just before serving for maximum freshness.
Freezing instructions: Fully assemble the sliders, wrap individually in foil, and freeze for up to two weeks. Bake from frozen, adding 3-5 minutes to the cooking time.
Serving suggestions: Pair with potato chips, coleslaw, or a light salad for a complete meal.
Variations: Add crispy bacon between the ham and cheese, include a layer of caramelized onions, or spread a thin layer of mayo or pesto on the buns before adding ham.
Party planning: These are perfect for making ahead and serving at parties. They stay warm for about 15-20 minutes if kept covered with foil.