
Hot chocolate bombs are the ultimate indulgence—a magical dessert that transforms ordinary hot milk into a luxurious treat. These elegant spheres of chocolate are filled with cocoa powder, marshmallows, and whipped cream, creating an enchanting experience when poured with steaming liquid. Whether you’re planning a cozy winter gathering or looking for a show-stopping homemade gift, this elegant entertaining recipe will impress everyone at your table.
I fell in love with hot chocolate bombs the moment I saw them at a specialty café—those gorgeous chocolate spheres sitting in delicate cups, waiting to be awakened by hot milk. The dramatic moment when the shell cracks open to reveal its treasures inside is pure magic. What started as a café curiosity has become one of my favorite homemade gifts and party tricks. The beauty of making them at home is that you control every ingredient, ensuring the highest quality chocolate and the perfect flavor combinations.
These bombs are easier to make than you might think, requiring just a few essential tools and quality ingredients. The key to success lies in working with chocolate that’s tempered properly and understanding the technique of creating hollow spheres. Once you master the basic method, you can customize them endlessly with different chocolate varieties, fillings, and flavor infusions. From classic milk chocolate with marshmallows to sophisticated dark chocolate with lavender-infused cream, the possibilities are truly limitless.
I love serving hot chocolate bombs during the holiday season, but honestly, they’re perfect any time you want to add a little magic to someone’s day. They’re wonderful for holiday gift boxes, elegant enough for bridal showers, and fun enough for children’s parties. The presentation alone makes everyone feel special, and the taste delivers on every promise. Let me walk you through my foolproof method for creating these show-stopping treats.
The technique for making hot chocolate bombs requires silicone molds, quality chocolate, and a bit of patience. Unlike other indulgent recipes, these don’t require any baking or cooking skills—just careful assembly and creativity. The chocolate shell needs to be thick enough to hold together but thin enough to crack beautifully when hot liquid is poured inside. I’ve perfected this ratio through countless batches, and I’m excited to share my secrets with you.
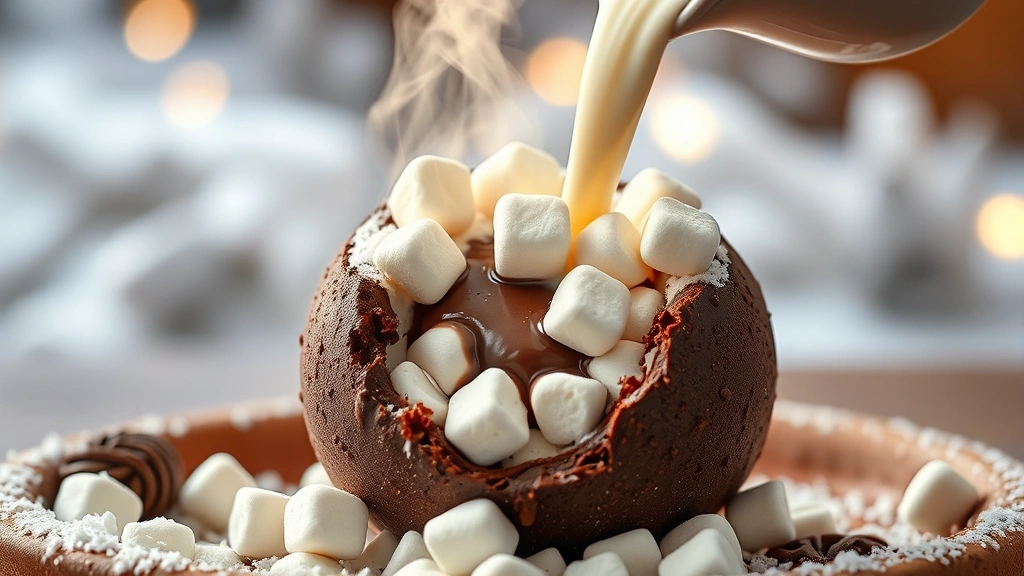
What makes these truly special is the element of surprise and delight. When guests pour hot milk or water over a chocolate bomb, it creates this wonderful moment of discovery as the shell shatters and the filling swirls into the liquid. It’s the kind of experience that makes people smile, and honestly, that’s what cooking is all about. These are perfect for creating memorable moments with the people you love, whether that’s a quiet morning for yourself or a celebration with friends.
Ingredients
- 12 ounces high-quality chocolate (milk, dark, or white), chopped
- 2 tablespoons coconut oil or cocoa butter
- 1/2 cup unsweetened cocoa powder
- 1/2 cup mini marshmallows
- 1/4 cup hot chocolate mix or additional cocoa powder
- 2 tablespoons powdered sugar
- 1/4 teaspoon sea salt
- 1/4 teaspoon vanilla extract
- Whipped cream for filling (optional)
- Additional decorative chocolate for garnish (optional)
- Edible glitter or sprinkles for decoration (optional)
Instructions
- Gather two silicone hemisphere molds (2-3 inch size) and place them on a baking sheet. These molds are essential for creating the perfect chocolate shells, so invest in quality ones that will last for many batches.
- Chop your chocolate into small, uniform pieces and place in a microwave-safe bowl. Add the coconut oil or cocoa butter, which will help create a smoother, more pourable chocolate consistency.
- Microwave the chocolate mixture in 30-second intervals, stirring between each interval, until completely melted and smooth. Be careful not to overheat, as this can cause the chocolate to become grainy or seize.
- Let the melted chocolate cool for about 2-3 minutes, then carefully spoon or pour it into each hemisphere mold, filling them about three-quarters full. The chocolate should coat the entire inside surface.
- Tap the molds gently on the counter to release any air bubbles and ensure an even coating. Use a small spoon or offset spatula to smooth any uneven spots if needed.
- Place the molds in the refrigerator for 15-20 minutes until the chocolate is set but not completely hardened. It should feel firm to the touch but still have a slight give.
- Carefully remove the chocolate shells from the molds and inspect them for any cracks or thin spots. Set aside the most perfect shells for assembly.
- In a small bowl, combine cocoa powder, hot chocolate mix, powdered sugar, and sea salt. Mix thoroughly to break up any clumps, ensuring an even distribution of all dry ingredients.
- Add vanilla extract to the dry mixture and stir until well combined. This adds depth and richness to the chocolate bomb filling.
- Spoon about 1 tablespoon of the filling mixture into one hemisphere shell, creating a small mound in the center.
- Add a small handful of mini marshmallows on top of the filling, distributing them evenly across the shell.
- If desired, add a small dollop of whipped cream on top of the marshmallows for extra indulgence and richness.
- Melt a small amount of additional chocolate in a microwave-safe bowl, heating in 15-second intervals until smooth and pourable.
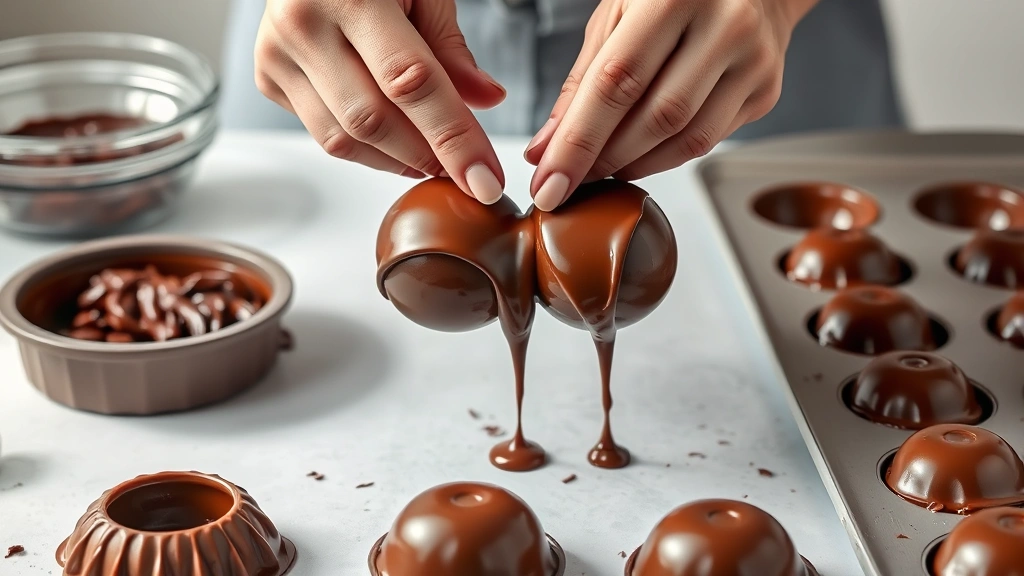
- Using a small spoon or piping bag, create a thin line of melted chocolate around the rim of the filled hemisphere shell.
- Quickly press a second chocolate hemisphere shell on top of the first, creating a complete sphere. Hold gently for a few seconds to ensure they bond together.
- Place the completed bomb on a parchment-lined baking sheet and refrigerate for at least 1 hour until completely set and stable.
- Once fully set, you can optionally decorate the bombs with additional melted chocolate drizzles, edible glitter, or sprinkles for a festive appearance.
- Store the finished hot chocolate bombs in an airtight container in a cool, dark place for up to 2 weeks.
- To serve, place one bomb in a mug and slowly pour 8-10 ounces of hot milk or water over it, watching as it cracks open and releases the magical filling.

Pro Tips
- Quality chocolate makes all the difference in these bombs—invest in brands like Ghirardelli, Lindt, or Callebaut for the best results and smoothest texture
- Silicone hemisphere molds can be found at baking supply stores or online; look for molds that are sturdy and flexible enough to release the chocolate shells easily
- If your chocolate becomes too thick while working, gently reheat it in the microwave for 10-15 seconds to restore the perfect consistency
- These bombs are wonderfully customizable—try white chocolate with peppermint filling, dark chocolate with chili powder, or milk chocolate with cinnamon for flavor variations
- For a vegan version, use dairy-free chocolate and coconut cream instead of whipped cream, adjusting all dairy-based fillings accordingly
- Mini marshmallows should be fresh and fluffy for the best texture; old marshmallows may become stale and affect the final result
- Don’t skip the cocoa butter or coconut oil—these additions create a smoother, more pourable chocolate that sets properly and cracks beautifully
- If shells are cracking or breaking during assembly, your chocolate may be too cold or brittle; let it warm slightly at room temperature before trying again
- These make excellent gifts when packaged in clear cellophane bags tied with ribbon and include simple serving instructions on a decorative tag
- For parties, you can prepare the bombs several days in advance, making them a stress-free entertaining option that impresses with minimal last-minute effort
- Experiment with different marshmallow varieties like freeze-dried raspberries, crushed candy canes, or chocolate-covered pretzels for unique flavor combinations
- Serve with alternative liquids like almond milk, oat milk, or even hot water mixed with a splash of liqueur for adult versions
- The filling mixture can be made in larger batches and stored in an airtight container for several weeks, making it easy to assemble bombs whenever inspiration strikes