
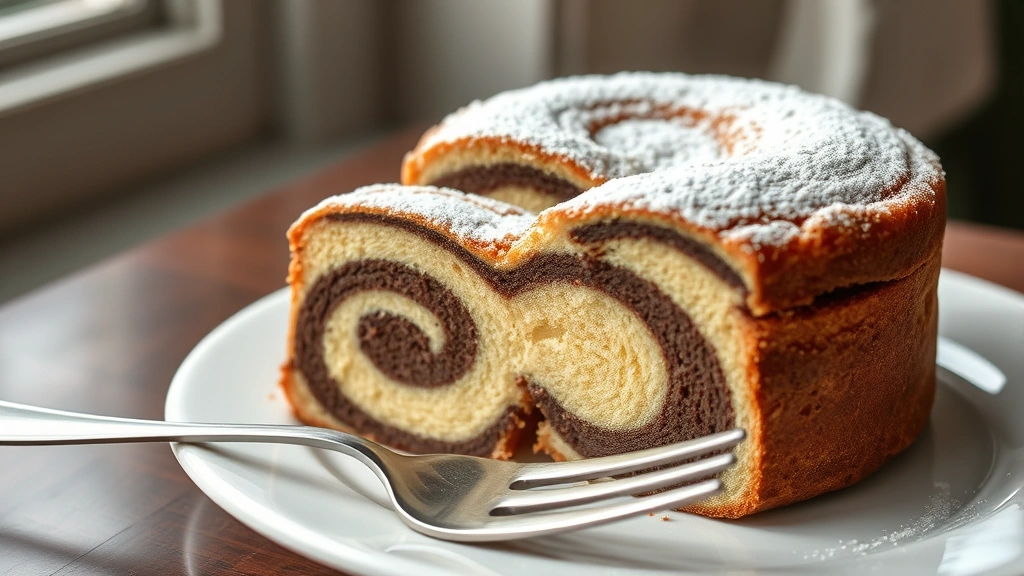
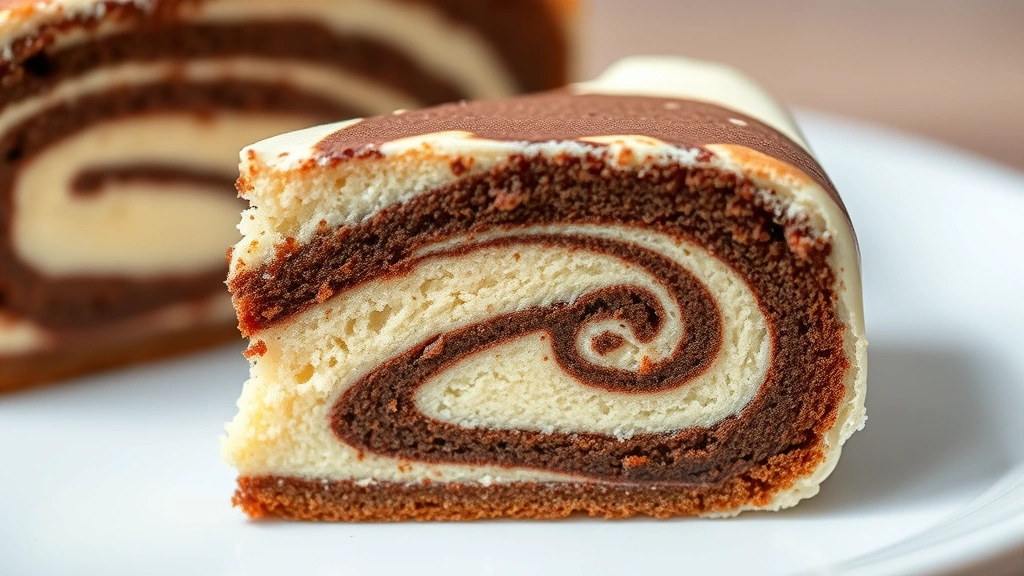
A marmor cake, or marble cake, is a stunning dessert that combines two complementary batters—typically vanilla and chocolate—swirled together to create those gorgeous marbled patterns throughout. This classic European-inspired cake is not only visually impressive but also incredibly delicious, with the perfect balance of rich chocolate and sweet vanilla in every bite.
What makes this marmor cake recipe so special is its simplicity combined with its elegant presentation. Whether you’re baking for a special occasion or just want to impress your family with homemade dessert, this recipe delivers restaurant-quality results from your own kitchen. The key to achieving those beautiful marble patterns is using the right technique when swirling the two batters together—not too much mixing, which would muddy the colors, but enough to create those distinctive veins throughout the cake.
This recipe is perfect for both beginner and experienced bakers. The basic vanilla and chocolate batters are straightforward to prepare, and the marbling technique, while it might seem intimidating, is actually quite forgiving once you understand the simple steps. The result is a moist, tender crumb with wonderful flavor that stays fresh for several days when properly stored.
I love serving this marmor cake with a simple dusting of powdered sugar, a dollop of whipped cream, or even a drizzle of chocolate ganache. It’s perfect alongside coffee or tea for an afternoon treat, and it also makes an impressive dessert for dinner parties. You can even customize this recipe by adjusting the ratio of vanilla to chocolate batter if you prefer one flavor over the other, or by adding different extracts and mix-ins to suit your taste preferences.
For best results, make sure all your ingredients are at room temperature before you begin, as this helps create a smoother, more uniform batter. Room temperature ingredients also incorporate more evenly, resulting in a lighter, fluffier cake. If you’re new to baking, I recommend reading through all the instructions before starting, so you understand the complete process. Once you’ve made this cake once or twice, you’ll find it becomes second nature, and you’ll be making it regularly.
This marmor cake pairs wonderfully with other classic desserts and baking projects. If you love this recipe, you might also enjoy exploring our collection of other baking techniques and flavor combinations, or perhaps you’d like to try complementary dessert sauces to serve alongside your cake. For those looking to expand their baking repertoire, check out our guide on mastering different cake techniques, and don’t miss our collection of recipes for entertaining.
For additional inspiration and professional tips on cake baking, check out Bon Appétit’s marble cake guide, explore Serious Eats’ comprehensive cake collection, or visit New York Times Cooking for their take on marble cake. These resources offer wonderful variations and troubleshooting tips that can help you perfect your baking skills.
Ingredients
- 2 1/4 cups all-purpose flour
- 2 1/2 teaspoons baking powder
- 1/2 teaspoon salt
- 1/2 cup (1 stick) unsalted butter, softened to room temperature
- 1 cup granulated sugar
- 3 large eggs, at room temperature
- 1 cup whole milk, at room temperature
- 2 teaspoons vanilla extract
- 1/4 cup unsweetened cocoa powder
- 1/4 cup boiling water
- 2 tablespoons granulated sugar (for chocolate batter)
- Powdered sugar for dusting (optional)
- Non-stick cooking spray or butter for greasing the pan
Instructions
- Preheat your oven to 350°F (175°C). Grease a 9-inch round cake pan (or 9×13 inch rectangular pan) with non-stick cooking spray or butter, then line the bottom with parchment paper for easy removal. Set aside.
- In a medium bowl, whisk together the all-purpose flour, baking powder, and salt. Set this dry mixture aside.
- In a large bowl, cream together the softened butter and 1 cup of granulated sugar using an electric mixer on medium speed. Beat for about 3-4 minutes until the mixture is light, fluffy, and pale in color. This process, called creaming, incorporates air into the batter and creates a lighter cake texture.
- Add the eggs to the butter mixture one at a time, beating well after each addition. Make sure each egg is fully incorporated before adding the next one. This ensures an even distribution of moisture and helps create a tender crumb.
- Add half of the flour mixture to the butter and egg mixture, stirring on low speed until just combined. Do not overmix, as this can develop the gluten and result in a tough cake.
- Pour half of the milk into the batter and stir on low speed until just combined. Again, avoid overmixing.
- Add the remaining flour mixture to the batter and stir on low speed until just combined.
- Add the remaining milk and vanilla extract to the batter and stir on low speed until just combined and smooth. The batter should be smooth but not overmixed. This is your vanilla batter.
- Measure out approximately 1 1/2 cups of the vanilla batter into a separate bowl. This portion will become your chocolate batter.
- In a small bowl, mix together the cocoa powder, 2 tablespoons of granulated sugar, and the 1/4 cup of boiling water, stirring until smooth and well combined. This blooms the cocoa powder and intensifies its chocolate flavor.
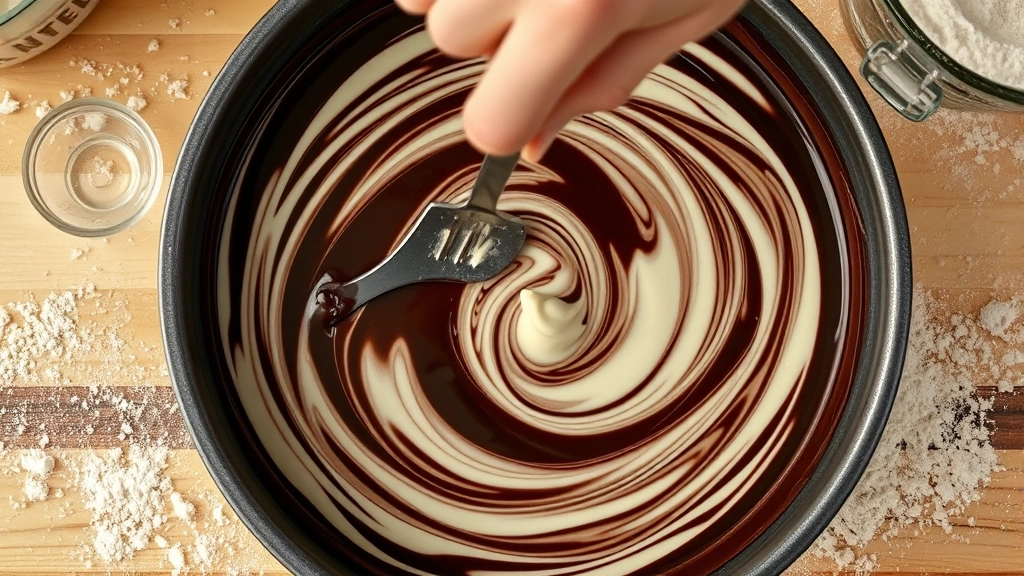
- Pour the chocolate mixture into the 1 1/2 cups of vanilla batter and stir until the color is uniform and there are no streaks of cocoa powder. This is your chocolate batter.
- Pour half of the remaining vanilla batter into the prepared cake pan, spreading it evenly to cover the bottom.
- Pour half of the chocolate batter over the vanilla layer, spreading it as evenly as possible.
- Pour the remaining vanilla batter on top of the chocolate layer.
- Pour the remaining chocolate batter on top of the vanilla layer.
- Using a butter knife, skewer, or small offset spatula, gently swirl the batters together by dragging the knife from the center toward the edges in a spiral pattern. Work carefully to create visible marble patterns without overworking the batter, which would blend the colors into a muddy brown. Make 8-10 swirls around the pan.
- Place the cake pan in the preheated oven and bake for 45-50 minutes, until a toothpick inserted into the center comes out clean or with just a few moist crumbs clinging to it.
- Remove the cake from the oven and allow it to cool in the pan for 10-15 minutes before turning it out onto a wire cooling rack.
- Allow the cake to cool completely to room temperature before serving, dusting with powdered sugar if desired. This typically takes 1-2 hours depending on your kitchen temperature.
Pro Tips
Marbling Technique: The key to beautiful marble patterns is restraint. Don’t overswirl the batters, as this will blend them together into a uniform brown color instead of creating those gorgeous veins. Aim for 8-10 swirls maximum, working from the center outward in a spiral motion.
Cocoa Powder Selection: Use unsweetened cocoa powder for the best results. Dutch-process cocoa will give you a darker, more elegant appearance, while natural cocoa powder will result in a slightly lighter brown with a more traditional chocolate flavor.
Pan Options: This recipe works well in round 9-inch cake pans, 9×13 inch rectangular pans, or even bundt pans. Adjust baking time slightly if using a bundt pan—it may take 50-60 minutes due to the different shape and thickness.
Storage Instructions: Store the finished marmor cake in an airtight container at room temperature for up to 3 days. You can also wrap it tightly in plastic wrap and freeze for up to 2 months. Thaw completely at room temperature before serving.
Frosting Options: While this cake is delicious plain or dusted with powdered sugar, you can also frost it with vanilla buttercream, chocolate buttercream, or a combination of both applied in stripes for additional visual impact.
Troubleshooting: If your cake sinks in the middle, the oven temperature may have been too low, or the cake may have been underbaked. Always check with a toothpick before removing from the oven. If the edges are dry but the center is still moist, your oven may run hot—try reducing the temperature by 25 degrees next time.
Baking Powder Notes: Make sure your baking powder is fresh and hasn’t expired, as old leavening agents won’t provide adequate rise. Store baking powder in a cool, dry place away from moisture.