
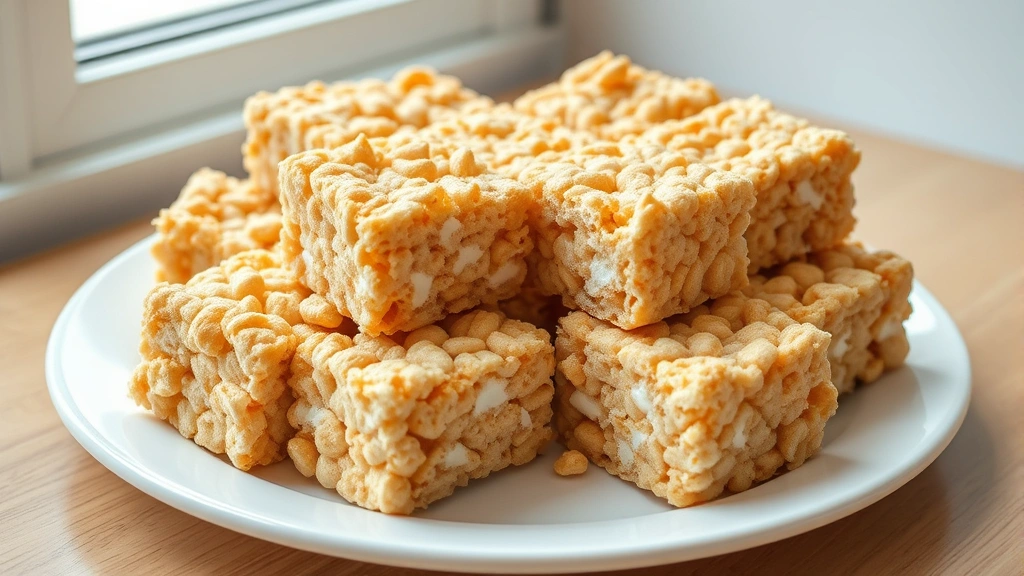
There’s something absolutely magical about homemade Rice Krispie treats, and when you swap out traditional marshmallows for luxurious marshmallow cream, you elevate this beloved classic into something truly spectacular. This marshmallow cream rice krispie recipe delivers the same nostalgic charm you remember from childhood, but with a sophisticated twist that makes them irresistibly creamy and decadent.
Marshmallow cream has a silkier, more refined texture than regular marshmallows, which means your rice krispie treats will have an incredibly smooth, cloud-like interior that practically melts on your tongue. The beauty of this recipe lies in its simplicity—just a handful of ingredients transform into a showstopping dessert that’s perfect for parties, potlucks, bake sales, or simply satisfying those sweet cravings.
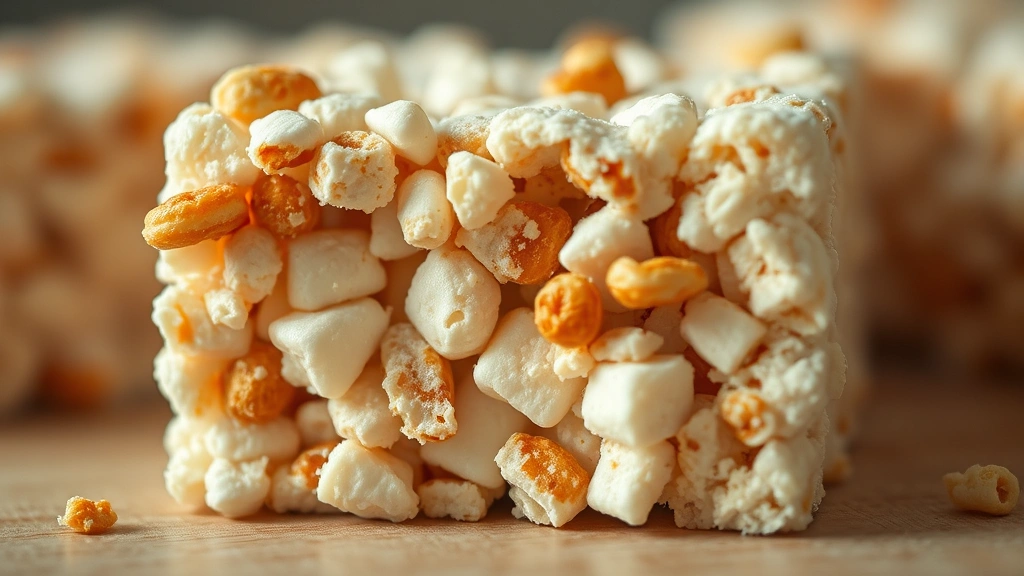
What makes this approach so special is that marshmallow cream distributes more evenly throughout the mixture, creating a uniform texture in every bite. Unlike chunky marshmallow pieces that can sometimes feel uneven, the cream blends seamlessly with the toasted rice cereal and butter, resulting in treats that are consistently delicious from edge to center.
I’ve been making Rice Krispie treats for years, and I can confidently say that switching to marshmallow cream was one of the best decisions I’ve made in my baking journey. The treats stay fresher longer, they’re easier to cut into neat squares, and they have a more elegant presentation that makes them feel special enough for any occasion. Whether you’re a seasoned baker or a complete beginner, this recipe is foolproof and absolutely forgiving.
The key to perfect marshmallow cream rice krispie treats is using quality ingredients and working quickly once everything is mixed together. The marshmallow cream sets faster than you might expect, so having all your tools and ingredients ready before you start is essential. I always use a well-buttered 9×13 inch baking pan and either parchment paper or additional butter to prevent sticking when cutting the treats.
One of my favorite things about this recipe is how customizable it is. You can add vanilla extract for extra flavor, include a pinch of sea salt for a sweet and salty combination, or even fold in some crushed candy canes during the holidays. The marshmallow cream base is incredibly versatile and works beautifully with whatever creative additions you want to incorporate.
These treats are perfect for gift-giving too. Wrap them individually in cellophane bags tied with pretty ribbons, and you have an impressive homemade gift that looks like you spent hours in the kitchen. The reality is, this recipe comes together in about 15 minutes of actual work, making it one of the most efficient desserts you can make when you need something impressive fast.
For the best results, I recommend using a quality brand of marshmallow cream and ensuring your Rice Krispies cereal is fresh and crispy. Stale cereal will result in less satisfying treats, so check your pantry and grab a new box if yours has been open for a while. The combination of fresh ingredients really does make a noticeable difference in the final product.
I also love that you can make these treats ahead of time. They keep beautifully in an airtight container for up to a week, making them perfect for meal prep or advance party planning. This recipe has become a staple in my kitchen, and I’m thrilled to share it with you. Get ready to impress everyone with these absolutely delicious marshmallow cream rice krispie treats that taste like they came from a professional bakery.
For additional sweet treat inspiration, check out our cream-based dessert techniques and explore more rich and creamy recipes. You might also enjoy learning about layering flavors in comfort food. Looking for complementary treats? Try our pickled garnish recipes and salad ideas.
For more inspiration on cereal-based treats, visit Bon Appétit’s dessert collection, explore Serious Eats’ candy and treat guides, and check out New York Times Cooking for classic dessert techniques.
Ingredients
- 4 tablespoons unsalted butter, plus more for greasing
- 7 cups Rice Krispies cereal
- 1 (10-ounce) jar marshmallow cream
- 1 teaspoon vanilla extract (optional)
- 1/4 teaspoon sea salt (optional)
- Parchment paper for lining pan
Instructions
- Prepare your workspace by lining a 9×13 inch baking pan with parchment paper, allowing some overhang on the sides for easy removal. Generously butter the parchment paper with about 1 tablespoon of softened butter, using your fingers or a pastry brush to create an even coating. This step is crucial for preventing sticking and ensuring your treats release cleanly from the pan.
- Measure out all 7 cups of Rice Krispies cereal into a large mixing bowl, making sure to use fresh cereal that still has its crispness. Set this aside and have all other ingredients within arm’s reach, as the marshmallow mixture will set quickly once heated.
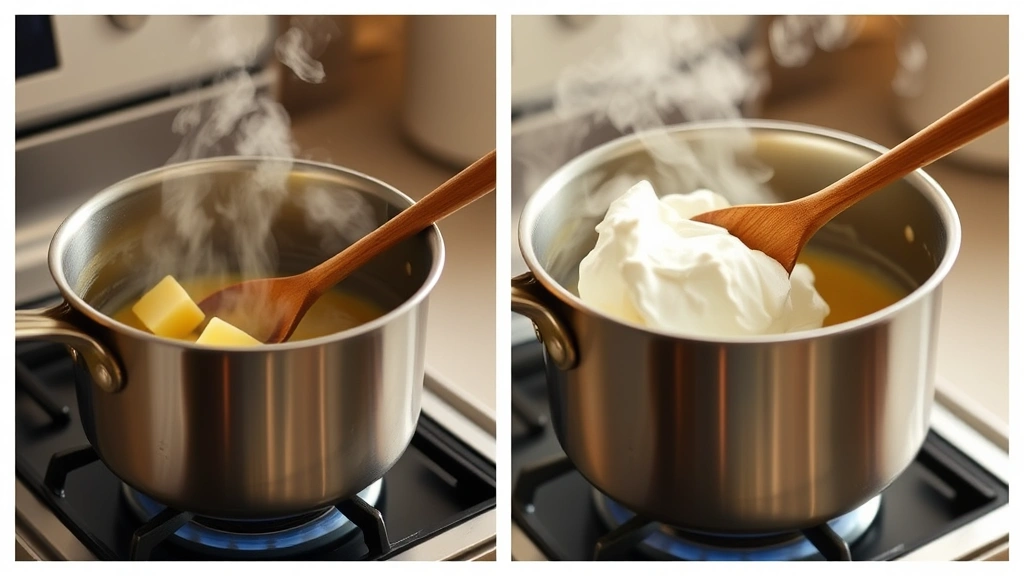
- Place a large saucepan over medium heat and add the 4 tablespoons of unsalted butter. Allow it to melt completely, swirling the pan occasionally to ensure even melting. This usually takes about 1-2 minutes depending on your stove’s heat intensity.
- Once the butter is completely melted and foamy, immediately add the entire jar of marshmallow cream to the pan. Stir constantly with a silicone spatula or wooden spoon, breaking up any large clumps as the cream begins to incorporate with the melted butter.
- Continue stirring the butter and marshmallow cream mixture for about 1-2 minutes until it’s completely smooth, creamy, and well combined. The mixture should have a glossy appearance and flow smoothly off your spoon. If you’re using vanilla extract and sea salt, add them now and stir to incorporate evenly.
- Remove the saucepan from heat immediately—do not let the mixture cook any longer, as this can cause the marshmallow cream to become tough and difficult to work with. Quickly pour the hot marshmallow mixture over the cereal in your large bowl.
- Using your silicone spatula or wooden spoon, begin folding the marshmallow mixture into the cereal with quick, efficient movements. Work fast but carefully, making sure to coat all the cereal evenly with the creamy mixture. The combination should come together within about 30-45 seconds.
- Once the cereal is completely coated and the mixture is uniform in appearance, immediately transfer it to your prepared baking pan. Using a well-buttered spatula or your buttered hands, press the mixture firmly and evenly into the bottom of the pan.
- Work quickly but gently, using firm, even pressure to ensure the treats are compacted properly without being overly compressed. You want them to hold together but still maintain a light, crispy texture. Fill in any gaps or low spots to create an even surface.
- Allow the treats to cool at room temperature for at least 5-10 minutes, during which time they’ll firm up considerably and become much easier to cut. Do not refrigerate during this initial cooling phase, as this can make cutting more difficult.
- Once the treats have cooled and firmed up, use the parchment paper overhang to lift the entire block out of the pan onto a clean cutting surface. Using a sharp knife that you’ve dipped in water or lightly buttered, cut the block into 12-16 even squares, wiping your knife between cuts for cleaner edges.
- Transfer the finished treats to an airtight container, separating layers with parchment paper to prevent sticking. Store at room temperature for up to one week, ensuring the container remains tightly sealed to maintain freshness and prevent the treats from drying out.
Pro Tips
- Marshmallow cream creates a smoother, more uniform texture than traditional marshmallows because it distributes evenly throughout the cereal mixture without leaving chunky pockets.
- The key to success is working quickly once the marshmallow mixture is combined with the cereal. The mixture begins to set rapidly, so have your pan ready and work with confidence and speed.
- Quality matters with this recipe. Use a reputable brand of marshmallow cream and ensure your Rice Krispies cereal is fresh and crispy for the best texture and flavor.
- Buttering your tools and surfaces generously prevents sticking and makes the entire process much more enjoyable. Keep a small dish of softened butter nearby for easy application.
- If the marshmallow mixture hardens before you finish pressing it into the pan, you can briefly return the saucepan to low heat for just a few seconds to soften it slightly. Do not overheat, or the texture will be compromised.
- These treats can be made 2-3 days in advance, making them perfect for party planning. Store in an airtight container at room temperature away from heat and humidity.
- For a gourmet twist, add 1/2 teaspoon of almond extract instead of vanilla, or include 1/2 cup of crushed pretzels folded into the cereal mixture for a sweet and salty combination.
- If you’re gifting these treats, wrap individual squares in cellophane bags and tie with ribbons. They make impressive homemade gifts that guests will absolutely love.
- The treats are best enjoyed within 3-4 days of making, though they’ll stay edible in an airtight container for up to a week. They may lose some crispness over time as they absorb ambient moisture.
- For holiday variations, try adding crushed candy canes during the holidays, or incorporate seasonal extracts like peppermint or eggnog flavoring for festive versions.
Pingback: How to Make the Best Amish Potato Salad Recipe! – Simple Recipe Finder