

There’s something absolutely magical about a no-bake peanut butter pie that requires zero oven time yet delivers all the creamy, dreamy decadence you could possibly want. This showstopping dessert is the perfect solution for hot summer days when you’d rather not heat up your kitchen, and honestly, it’s so simple to make that even beginner bakers will feel like pastry professionals.
What makes this recipe truly the BEST is the combination of a buttery graham cracker crust, a silky smooth peanut butter filling, and a cloud-like whipped topping that comes together in minutes. The beauty of no-bake desserts is that they give you time to focus on what really matters—gathering around the table with people you love. Plus, this pie actually tastes better when it’s been chilled for several hours, so you can make it in the morning and let the flavors meld beautifully throughout the day.
I’ve been making variations of this pie for years, and I’ve finally perfected the ratio of peanut butter to cream cheese to whipped cream that creates the most luxurious texture imaginable. The key is using creamy, high-quality peanut butter (not the natural kind with oil separation) and ensuring all your ingredients are at room temperature before you start mixing. This prevents lumps and ensures a perfectly smooth filling that will have everyone asking for seconds.
Whether you’re planning a casual weeknight dessert or a special occasion showstopper, this no-bake peanut butter pie recipe is absolutely foolproof. The best part? You can prepare it ahead of time, which means less stress on the day you’re serving it. I love making this for potlucks because it transports beautifully, and the presentation always impresses, even though everyone will swear you spent hours in the kitchen.
The Bon Appétit approach to no-bake desserts emphasizes quality ingredients and proper technique, and this recipe follows those principles perfectly. You’ll notice that this pie uses both cream cheese and peanut butter for depth of flavor—the tanginess of the cream cheese balances the richness of the peanut butter beautifully. If you’re a peanut butter lover like me, you’ll be obsessed with how this filling tastes like an elevated version of your favorite childhood treat.
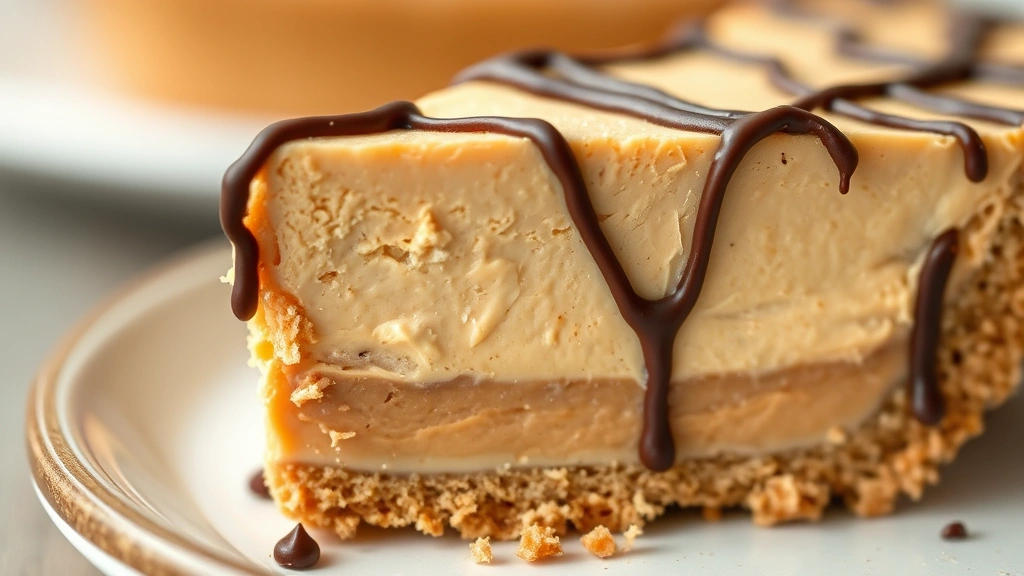
One of my favorite things about this recipe is how versatile it is. You can dress it up with chocolate shavings, add a drizzle of melted chocolate on top, or even swirl in some chocolate ganache for chocolate peanut butter lovers. Some people love adding a layer of fudge sauce before the filling, while others prefer to keep it classic and simple. The graham cracker crust is forgiving and can be customized too—some people use chocolate graham crackers or add a touch of cinnamon for extra warmth.
For the ultimate presentation, I recommend serving this pie with a dollop of fresh whipped cream and a sprinkle of crushed peanuts on top. The textural contrast between the smooth filling and the crunchy toppings is absolutely divine. You could also drizzle it with a silky chocolate sauce for an extra touch of elegance that makes it feel restaurant-quality.
This recipe makes enough for 8-10 generous slices, which makes it perfect for feeding a crowd without requiring multiple pies. The pie actually keeps well in the refrigerator for up to three days, though I can promise it won’t last that long once people get a taste of it. If you want to make it even further ahead, you can freeze the unbaked crust and filling separately, then assemble and chill right before serving.
I’ve tested this recipe dozens of times with different brands of peanut butter, different types of graham crackers, and various ratios of ingredients, and I’m confident this is the formula that delivers the most consistently delicious results. The New York Times cooking section often emphasizes the importance of precision in baking, and while this is more straightforward than traditional baking, accurate measurements still matter for achieving that perfect creamy texture.
One pro tip I always share: make sure your mixing bowl and beaters are clean and dry before whipping the cream. Any trace of water or fat can prevent the cream from whipping to the proper consistency. Similarly, ensure your peanut butter is at room temperature so it mixes smoothly without lumps. These small details are what separate an okay pie from an absolutely spectacular one.
The beauty of this no-bake dessert approach is that it’s perfect for any season or occasion. Make it for summer potlucks, holiday gatherings, or just because it’s Tuesday and you want something delicious. Your family will love you for it, and you’ll love how easy it is to make. Trust me, this recipe is about to become a permanent fixture in your dessert rotation!
Ingredients
- 1 1/2 cups graham cracker crumbs (about 12 full crackers)
- 1/4 cup granulated sugar
- 6 tablespoons unsalted butter, melted
- 8 ounces cream cheese, softened to room temperature
- 1 cup creamy peanut butter, at room temperature
- 1 cup powdered sugar
- 1 teaspoon vanilla extract
- 2 cups heavy whipping cream, cold
- 3 tablespoons granulated sugar for whipping cream
- Pinch of salt
- Chocolate shavings or crushed peanuts for topping (optional)
- Chocolate sauce for drizzling (optional)

Instructions
- Make the crust by combining graham cracker crumbs, 1/4 cup granulated sugar, and melted butter in a medium bowl, stirring until the mixture resembles wet sand.
- Press the mixture firmly into a 9-inch pie dish, making sure to coat the bottom and sides evenly. Use the bottom of a measuring cup to help pack it down.
- Place the crust in the freezer while you prepare the filling.
- In a large mixing bowl, beat the softened cream cheese on medium speed for about 2 minutes until it’s completely smooth and creamy.
- Add the room-temperature peanut butter to the cream cheese and beat on medium speed for 2-3 minutes, scraping down the sides of the bowl as needed, until fully combined and no streaks remain.
- Add the powdered sugar, vanilla extract, and a pinch of salt to the peanut butter mixture and beat on medium speed for 2 minutes until the filling is light and fluffy.
- In a separate bowl, pour the cold heavy whipping cream and add 3 tablespoons granulated sugar.
- Beat the cream on high speed for 2-3 minutes, starting at medium speed and increasing to high, until stiff peaks form. Do not overbeat or the cream will turn to butter.
- Gently fold the whipped cream into the peanut butter mixture in two additions using a spatula, being careful not to deflate the whipped cream. Fold just until combined.
- Remove the crust from the freezer and pour the peanut butter filling into it, smoothing the top with a spatula.
- Refrigerate the pie for at least 4 hours, or preferably overnight, until the filling is completely set and chilled.
- Before serving, top with chocolate shavings, crushed peanuts, or a drizzle of chocolate sauce if desired.
- Slice with a hot, clean knife, wiping the knife clean between each slice for neat presentation.
- Serve immediately and store any leftovers covered in the refrigerator for up to 3 days.
Pro Tips
Do not use natural peanut butter with separated oil on top, as it will result in a greasy, unstable filling. Stick with creamy peanut butter from brands like Jif or Skippy.
When folding the whipped cream into the peanut butter mixture, work gently and carefully. You want to maintain as much of the whipped cream’s volume as possible to keep the filling light and airy.
For a no-fail whipped cream, make sure your bowl and beaters are completely clean and dry. Even a tiny amount of grease or water will prevent the cream from whipping properly.
This pie can be made up to one day in advance, making it perfect for entertaining. Simply cover it with plastic wrap and refrigerate until you’re ready to serve.
You can customize the crust by using chocolate graham crackers, adding a tablespoon of cinnamon to the crumbs, or even using crushed vanilla wafers instead.
For a chocolate peanut butter pie, add a layer of chocolate ganache to the crust before adding the filling, or drizzle melted chocolate over the top before serving.
If your filling seems too soft after 4 hours, refrigerate for an additional 1-2 hours. Some kitchens run warmer than others, affecting setting time.
To slice the pie neatly, dip your knife in hot water and wipe it clean between each cut. This creates smooth, professional-looking slices.
Leftovers can be frozen in an airtight container for up to two weeks. Thaw in the refrigerator before serving.