
There’s something absolutely magical about a perfectly roasted beef chuck that fills your kitchen with the most wonderful aromas and delivers fork-tender, melt-in-your-mouth results. This oven roasted beef chuck recipe is truly a game-changer for weeknight dinners and special occasions alike. I’m sharing my absolute favorite method that’s been perfected over years of cooking for my family and friends.
Beef chuck is one of my go-to cuts because it’s incredibly flavorful, budget-friendly, and transforms into something absolutely spectacular when roasted low and slow. The key to achieving that restaurant-quality tenderness is understanding the science behind the cooking process and not rushing it. When you roast chuck at the right temperature with patience and love, the collagen breaks down into gelatin, creating that luxurious, silky texture that makes everyone ask for seconds.
This recipe is versatile enough to serve alongside classic comfort sides like mashed potatoes and roasted vegetables, or you can shred it for sandwiches, tacos, or hearty grain bowls. I often pair mine with a simple pickled red onion recipe for brightness, or serve it over creamy pasta like my best heavy cream alfredo sauce recipe. The beauty of this preparation is that it’s not complicated—it just requires good ingredients, proper seasoning, and time in the oven.
What makes this beef chuck roast recipe different from others is the emphasis on proper searing, which develops incredible flavor through the Maillard reaction, combined with aromatic vegetables that create a rich, savory braising liquid. I’ve also included tips for achieving a beautiful caramelized exterior while keeping the interior incredibly tender and juicy. According to Serious Eats, understanding the importance of resting your meat is crucial, and I’ll explain exactly why.
Whether you’re planning a dinner party or a cozy family meal, this oven roasted beef chuck will absolutely impress. The preparation is straightforward enough for weeknight cooking, yet elegant enough for entertaining. I promise that once you master this technique, you’ll be making it regularly. The combination of tender beef, caramelized vegetables, and rich, flavorful pan juices creates a dish that’s nothing short of extraordinary. Let me walk you through every step to ensure your success!
Ingredients
- 4-5 pound beef chuck roast, trimmed of excess fat
- 2 tablespoons kosher salt
- 1 tablespoon freshly ground black pepper
- 2 tablespoons garlic powder
- 1 tablespoon onion powder
- 1 tablespoon dried thyme
- 1 teaspoon paprika
- 3 tablespoons olive oil
- 4 medium carrots, cut into 2-inch pieces
- 4 medium potatoes, cut into 2-inch chunks
- 1 large onion, cut into quarters
- 6 cloves fresh garlic, minced
- 2 cups beef broth
- 1 cup red wine (optional, can substitute with more broth)
- 2 tablespoons tomato paste
- 3 sprigs fresh rosemary
- 3 sprigs fresh thyme
- 2 bay leaves
- 1 tablespoon Worcestershire sauce
- 1 tablespoon balsamic vinegar

Instructions
- Remove your beef chuck roast from the refrigerator 30-45 minutes before cooking to bring it closer to room temperature. This ensures more even cooking throughout the meat.
- Preheat your oven to 325 degrees Fahrenheit. Position the oven rack in the lower-middle position to ensure even heat distribution.
- Pat the beef chuck roast completely dry with paper towels. Moisture is the enemy of browning, so take time to ensure every surface is dry.
- In a small bowl, combine kosher salt, black pepper, garlic powder, onion powder, dried thyme, and paprika. Mix thoroughly to create an even seasoning blend.
- Season all sides of the beef chuck roast generously with your spice mixture, rubbing it into the meat and pressing gently so it adheres well.
- Heat 3 tablespoons of olive oil in a large Dutch oven or heavy-bottomed pot over medium-high heat until it’s shimmering and just beginning to smoke.
- Carefully place the seasoned beef chuck roast into the hot oil. Do not move it for 4-5 minutes to allow a deep brown crust to develop on the bottom.
- Using tongs, flip the beef chuck and sear the other side for another 4-5 minutes until deeply browned. Sear the edges and any remaining sides for 2-3 minutes each.
- Transfer the seared beef chuck to a large plate and set aside temporarily. Do not clean the pot—those browned bits are liquid gold for flavor.
- Add the chopped onion, carrot pieces, and potato chunks to the same pot. Sauté for 5 minutes, stirring occasionally, until the vegetables begin to soften and develop some color.
- Add the minced fresh garlic to the vegetables and cook for 1-2 minutes, stirring constantly, until fragrant.
- Stir in the tomato paste and cook for 2 minutes, allowing it to caramelize slightly and deepen in color.
- Pour in the red wine (if using) and use a wooden spoon to scrape up all the browned bits from the bottom of the pot. Let this simmer for 2-3 minutes to reduce slightly.
- Add the beef broth, Worcestershire sauce, and balsamic vinegar to the pot, stirring to combine everything well.
- Return the seared beef chuck roast to the pot, nestling it among the vegetables. The liquid should come about halfway up the sides of the meat.
- Add the fresh rosemary sprigs, fresh thyme sprigs, and bay leaves to the pot for additional aromatic flavor.
- Cover the Dutch oven with a tight-fitting lid and transfer to the preheated 325-degree oven.
- Roast for 2.5 to 3 hours, checking at the 1.5-hour mark to ensure the liquid is simmering gently. If it’s boiling too vigorously, lower the oven temperature by 25 degrees.
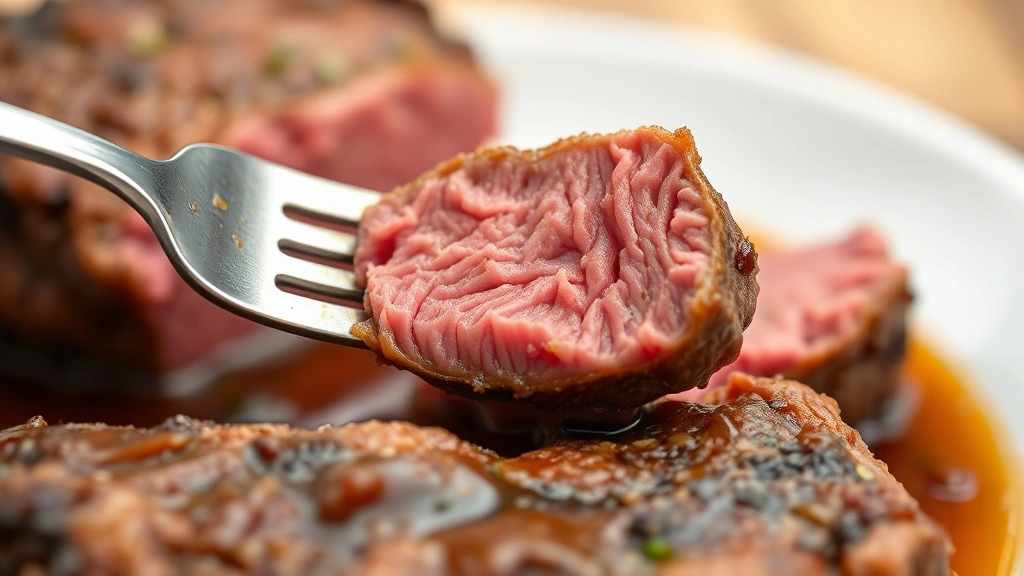
- The beef chuck is done when a fork easily pierces the meat and it pulls apart with minimal resistance. The internal temperature should reach 190-205 degrees Fahrenheit for maximum tenderness.
- Remove the pot from the oven and let the beef chuck rest in the braising liquid for 10-15 minutes before carving. This allows the juices to redistribute throughout the meat.
- Transfer the beef chuck to a cutting board using tongs and a meat fork. Tent loosely with foil to keep warm.
- Strain the braising liquid through a fine-mesh sieve into a saucepan, discarding the herb sprigs and bay leaves but keeping the vegetables.
- If desired, skim off any excess fat from the surface of the braising liquid using a fat separator or by tilting the pan and spooning off fat.
- Simmer the liquid over medium heat for 5-10 minutes to concentrate the flavors and create a rich, glossy sauce.
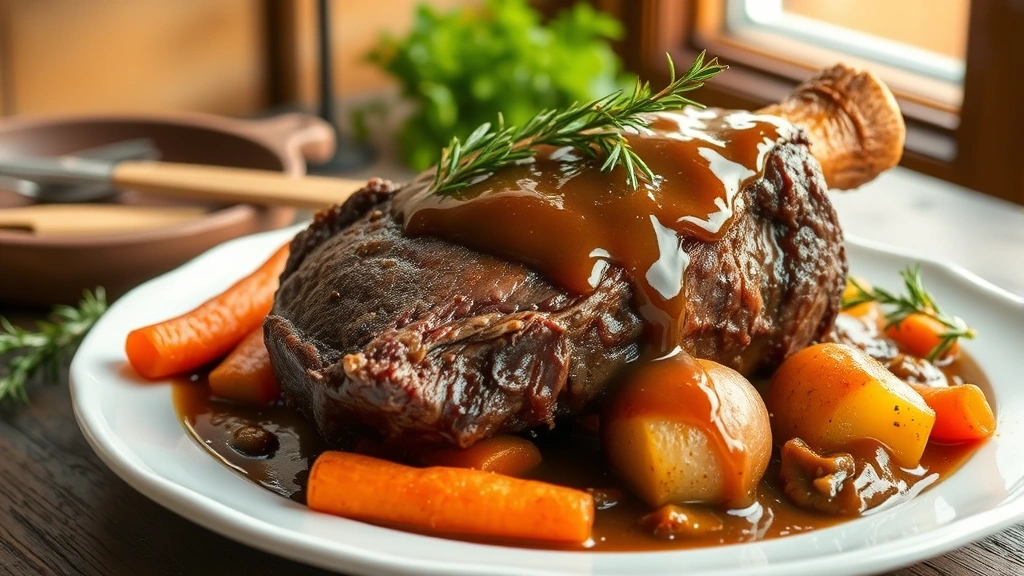
- Slice or shred the beef chuck roast according to your preference and serve on a platter surrounded by the roasted vegetables.
- Pour the warm braising liquid over the beef and vegetables just before serving, allowing the sauce to cascade over everything beautifully.
Pro Tips
Cut selection: Chuck roast is ideal for this recipe because it contains the perfect amount of marbling and connective tissue. Other suitable cuts include beef brisket, beef shoulder, or beef round, though cooking times may vary slightly depending on the exact cut chosen.
Wine selection: Use a wine you’d actually enjoy drinking. A medium-bodied red like Pinot Noir, Merlot, or Côtes du Rhône works beautifully. Avoid overly acidic wines or anything labeled as cooking wine, which contains added salt and preservatives.
Vegetable variations: Feel free to add or substitute vegetables based on availability and preference. Pearl onions, parsnips, celery, mushrooms, and Brussels sprouts all work wonderfully. Add harder vegetables at the beginning and softer ones halfway through cooking for optimal texture.
Leftover ideas: Shred any remaining beef chuck and use it for sandwiches, tacos, grain bowls, or even creamy pasta dishes. The braising liquid freezes beautifully for up to 3 months and makes an excellent base for soups and stews.
Braising liquid conservation: Don’t discard the flavorful braising liquid! Strain and refrigerate it for up to 5 days. It’s perfect for making beef gravy, enriching soups, or adding depth to other beef dishes throughout the week.
Temperature guidance: Invest in a reliable meat thermometer for guaranteed results. Beef chuck reaches its optimal tenderness at 190-205 degrees Fahrenheit, at which point the collagen has fully converted to gelatin. This differs from tender cuts like ribeye, which are best served at 130-135 degrees.
Searing importance: Don’t skip the searing step, even though it adds time. This crucial step develops the Maillard reaction, which creates complex, savory flavors that can’t be replicated any other way. It’s the difference between good and absolutely incredible.
Pot selection: A 5-7 quart Dutch oven is ideal for this recipe. The heavy construction ensures even heat distribution, and the tight-fitting lid traps steam for moist, tender results. A roasting pan with foil covering works in a pinch but doesn’t conduct heat quite as evenly.