
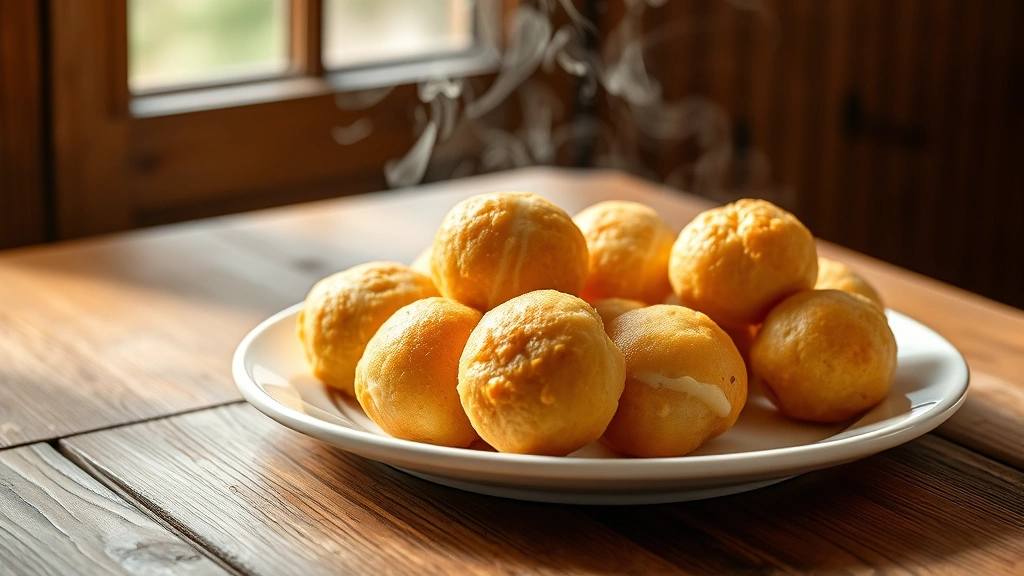
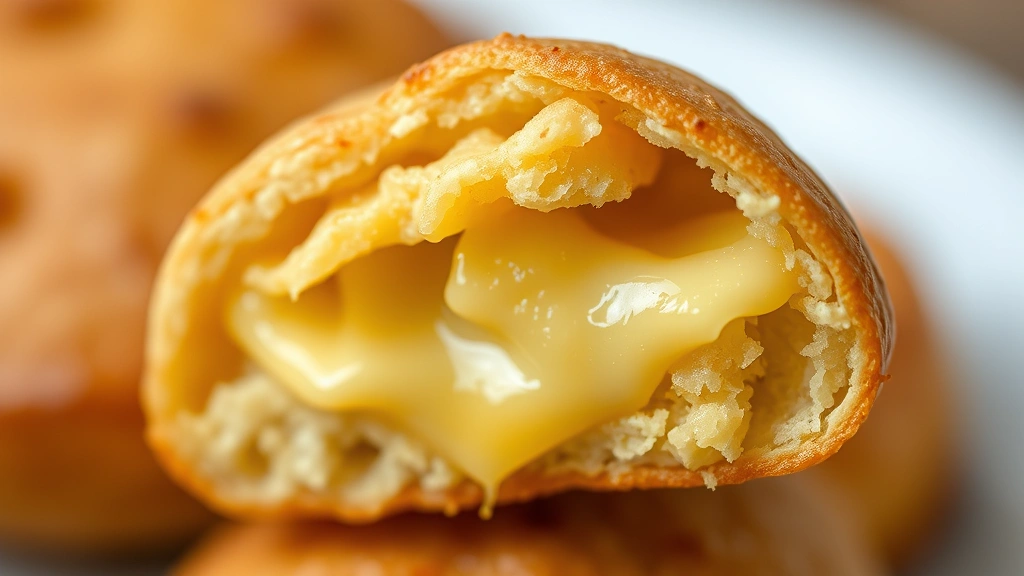
Pão de queijo, the beloved Brazilian cheese bread, is a revelation in every bite—crispy on the outside, wonderfully chewy on the inside, and bursting with melted cheese flavor. This traditional recipe has been passed down through generations and is a staple at Brazilian tables, bakeries, and celebrations. What makes pão de queijo so special is its unique texture, which comes from tapioca starch (also called tapioca flour), creating that signature chewy, almost gummy interior that’s completely gluten-free.
I discovered pão de queijo during a trip to Brazil, and I was immediately hooked. The combination of crispy exterior and creamy cheese interior is absolutely addictive. What I love most is how simple the ingredient list is—just a handful of pantry staples transform into something absolutely magical. These little bites are perfect for breakfast, afternoon snacks, or served alongside soups and stews.
The beauty of this recipe is that it comes together in about 30 minutes, and the results are restaurant-quality. Unlike many bread recipes that require extensive kneading and rising times, pão de queijo is quick and forgiving. You’ll be amazed at how a simple batter becomes these gorgeous, puffy cheese puffs in the oven.
If you’re looking to impress guests or simply want to elevate your snack game, this homemade bread recipe is a must-try. The combination of Gruyère and Parmesan creates depth of flavor, while the tapioca starch gives it that signature texture you can’t replicate with regular flour. Serve these warm straight from the oven, and watch everyone’s faces light up.
For more inspiration on cheese-forward recipes, this pão de queijo pairs beautifully with other Brazilian dishes. I often make a batch and freeze them for quick snacks throughout the week. You can also check out this appetizer collection for other crowd-pleasing options.
The secret to the BEST pão de queijo is using good quality cheese and not overmixing the batter. Unlike traditional bread doughs, you want a smooth, almost cake-batter consistency. The tapioca starch does most of the heavy lifting, creating that stretchy, chewy texture that makes pão de queijo so irresistible. For detailed techniques, Serious Eats has wonderful baking guides that explain the science behind bread textures.
These cheese puffs are naturally gluten-free, making them perfect for those with dietary restrictions. They’re also incredibly versatile—you can make them smaller for appetizers or larger for a more substantial snack. I’ve even seen creative variations with jalapeños, herbs, and different cheese combinations. The base recipe, however, remains timeless and perfect as-is.
What I appreciate most about pão de queijo is how it brings people together. In Brazil, these are shared at family gatherings, church events, and street markets. The aroma of warm cheese bread baking in the oven is absolutely irresistible. For more international recipes, Brazilian cuisine offers so much delicious inspiration.
Make a batch this weekend and experience why pão de queijo has captured hearts worldwide. Your kitchen will smell absolutely divine, and your family will be asking for seconds (and thirds!). Trust me, once you master this recipe, you’ll be making it constantly. For additional baking inspiration, Bon Appétit’s baking section has wonderful tips and tricks. You can also explore New York Times cooking for more global recipes.
Ingredients
- 1 cup whole milk
- 1/2 cup vegetable oil
- 1/2 teaspoon salt
- 1/4 teaspoon white pepper
- 2 cups tapioca starch (tapioca flour)
- 2 large eggs
- 1 cup Gruyère cheese, finely grated
- 3/4 cup Parmesan cheese, finely grated
- Pinch of nutmeg (optional but recommended)
Instructions
- Preheat your oven to 375°F (190°C). Line a baking sheet with parchment paper or grease a muffin tin well—pão de queijo can stick, so don’t skip this step.
- In a small saucepan, combine the milk, vegetable oil, salt, white pepper, and nutmeg if using. Heat over medium heat until steaming and small bubbles form around the edges, but do not boil. This should take about 3-4 minutes.
- Remove the milk mixture from heat and let it cool for about 2 minutes. You want it warm but not so hot that it will scramble the eggs.
- Pour the warm milk mixture into a blender or food processor. Add the tapioca starch gradually while blending on low speed, mixing until well combined and smooth. This creates the base of your pão de queijo batter.
- While the blender is running on low speed, add the eggs one at a time, allowing each to fully incorporate before adding the next. The mixture should become slightly lighter and smoother.
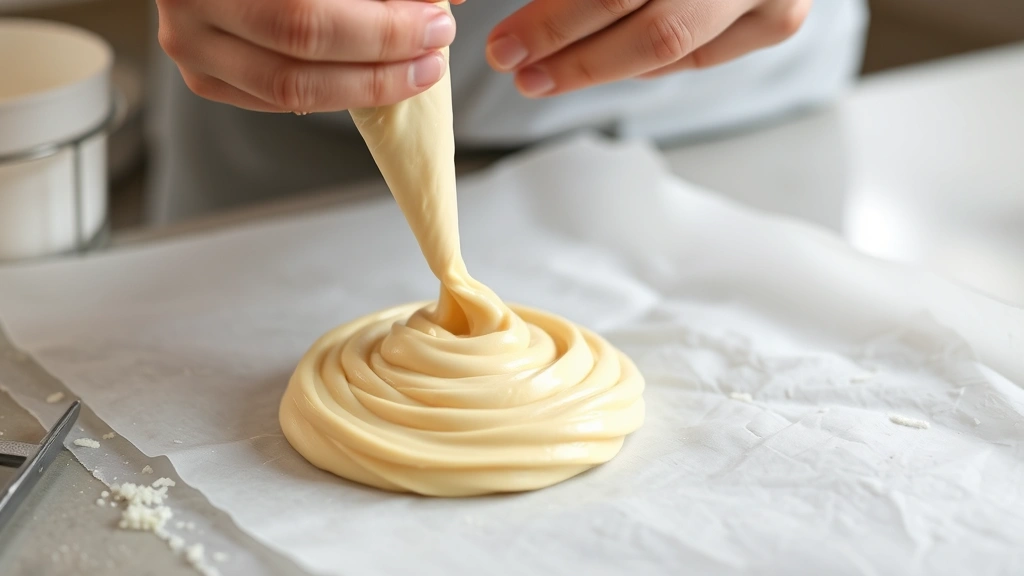
- With the blender still running on low, gradually add the grated Gruyère and Parmesan cheeses. Blend until the mixture is completely smooth and creamy, scraping down the sides as needed. Do not overmix—you’re looking for a smooth, pudding-like consistency.
- Transfer the batter to a piping bag fitted with a large round tip, or use two spoons to portion the batter. If using a piping bag, this makes uniform, professional-looking pão de queijo.
- Pipe or spoon the batter onto your prepared baking sheet, leaving about 2 inches between each piece. You should have 12-15 individual puffs. Alternatively, you can bake them in a greased muffin tin, filling each cup about three-quarters full.
- Bake in the preheated oven for 18-22 minutes, until the pão de queijo is puffed, golden brown on top, and slightly crispy on the outside. The tops should be a beautiful golden-brown color.
- Remove from the oven and let cool for 2-3 minutes on the baking sheet. These are best served warm, while the cheese is still melted and gooey inside.
- Transfer to a serving plate and enjoy immediately. If making ahead, store in an airtight container and reheat in a 300°F oven for 5 minutes to restore crispiness.
Pro Tips
- Tapioca starch is essential for the signature texture—don’t substitute with regular flour or cornstarch, as it won’t create the same chewy interior. Find it in the baking aisle or international section of most grocery stores.
- Cheese quality matters significantly. Use good quality Gruyère and Parmesan that you grate yourself from whole blocks. Pre-shredded cheese contains anti-caking agents that can affect texture.
- The batter should be smooth and creamy, similar to cake batter or pudding. If it seems too thick, add a tablespoon of milk at a time until you reach the right consistency.
- Don’t overmix the batter once the cheese is added. Unlike bread dough, you’re not developing gluten (there isn’t any!). Overmixing can make the final product dense rather than light and chewy.
- These are best served warm from the oven when the cheese is still melted and gooey. However, they’re still delicious at room temperature.
- Make-ahead option: Prepare the batter and refrigerate in an airtight container for up to 24 hours. Bring to room temperature before baking, or add 2-3 minutes to baking time if baking straight from the fridge.
- Freezer-friendly: Bake completely, cool, then freeze in an airtight container for up to 3 months. Reheat at 300°F for 8-10 minutes until warmed through and crispy.
- Variations: Add fresh herbs like rosemary or thyme, crispy bacon bits, or jalapeños for flavor variations. Keep additions to about 1/4 cup total to maintain the proper texture.
- If using a muffin tin, the baking time may be slightly longer (20-25 minutes) since the batter is more contained. Watch for golden-brown tops.
- White pepper is preferred over black pepper as it blends seamlessly into the batter without visible specks, but black pepper works fine if that’s what you have.
- The oil can be any neutral oil—vegetable, canola, or light olive oil all work beautifully.
- For a richer version, use half-and-half instead of whole milk, or add an extra egg yolk.
- These naturally gluten-free puffs are perfect for anyone avoiding gluten, making them an excellent addition to your gluten-free baking repertoire.