
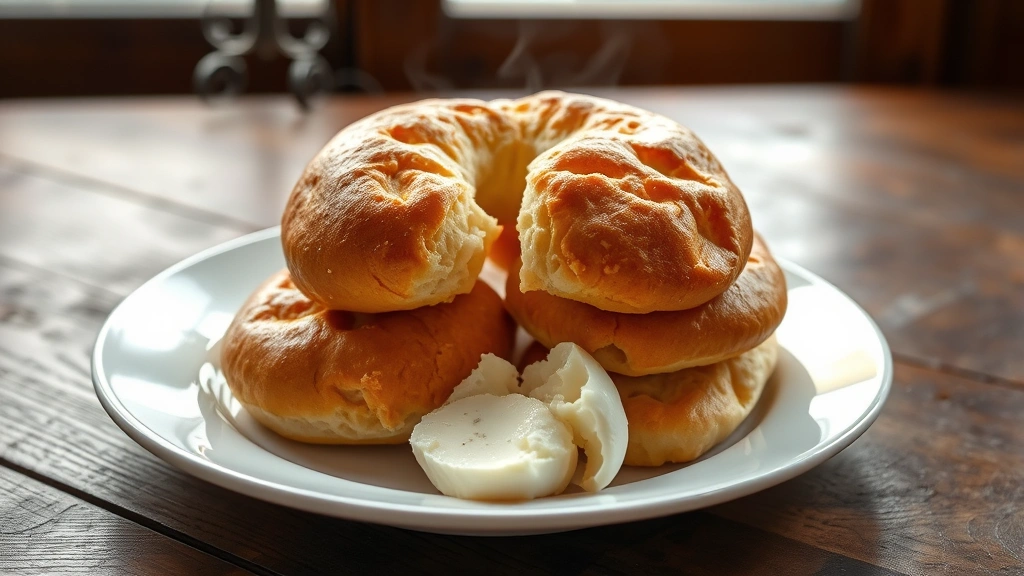
Pan de Bono is a delightful Colombian cheese bread that’s crispy on the outside and wonderfully chewy on the inside—absolutely irresistible! This traditional treat combines simple ingredients like cheese, cornstarch, and eggs to create something truly magical. Whether you’re looking for an authentic Latin American snack or a crowd-pleasing appetizer, this pan de bono recipe delivers bakery-quality results right from your own kitchen.
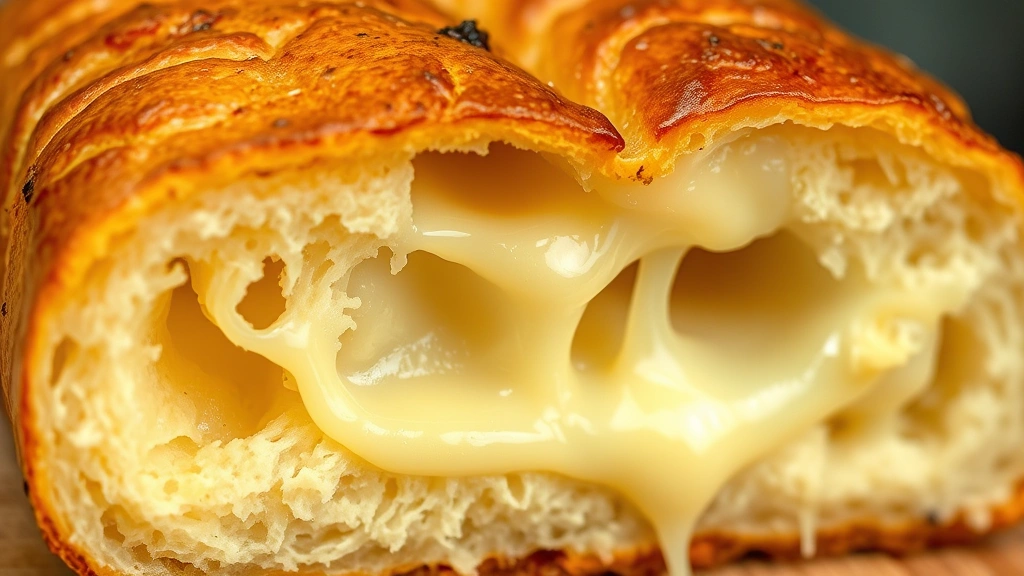
What makes pan de bono so special is its unique texture. The combination of cornstarch and cheese creates that signature chewy interior while the exterior gets beautifully golden and crispy during frying. It’s similar to other Latin American cheese breads, but pan de bono has its own distinctive charm that keeps people coming back for more.
I grew up watching my abuela make these golden pockets of cheesy goodness, and now I’m thrilled to share her secrets with you. The beauty of this recipe is that it’s actually quite simple—you don’t need any fancy equipment or hard-to-find ingredients. Most of what you need is probably already in your pantry!
These pan de bono are perfect served warm with a hot cup of coffee or hot chocolate for breakfast, or as an appetizer at your next gathering. They’re also fantastic as a snack with your favorite dipping sauce. If you love cheese and carbs (and who doesn’t?), you absolutely need to try this recipe. For more Latin-inspired dishes, check out our Quick Tasty Bacon Carbonara Recipe or explore classic comfort foods like our Easy Chicken Alfredo Recipe.
The key to success with pan de bono is using good quality cheese—fresh mozzarella or queso fresco works beautifully. The cheese should be slightly sticky and pliable so it incorporates smoothly into the dough. Don’t skip the resting time either; this allows the flavors to meld together and makes the dough much easier to work with. Many bakers also swear by using a combination of cream-based ingredients to enhance the richness of their cheese breads.
One thing I love about making pan de bono at home is that you can customize them to your taste. Some people add a pinch of paprika or garlic powder to the dough for extra flavor. Others prefer them plain and simple to let the cheese shine through. I’ve even seen versions with jalapeños mixed in for a spicy kick! The beauty is that once you master the basic technique, you can play around with flavors to create your perfect version.
For frying, make sure your oil is at the right temperature—around 350°F is ideal. If it’s too hot, the outside will burn before the inside cooks through. If it’s too cool, you’ll end up with greasy, soggy pan de bono. An instant-read thermometer takes the guesswork out of this step. You can also test the temperature by dropping a small piece of dough into the oil; it should sizzle immediately and rise to the surface within a few seconds.
When you first try this recipe, you might be amazed at how the dough comes together. The cornstarch is crucial here—it gives pan de bono that distinctive slightly grainy but incredibly chewy texture that sets it apart from regular bread. Some recipes use all-purpose flour, but I find the cornstarch creates that authentic texture you’re looking for.
Serving your pan de bono warm is absolutely essential. They’re best enjoyed within a few hours of frying, while they’re still crispy outside and soft inside. If you need to make them ahead, you can prepare the dough the night before and fry them fresh the next day. Store any leftovers in an airtight container at room temperature for up to two days, then reheat them in a 350°F oven for about 5 minutes to restore the crispiness.
Pan de bono pairs wonderfully with savory accompaniments. Try serving them with rich cream sauces or alongside fresh salsas and guacamole. They’re also delicious with a simple tomato dipping sauce or even a cheese sauce for extra indulgence. For a lighter option, pair them with a fresh fruit salsa or a simple lime crema.
If you’re planning to serve these for a party or gathering, here’s a pro tip: you can make the dough balls ahead of time and refrigerate them for up to 24 hours. When you’re ready to serve, simply fry them directly from the refrigerator—no thawing needed. This makes entertaining so much easier because you can have these golden cheese pockets ready to fry at a moment’s notice.
The health-conscious might wonder about the frying aspect of this recipe. While pan de bono are definitely an indulgence, they’re meant to be enjoyed in moderation as a special treat. If you’re looking for lighter cheese bread options, consider checking out recipes that use fresh vegetable accompaniments to balance out richer foods.
For more inspiration and detailed techniques on bread-making and cheese preparations, check out resources like Serious Eats and New York Times Cooking. You can also find excellent variations and expert tips on Bon Appétit.
Making pan de bono is truly a labor of love, and the reward is absolutely worth it. These golden, cheesy bites will transport you straight to a Colombian bakery and have everyone asking for your secret recipe. I can’t wait for you to experience the joy of biting into warm, fresh pan de bono—crispy outside, wonderfully chewy inside, and absolutely loaded with melty cheese. This is comfort food at its finest!
Ingredients
- 2 cups fresh mozzarella cheese (or queso fresco), shredded
- 1 1/2 cups cornstarch
- 1/2 cup all-purpose flour
- 1 tablespoon granulated sugar
- 1 teaspoon salt
- 1/2 teaspoon ground white pepper
- 3 large eggs
- 1/4 cup whole milk
- 2 tablespoons butter, melted
- Oil for frying (vegetable, canola, or peanut oil)
- Optional: 1/4 teaspoon garlic powder for extra flavor
Instructions
- In a large mixing bowl, combine the cornstarch, all-purpose flour, sugar, salt, and white pepper. Whisk these dry ingredients together until well combined and there are no lumps.
- In a separate bowl, beat together the 3 eggs and milk until fully incorporated and slightly frothy.
- Pour the egg mixture into the dry ingredients and stir with a wooden spoon or sturdy spatula until a thick, sticky dough begins to form.
- Add the melted butter and mix thoroughly until the dough is smooth and cohesive.
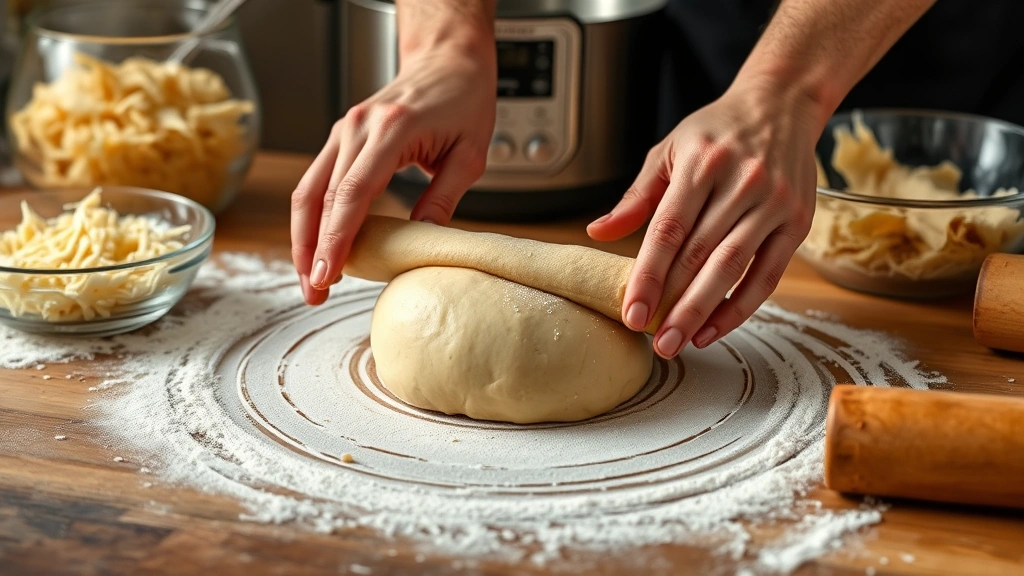
- Fold in the shredded mozzarella cheese gently but thoroughly, making sure the cheese is evenly distributed throughout the dough. The dough should now be thick and slightly tacky.
- Let the dough rest at room temperature for 5-10 minutes. This resting period allows the cornstarch to absorb moisture and makes the dough much easier to handle.
- Fill a deep pot or heavy-bottomed saucepan with about 2-3 inches of oil. Heat the oil to 350°F, using an instant-read thermometer to monitor the temperature accurately.
- While the oil heats, prepare a baking sheet lined with paper towels for draining the fried pan de bono.
- Once the oil reaches the correct temperature, carefully scoop the dough using a tablespoon or small ice cream scoop. Roll each portion between your palms to form smooth, compact balls about the size of a ping-pong ball.
- Gently place the first dough ball into the hot oil. It should immediately sizzle and begin to sink, then rise to the surface within 2-3 seconds.
- Fry 4-5 pan de bono at a time, being careful not to overcrowd the pan. Overcrowding will lower the oil temperature and result in greasy, soggy pan de bono.
- Fry each batch for about 3-4 minutes total, turning them frequently with a slotted spoon or spider strainer to ensure even golden browning on all sides.
- When the pan de bono are deeply golden brown and crispy-looking, remove them from the oil using a slotted spoon and place them on the prepared paper towel-lined baking sheet.
- Allow the first batch to drain while you continue frying the remaining dough in batches, being careful to maintain the oil temperature at 350°F throughout.
- Once all pan de bono are fried and drained, transfer them to a serving platter. They’re best enjoyed warm, so serve them immediately while they’re still crispy on the outside and creamy on the inside.
- If you need to keep them warm while finishing all batches, place finished pan de bono in a 200°F oven on a baking sheet.
Pro Tips
- **Cheese selection is crucial**: Use fresh mozzarella or traditional queso fresco for the most authentic pan de bono. Avoid aged hard cheeses as they won’t melt properly into the dough. If fresh mozzarella is too wet, pat it dry with paper towels before shredding.
- **Oil temperature matters more than you think**: Invest in a reliable instant-read thermometer. Oil that’s too hot will burn the outside before the inside cooks, while oil that’s too cool results in greasy, heavy pan de bono that absorbs excess oil.
- **Make-ahead tip**: You can prepare the dough up to 24 hours in advance and refrigerate it in an airtight container. The dough actually becomes easier to scoop after chilling. Fry directly from the refrigerator without thawing for best results.
- **Freezing instructions**: Unbaked dough balls can be frozen on a baking sheet for up to 3 months. Fry directly from frozen, but add 1-2 minutes to the cooking time. Fully cooked pan de bono can be frozen for up to 2 months; reheat in a 350°F oven for 5-7 minutes.
- **Flavor variations**: Add 1/4 teaspoon garlic powder, 1/4 teaspoon paprika, or even finely diced jalapeños to the dough for different flavor profiles. Some people also add a pinch of nutmeg for subtle warmth.
- **Dipping sauce ideas**: Serve with fresh lime crema, chimichurri sauce, garlic aioli, or simple tomato sauce. For breakfast versions, pair with hot chocolate or coffee.
- **Preventing soggy pan de bono**: Never skip the paper towel draining step. For extra crispness, you can place drained pan de bono in a warm oven for 5 minutes on a wire rack to allow air circulation underneath.
- **Scaling the recipe**: This recipe doubles easily if you’re hosting a crowd. Just double all ingredients and fry in batches. The dough keeps well during this process.
- **Best served immediately**: Pan de bono are most delicious within 2 hours of frying while they still have that prized contrast between crispy exterior and creamy interior. After 24 hours, they begin to soften significantly.
- **Storage method**: Keep leftovers in an airtight container at room temperature for up to 2 days. Reheat in a 350°F oven rather than a microwave to restore the crispy exterior.