
There’s something magical about recreating the whimsical desserts from Paper Mario: The Thousand-Year Door! This show-stopping cake brings the charm and wonder of the beloved video game to your kitchen. Whether you’re a devoted TTYD fan or simply looking for a spectacular layered cake that’s sure to impress, this recipe delivers both visual appeal and delicious flavor.
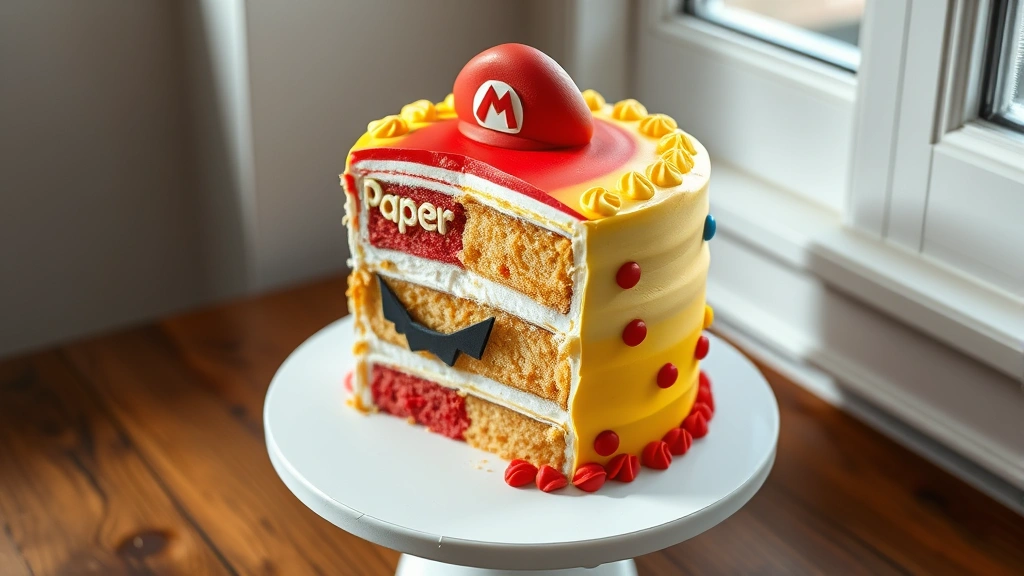
Inspired by the game’s colorful aesthetic and the delightful food themes throughout the adventure, this cake features vibrant colors, playful decoration, and layers of rich vanilla and chocolate that would make any RPG fan swoon. The design captures that iconic Paper Mario charm with its paper-like texture details and stacked, dimensional presentation that mirrors the game’s signature paper-craft art style.
What makes this cake truly special is how it combines classic baking techniques with creative, whimsical decoration. You’ll create multiple cake layers, each one perfectly moist and tender, then stack them with silky frosting and eye-catching fondant work. The result is a centerpiece that looks like it jumped straight out of Peach’s Castle kitchen and onto your dessert table.
This recipe is perfect for game night celebrations, birthday parties for TTYD enthusiasts, or whenever you want to bring a little extra joy and personality to your baking. Don’t worry if you’ve never worked with fondant before—we’ll walk you through every step to ensure success. The combination of techniques used here will also give you skills you can apply to other creative cake projects. For additional frosting inspiration, check out our best cream sauce techniques for understanding rich, smooth textures. You might also enjoy exploring our heavy cream applications to understand how to work with luxurious dairy elements in your kitchen.
While this cake does require some time and attention to detail, the process is broken into manageable stages that you can spread across two days if needed. Bake your layers one day, prepare your frosting and decorations the next, then assemble everything when you’re ready. This approach makes the project feel less daunting and ensures each component gets the attention it deserves.
The flavor profile balances sweetness with depth, using quality vanilla and chocolate to create layers of taste that complement rather than overwhelm. The frosting is silky and pipeable, perfect for creating decorative details, while the fondant provides structure and that professional, polished appearance that makes this cake truly special.
For those looking to add savory contrast to their celebration menu, consider our quick bacon carbonara or pickled red onions recipe as appetizers before dessert. You might also check out external resources like Bon Appétit’s layer cake guide for additional layering techniques and Serious Eats’ frosting mastery for professional finishing touches.
The beauty of this cake lies in its adaptability—you can adjust the colors to match your favorite Paper Mario characters, experiment with different flavor combinations, or simplify the decoration to suit your skill level. What matters most is the love and creativity you pour into this project. Your fellow TTYD fans will absolutely adore this tribute dessert, and the memories created while sharing it will be just as sweet as the cake itself.
Ingredients
- 2 3/4 cups all-purpose flour
- 2 1/2 teaspoons baking powder
- 1/2 teaspoon baking soda
- 1/2 teaspoon salt
- 1/2 cup unsalted butter, softened
- 1/2 cup vegetable oil
- 1 1/2 cups granulated sugar
- 3 large eggs, room temperature
- 1 cup sour cream, room temperature
- 1/4 cup whole milk
- 2 teaspoons vanilla extract
- 1/2 cup unsweetened cocoa powder for chocolate layer
- 1/2 cup hot water for chocolate layer
- 1 cup unsalted butter, softened (for frosting)
- 4 cups powdered sugar
- 1/4 cup heavy cream
- 1 tablespoon vanilla extract (for frosting)
- Red, yellow, and blue gel food coloring
- 2 pounds fondant (store-bought or homemade)
- Cornstarch for dusting
- 1/4 cup seedless raspberry jam
- Edible gold dust (optional)
- Toothpicks and cake decorating tools
Instructions
- Preheat your oven to 350°F (175°C). Grease and flour three 8-inch round cake pans, or line the bottoms with parchment paper for easier removal.
- In a medium bowl, whisk together flour, baking powder, baking soda, and salt. Set this dry mixture aside.
- In a large mixing bowl, combine softened butter and oil. Beat together on medium speed for about 2 minutes until well incorporated.
- Add sugar to the butter mixture and beat on medium-high speed for 3-4 minutes until the mixture is light and fluffy, scraping down the bowl occasionally.
- Add eggs one at a time, beating well after each addition to fully incorporate and create an emulsified mixture.
- In a separate small bowl, whisk together sour cream, milk, and vanilla extract until smooth.
- Alternate adding the dry ingredients and sour cream mixture to the butter mixture, beginning and ending with the dry ingredients. Mix on low speed and do not overmix—stir just until combined after each addition.
- Divide the batter evenly among your prepared pans, smoothing the tops with a spatula.
- Bake for 30-35 minutes, until a toothpick inserted in the center comes out clean or with just a few moist crumbs.
- Remove cakes from the oven and let them cool in the pans for 10 minutes, then turn them out onto wire racks to cool completely.
- Once cakes are completely cool, level them if needed by carefully slicing off any dome with a serrated knife to create flat surfaces for stacking.
- Prepare the frosting by beating softened butter in a large bowl on medium speed for 2-3 minutes until creamy and pale.
- Gradually add powdered sugar, one cup at a time, beating well after each addition to incorporate air and prevent lumps.
- Add heavy cream and vanilla extract, then beat on medium-high speed for 2-3 minutes until the frosting is light, fluffy, and spreadable.
- Divide the frosting into separate bowls and tint each portion with gel food coloring to create your Paper Mario color palette—try vibrant red, cheerful yellow, and sky blue to match the game’s aesthetic.
- Place your first cake layer on a cake board or serving plate, and secure it with a small dollop of frosting underneath.
- Spread a thin layer of frosting (about 1/4 inch thick) over the first cake layer, then add a thin layer of raspberry jam for flavor and visual appeal.
- Place the second cake layer on top and repeat with frosting and jam.
- Top with the third cake layer and ensure all three layers are properly aligned and stable.
- Apply a crumb coat—a thin layer of frosting all over the outside of the stacked cake—to seal in crumbs. Refrigerate for 15-20 minutes.
- Apply the final coat of frosting, using an offset spatula or butter knife to create smooth sides and a level top.
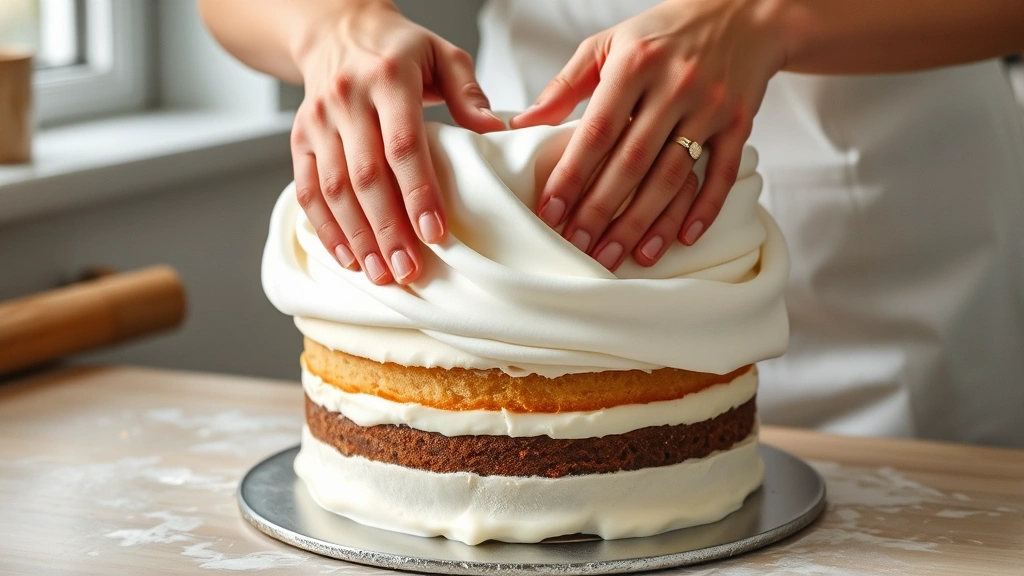
- Roll out your fondant on a cornstarch-dusted surface to about 1/8-inch thickness, large enough to cover the entire cake.
- Carefully drape the fondant over the frosted cake, smoothing gently from the top down to avoid air bubbles and creating clean, paper-like folds that reference Paper Mario’s aesthetic.
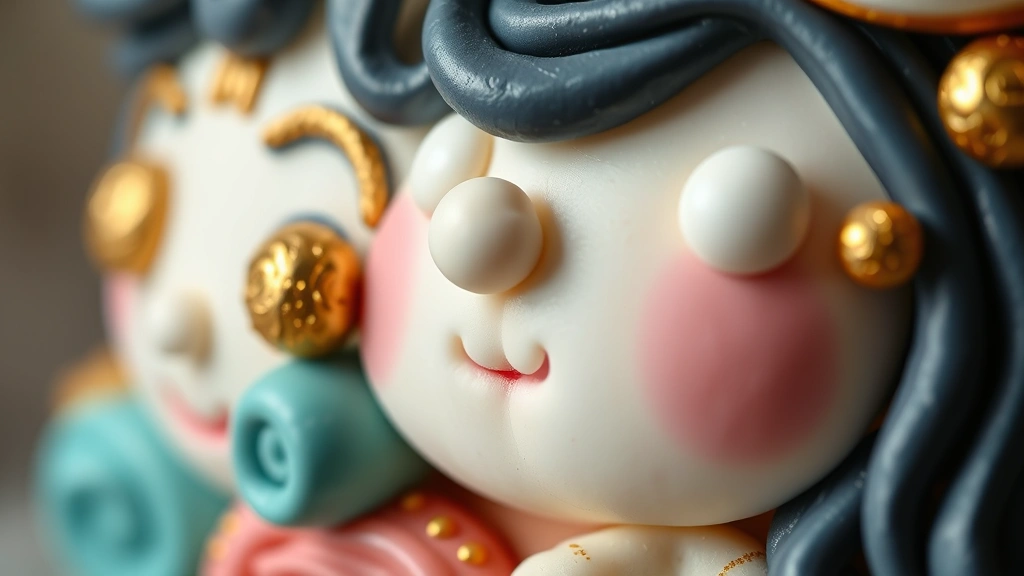
- Use fondant scraps tinted in contrasting colors to create decorative elements like eyes, mouths, or game-inspired designs, attaching them with a small brush dipped in water.
- If desired, brush edible gold dust over select fondant details to create a magical, storybook quality.
- Let the finished cake rest at room temperature for at least 30 minutes before serving to allow the fondant to set properly.
- Slice with a sharp, warm knife (wipe between cuts with a hot, damp cloth) for clean, beautiful slices.
Pro Tips
- **Make-Ahead Strategy:** You can bake your cake layers up to two days in advance and store them wrapped in plastic wrap at room temperature, or freeze them for up to one month. Thaw completely before assembly.
- **Fondant Handling Tips:** If your fondant becomes too soft while working, chill it briefly in the refrigerator. If it cracks, use a small brush with a tiny bit of water to smooth the cracks back together. Cornstarch prevents sticking but can create a dull finish—brush away excess with a soft, dry brush.
- **Color Customization:** Match your cake colors to your favorite Paper Mario characters! Use purple and orange for Vivian, green for Bonetail, or multicolored sections to represent the different chapters of the game.
- **Frosting Consistency:** If your frosting seems too soft, chill it for 10-15 minutes before applying. If it’s too thick, add cream one tablespoon at a time until you reach spreadable consistency.
- **Cake Stability:** Ensure your cake layers are completely cool before frosting to prevent melting. Use leveled, flat layers to ensure stability—uneven layers can cause the cake to slide.
- **Decoration Details:** Create fondant decorations in advance and let them dry on parchment paper for several hours or overnight before attaching them to the cake. This ensures they hold their shape.
- **Serving Suggestions:** This cake pairs beautifully with vanilla ice cream or fresh whipped cream. You might also serve it alongside our best chickpea salad recipe for a game-day spread, or our best shishito peppers recipe as a savory appetizer.
- **Storage:** Cover leftover cake and refrigerate for up to 4 days. The fondant exterior helps keep the cake fresh and moist.
- **Skill Building:** This recipe teaches valuable techniques including cake leveling, crumb coating, fondant application, and decorative piping—all transferable to other baking projects.
- **Troubleshooting:** If your cake sinks in the middle, your oven temperature may be inaccurate—invest in an oven thermometer. If the frosting is grainy, you may have added powdered sugar too quickly; beat longer to smooth it out.
- **Video Game Celebration:** Consider serving this cake at a TTYD-themed party alongside character-inspired appetizers and themed decorations for an immersive celebration experience.