

These homemade peanut butter balls are the ultimate holiday treat that rivals any store-bought candy! With a creamy peanut butter center and a rich chocolate coating, they’re surprisingly simple to make yet taste absolutely luxurious. Perfect for gift-giving or keeping all to yourself, this classic recipe has been perfected over years of testing.
What makes these peanut butter balls so special is the balance between the smooth, buttery peanut filling and the snappy chocolate shell. Unlike some recipes that result in a grainy or too-sweet center, this version uses the perfect ratio of peanut butter, powdered sugar, and butter to create that dreamy texture we all crave. Similar to chocolate truffles, these require a bit of patience, but the results are absolutely worth it.
I’ve been making these for nearly two decades, and I’ve learned all the tricks to ensure success every single time. The key is keeping your chocolate at the right temperature—too hot and it’ll crack, too cool and it won’t coat evenly. Like chocolate-dipped treats, proper tempering makes all the difference. You’ll also want to invest in a candy thermometer if you don’t already have one, as it takes the guesswork out of chocolate work.
These make an impressive gift when packaged in a pretty box or cellophane bag tied with a ribbon. Friends and family absolutely love receiving homemade candy, and these peanut butter balls feel special without requiring professional baking skills. Other homemade candies like fudge also make great gifts, but peanut butter balls are my go-to because they’re so universally loved.
One of my favorite aspects of this recipe is that you can customize it to your taste. Prefer more chocolate? Dip them twice! Like your peanut butter less sweet? Adjust the powdered sugar. Want to make them even fancier? Try adding sprinkles or drizzling contrasting chocolate on top before the coating sets.
For the best results, make these in a cool kitchen—ideally around 65-70 degrees Fahrenheit. If your kitchen is warm, you’ll want to work quickly and possibly chill your peanut butter balls longer between steps. The beauty of this recipe is that it’s forgiving enough for beginners but sophisticated enough to impress seasoned candy makers.
I always make a double or triple batch during the holiday season because they disappear so quickly. They store beautifully in an airtight container for up to two weeks, though they rarely last that long in my house. Proper storage keeps them fresh and delicious.
For additional inspiration and technique tips, check out Serious Eats’ comprehensive guide and Bon Appétit’s peanut butter cup variations. The New York Times also has wonderful candy-making resources, and their buckeye recipe offers another take on this classic.
Ingredients
- 1 cup creamy peanut butter (room temperature)
- 1/2 cup (1 stick) unsalted butter (room temperature)
- 2 cups powdered sugar, sifted
- 1/2 teaspoon vanilla extract
- 1/4 teaspoon sea salt
- 2 cups semi-sweet or dark chocolate chips (or candy melts)
- 2 tablespoons coconut oil or vegetable shortening
- Fleur de sel or sea salt for topping (optional)
Instructions
- Line a baking sheet with parchment paper and set aside. This will be where you place your finished peanut butter balls for the final chocolate setting.
- In a large mixing bowl, combine the room-temperature peanut butter and softened butter, beating together with an electric mixer on medium speed until completely smooth and well combined, approximately 2 minutes. The mixture should be light and fluffy.
- Add the sifted powdered sugar to the peanut butter mixture one cup at a time, beating on low speed between additions to prevent sugar from flying everywhere. Once all powdered sugar is incorporated, increase speed to medium and beat until the mixture is light, fluffy, and well combined.
- Stir in the vanilla extract and sea salt using a rubber spatula or wooden spoon, mixing until fully incorporated and the mixture is homogeneous throughout.
- Using a cookie scoop or melon baller (about 1 tablespoon each), portion the peanut butter mixture onto the prepared baking sheet, spacing them about 2 inches apart.
- Place the baking sheet in the refrigerator for at least 1 hour, or until the peanut butter balls are completely firm and hold their shape when gently pressed.
- Once chilled, gently roll each peanut butter ball between your palms to create smooth, evenly shaped spheres. If they become too soft while rolling, return them to the refrigerator for 10-15 minutes.
- Place the shaped peanut butter balls back on the parchment-lined baking sheet and return to the refrigerator while you prepare the chocolate coating.
- Fill a microwave-safe bowl with the chocolate chips and coconut oil. Microwave in 30-second intervals, stirring between each interval, until the chocolate is completely melted and smooth. Do not overheat the chocolate.
- Alternatively, melt the chocolate using a double boiler method: place a heatproof bowl over a pot of simmering water, ensuring the bowl doesn’t touch the water. Stir the chocolate and coconut oil frequently until completely melted and smooth.
- Allow the melted chocolate to cool for approximately 2-3 minutes so it reaches the optimal consistency for coating without being too hot.
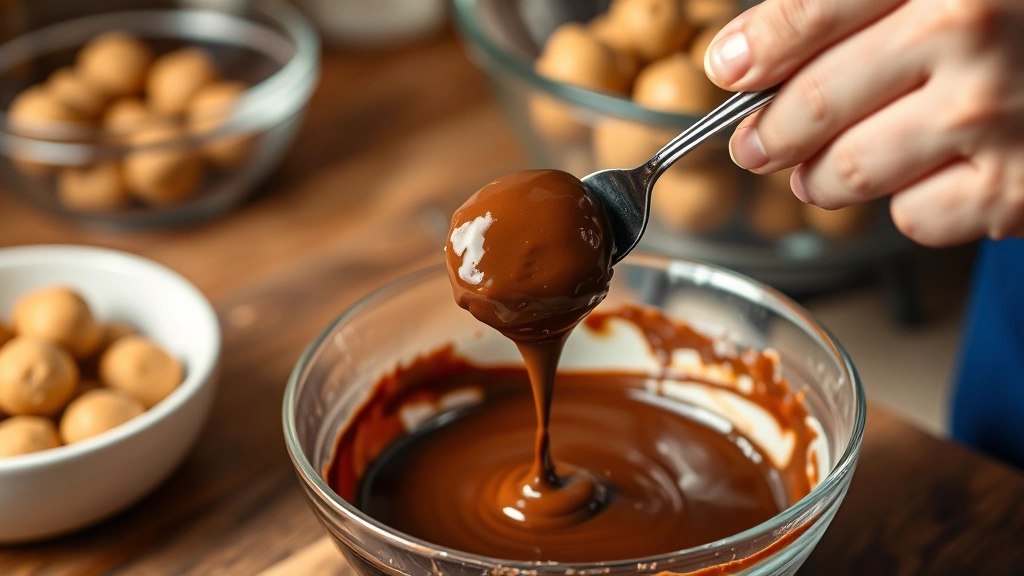
- Using a fork or dipping tool, carefully pick up one peanut butter ball and submerge it completely into the melted chocolate, then lift it out and gently tap the fork on the side of the bowl to remove excess chocolate.
- Place the chocolate-coated peanut butter ball back on the parchment paper. If desired, immediately sprinkle a tiny pinch of sea salt on top before the chocolate sets.
- Repeat the dipping process with the remaining peanut butter balls, working quickly but carefully. If the chocolate becomes too thick while dipping, reheat it briefly in the microwave for 10-15 seconds.
- Once all peanut butter balls are coated, place the baking sheet in the refrigerator for at least 30 minutes, or until the chocolate coating is completely set and firm to the touch.
- Transfer the finished peanut butter balls to an airtight container for storage, placing parchment paper between layers to prevent sticking.
- Store in a cool, dry place or in the refrigerator for up to two weeks. For longer storage, these freeze beautifully for up to three months.

Pro Tips
- **Peanut Butter Selection**: Use a high-quality creamy peanut butter without added sugars or oils for the best results. Natural peanut butter works but may result in a slightly grainier texture due to its oil content.
- **Room Temperature Ingredients**: Both the peanut butter and butter must be at room temperature for proper mixing and incorporation. Cold ingredients won’t blend smoothly and may result in a grainy filling.
- **Powdered Sugar Quality**: Sift your powdered sugar before measuring and adding to prevent lumps in the final mixture. This ensures an incredibly smooth, creamy filling.
- **Chocolate Selection**: Semi-sweet and dark chocolate both work beautifully. Semi-sweet provides a sweeter coating that balances the rich peanut butter, while dark chocolate offers a more sophisticated flavor. Milk chocolate is too sweet for most palates with this filling.
- **Tempering Matters**: While not strictly necessary for home candy-making, properly tempered chocolate creates a shinier finish and crispier coating. If you don’t temerate, the chocolate may have a slightly dull finish but will still taste delicious.
- **Coconut Oil vs. Shortening**: Coconut oil adds a subtle flavor and creates a smoother coating, while vegetable shortening keeps the focus on pure chocolate. Both work equally well—choose based on your preference.
- **Double Dipping**: For an extra-thick chocolate coating, allow the first coat to set completely in the refrigerator, then dip the balls again in melted chocolate. This creates a luxurious, professional appearance.
- **Temperature Control**: Keep your kitchen cool while working with chocolate. If your kitchen is warm, work in smaller batches and return your peanut butter balls to the refrigerator more frequently to prevent them from becoming too soft.
- **Troubleshooting Grainy Texture**: If your filling becomes grainy, the peanut butter was likely too oily or the ingredients weren’t properly combined. This doesn’t affect the taste but impacts the texture. Always use room-temperature ingredients and mix thoroughly.
- **Chocolate Seized**: If your chocolate becomes thick and grainy (seized), add one teaspoon of coconut oil at a time and stir gently until smooth again. Seizing occurs when water gets into the chocolate, so keep your utensils completely dry.
- **Gift Packaging**: Place finished peanut butter balls in small paper liners inside a decorative box or tin. Tie with ribbon and include a note about storage. They make impressive, homemade gifts that feel luxurious and special.
- **Flavor Variations**: Add almond extract instead of vanilla, stir in crushed pretzels for a sweet-and-salty version, or add a touch of espresso powder to complement the chocolate. These simple variations create unique flavor profiles.