
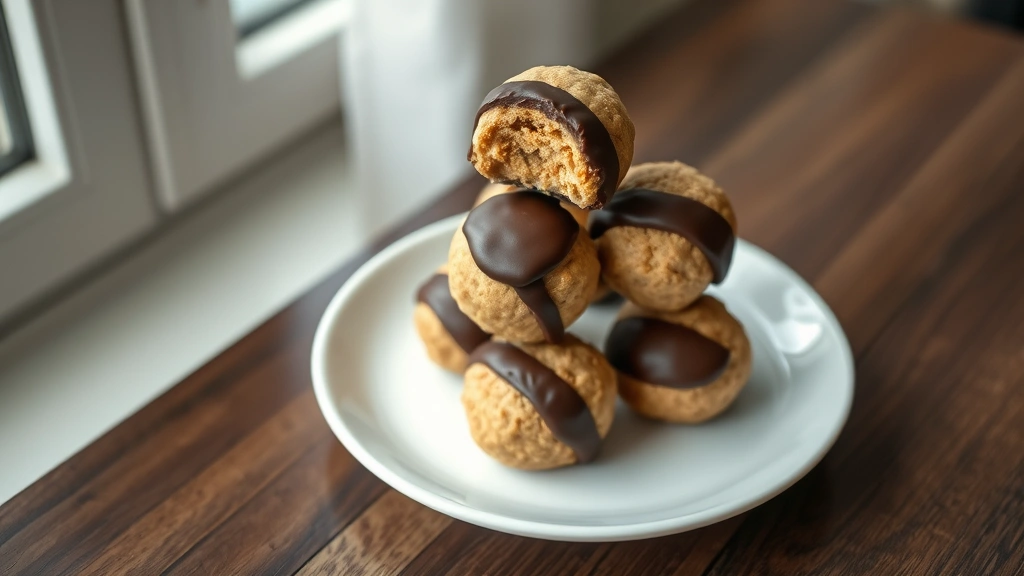
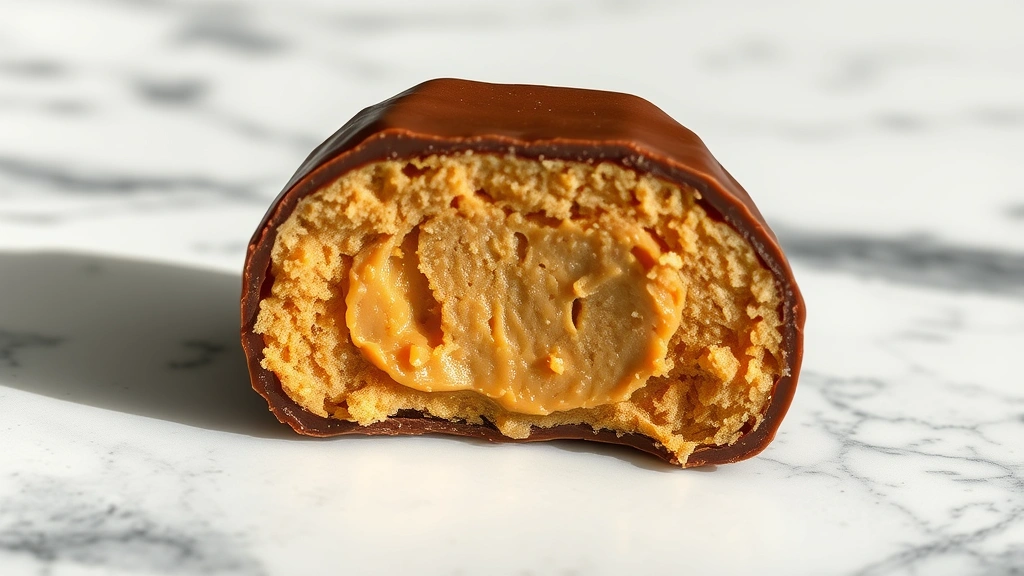
There’s nothing quite like homemade peanut butter balls – those adorable little spheres of creamy peanut butter filling coated in rich, glossy chocolate. They’re the ultimate holiday treat that looks fancy enough to gift but is honestly so easy to make at home. I’m talking restaurant-quality results with just a handful of ingredients and minimal fuss.
These peanut butter balls are the perfect balance of sweet and nutty, with a smooth peanut butter center that practically melts on your tongue. The chocolate coating provides that satisfying snap and richness that takes them to the next level. What I love most about this recipe is how customizable it is – you can make them as simple or as decadent as you’d like.
These treats are perfect for holiday gift-giving, party platters, or simply keeping a stash in your freezer for those moments when you need something sweet. Trust me, once you start making these, you’ll never go back to store-bought versions. They’re that good, and honestly, they’re easier to make than you might think.
I’ve been making these for years, and I’ve perfected the technique to ensure you get perfectly shaped, beautifully coated peanut butter balls every single time. The secret is in the temperature of your chocolate and the chilling time – two things that make all the difference. Whether you’re a seasoned baker or a complete novice in the kitchen, this recipe is foolproof and absolutely delicious.
If you love peanut butter desserts, you’ll also want to try my creamy peanut butter sauce for drizzling over desserts. For other sweet treats, check out my decadent cream-based dessert recipes and my collection of indulgent comfort food recipes. You might also enjoy exploring other make-ahead treats perfect for entertaining. And if you’re looking for other easy no-bake options, don’t miss my simple preparation techniques.
The beauty of this peanut butter balls recipe is that it requires no special equipment or baking skills. You don’t even need an oven! Everything comes together in about an hour, with most of the time being hands-off chilling. It’s the perfect make-ahead recipe because you can prepare these days in advance and store them in an airtight container. They’re also naturally gluten-free if you use quality chocolate and peanut butter without additives.
What makes these peanut butter balls truly special is the quality of your ingredients. Use a natural peanut butter with good flavor, real butter, and quality chocolate – the difference is noticeable. Dark chocolate, milk chocolate, or even white chocolate all work beautifully depending on your preference. Some people like to add a hint of vanilla or a pinch of salt to enhance the flavors, and I’m totally here for that variation.
These treats are wonderfully versatile for different occasions. They’re perfect for Christmas stockings, Valentine’s Day gifts, Easter baskets, or simply as a homemade thank-you gift for neighbors and friends. The presentation is already half the battle – they look so professional and special that people always assume you spent hours making them. Your secret’s safe with me!
The technique is really straightforward: mix together your peanut butter, butter, and powdered sugar to create a smooth filling, shape into balls, chill them until firm, then dip into melted chocolate. That’s it! The key is keeping everything cool and working quickly with the chocolate so it sets beautifully. I always recommend tempering your chocolate or using chocolate chips specifically designed for coating because they’ll set with a gorgeous shine and satisfying snap.
For external inspiration and technique tips, check out Bon Appétit’s chocolate techniques, Serious Eats’ candy-making guide, and New York Times Cooking’s dessert collection for additional inspiration. These resources have wonderful information about working with chocolate and creating professional-looking treats at home.
Ingredients
- 1 cup natural creamy peanut butter, room temperature
- ½ cup unsalted butter, room temperature
- 2 cups powdered sugar, sifted
- ½ teaspoon vanilla extract
- ¼ teaspoon sea salt
- 2 cups semi-sweet or dark chocolate chips
- 1 tablespoon coconut oil or shortening (for chocolate dipping)
Instructions
- Line a baking sheet with parchment paper and set aside. This will be your workspace for shaping and chilling the peanut butter balls.
- In a medium bowl, combine the room temperature peanut butter and softened butter, mixing until well combined and creamy. The butter should be soft enough to blend easily but not melted.
- Gradually add the sifted powdered sugar to the peanut butter mixture, stirring well after each addition. Continue mixing until you have a thick, moldable dough-like consistency.
- Stir in the vanilla extract and sea salt, mixing until evenly distributed throughout the filling. Taste a small amount and adjust seasonings if desired – you want a balanced sweet and salty flavor.
- Using a small cookie scoop or tablespoon, portion the peanut butter mixture onto the prepared baking sheet, spacing them about an inch apart. You should have approximately 24 portions.
- Using your hands or the back of a spoon, gently roll each portion into a smooth ball. Try to make them as uniform in size as possible so they coat evenly in chocolate.
- Place the baking sheet in the freezer for at least 45 minutes, or until the peanut butter balls are very firm and cold. This is essential – cold centers prevent them from falling apart during chocolate dipping.
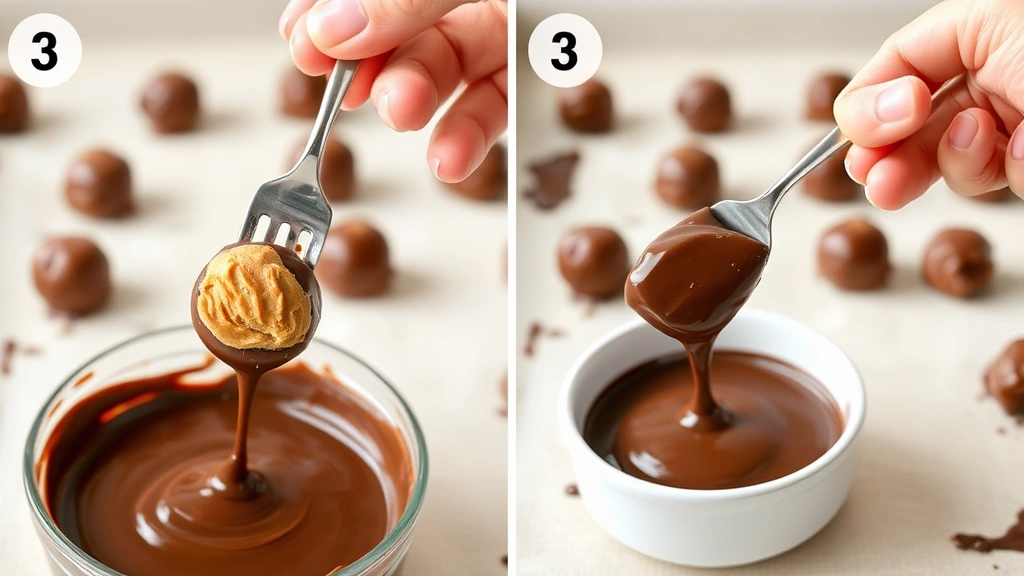
- While the peanut butter balls are chilling, prepare your chocolate coating. Combine the chocolate chips and coconut oil in a microwave-safe bowl. Microwave in 30-second intervals, stirring between each interval, until the chocolate is completely melted and smooth.
- Remove the peanut butter balls from the freezer. Working quickly, use a fork or dipping tool to submerge each ball into the warm chocolate, ensuring it’s completely coated on all sides.
- Tap the fork gently against the side of the bowl to remove excess chocolate, then carefully slide the coated ball onto the parchment-lined baking sheet. Work quickly to maintain the cold temperature of the peanut butter centers.
- Once all balls have been dipped, place the baking sheet in the refrigerator for 15-20 minutes until the chocolate coating is completely set and firm.
- Transfer the finished peanut butter balls to an airtight container and store in the refrigerator for up to 2 weeks or in the freezer for up to 2 months. They can be served chilled or at room temperature, depending on your preference.
Pro Tips
- **Temperature is everything:** Keep your peanut butter filling cold and your chocolate at the right temperature for the best results. If the chocolate gets too hot, it will be thin and won’t coat properly. If it’s too cool, it will be thick and clumpy.
- **Chocolate chip selection matters:** Use quality chocolate chips designed for coating or melting. Chocolate chips made with cocoa butter will set more smoothly than chocolate candy melts, though both work well.
- **Make ahead friendly:** These peanut butter balls can be made up to two weeks in advance and stored in an airtight container in the refrigerator. They also freeze beautifully for up to two months, making them perfect for holiday planning.
- **Double-dipping technique:** For an extra thick chocolate coating, allow the first coat to set completely, then dip again. This creates a luxurious, professional appearance.
- **Customization ideas:** Add ½ teaspoon of almond extract for a different flavor profile, or mix in ¼ cup of finely chopped pretzels or nuts into the peanut butter filling for added texture and crunch.
- **Serving suggestions:** These are best served chilled or at room temperature. They become quite soft if left out on a warm day, so keep them refrigerated until ready to serve.
- **Gift packaging:** These look beautiful packaged in layers separated by parchment paper in a decorative box or tin. Include a gift tag noting that they should be stored in the refrigerator.
- **Peanut butter quality:** Use a natural peanut butter without added sugars or oils for the best flavor and texture. Avoid peanut butters that are too oily, as they can make the filling too soft.
- **Salt enhancement:** The sea salt is crucial – it brings out the peanut butter flavor and balances the sweetness perfectly. Don’t skip it or reduce it.
- **Uniform sizing:** Using a cookie scoop ensures all your peanut butter balls are the same size, which means they’ll all cook and coat evenly. Consistency is key to professional-looking results.
- **Coconut oil substitution:** If you don’t have coconut oil, you can use vegetable shortening or even a small amount of butter, though coconut oil provides the best setting properties.