
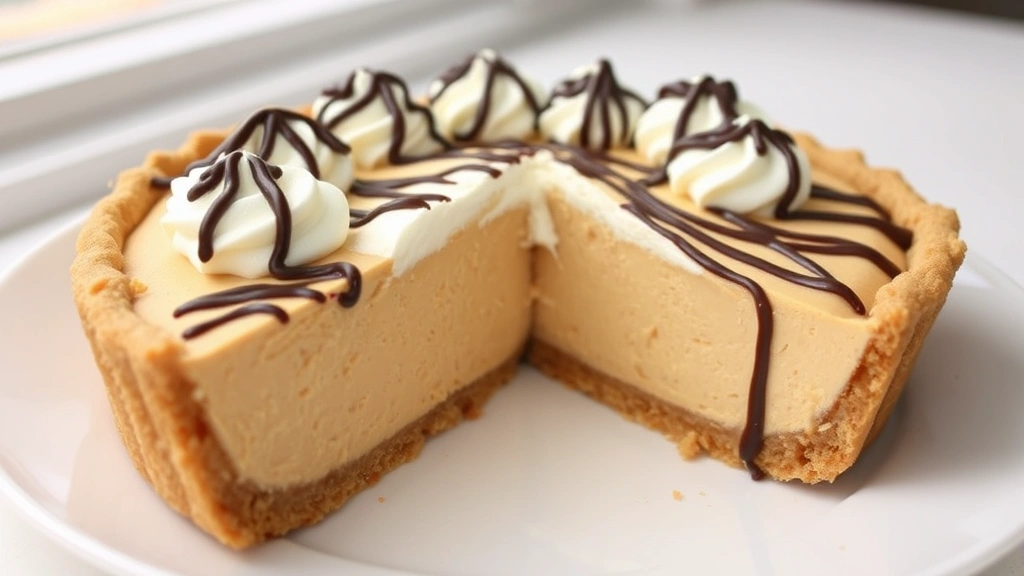
There’s something absolutely magical about a homemade peanut butter pie that just melts on your tongue with creamy, dreamy peanut butter goodness. This isn’t your average dessert – it’s a showstopper that will have everyone asking for your secret. The beauty of this peanut butter pie recipe is that it combines a buttery graham cracker crust with a silky peanut butter filling that’s rich without being overwhelming, all topped with a cloud of whipped cream and a drizzle of chocolate. Whether you’re a peanut butter devotee or just looking for an impressive dessert to serve at your next dinner party, this recipe delivers every single time.
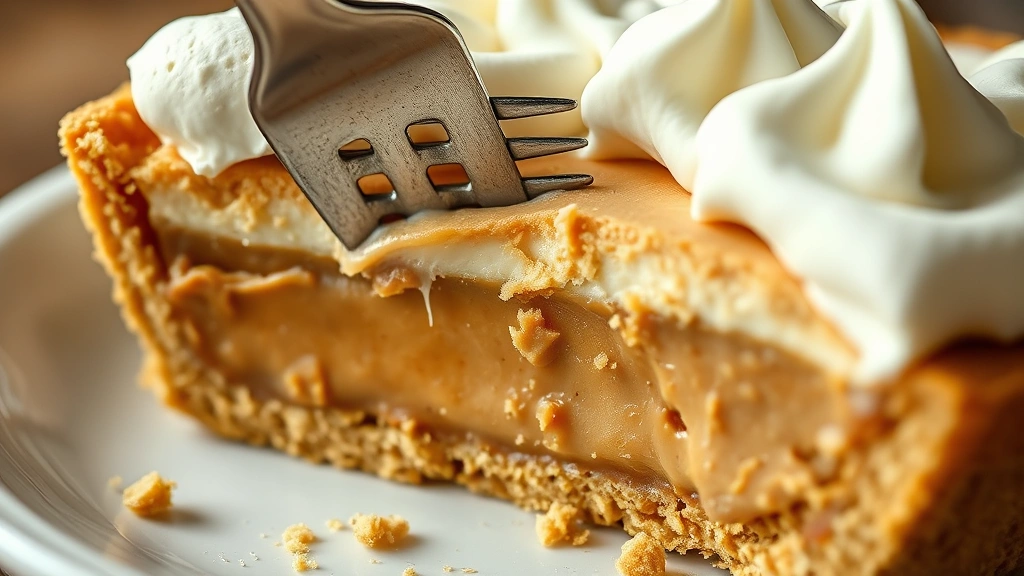
I’ve been making peanut butter pie for years, and I’ve finally perfected the formula. The key is using quality peanut butter – not the overly sweetened variety, but real, creamy peanut butter that you can actually taste. Combined with cream cheese and just the right amount of powdered sugar, you get a filling that’s perfectly balanced between sweet and nutty. The texture is what really sets this apart; it’s not too heavy, not too light, but absolutely perfect. When you take that first bite, the graham cracker crust gives way to the silky filling, and then there’s that hint of chocolate on top. It’s pure bliss.
What I love most about this recipe is how versatile it is. You can make it ahead of time, which makes it perfect for entertaining. You can also customize it to your preferences – want it darker? Add more chocolate. Prefer it less sweet? Use a bit less powdered sugar. The beauty of baking is that once you understand the fundamentals, you can make it your own. This peanut butter pie is forgiving, elegant, and absolutely delicious. I’m thrilled to share my favorite version with you today, and I’m confident that once you make it, it’ll become a staple in your dessert rotation.
Before diving into the recipe, let me share a few pro tips that will ensure your success. First, make sure all your ingredients are at room temperature – this helps everything blend together smoothly and creates that perfect creamy texture. Second, don’t skip the chilling time; it’s not just for looks, it helps the flavors meld together beautifully. Third, when you’re making the crust, press it firmly into the pie dish and up the sides – you want it to be sturdy enough to hold the filling without crumbling. Finally, if you’re short on time, you can use a store-bought graham cracker crust, though homemade is always superior. Now let’s get into the nitty-gritty of making the best peanut butter pie you’ve ever tasted.
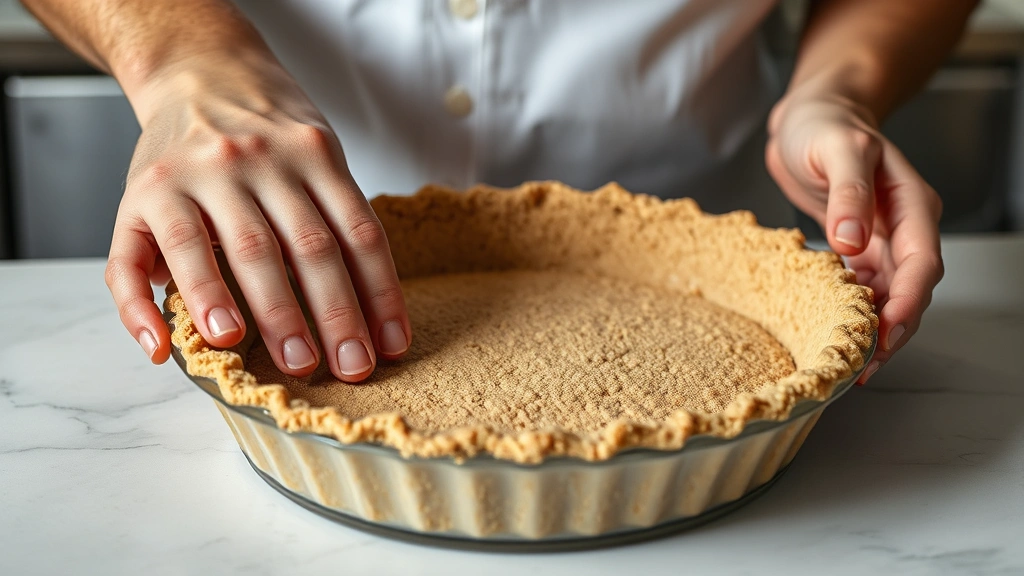
The foundation of any great pie is the crust, and this graham cracker crust is no exception. Graham crackers provide the perfect base – they’re slightly sweet, they have a wonderful texture, and they complement peanut butter beautifully. When combined with melted butter and a touch of sugar, they create a crust that’s crispy on the outside and slightly tender on the inside. The crust bakes just long enough to set it and give it a subtle golden color, which adds depth of flavor.
Once your crust is ready, the real magic happens with the filling. The combination of peanut butter, cream cheese, and butter creates an emulsion that’s silky and smooth. The peanut butter provides the star flavor, the cream cheese adds tang and helps with the texture, and the butter contributes richness. Powdered sugar sweetens everything without adding graininess, and a pinch of salt enhances all the flavors. When you whip this mixture together, you’re incorporating air, which gives the filling that light, mousse-like quality that makes people swoon.
The topping is where you can really have fun. Whipped cream is classic for a reason – it’s light, it’s fluffy, and it provides a beautiful contrast to the rich filling. A drizzle of chocolate sauce or shavings adds visual appeal and another layer of flavor. Some people like to add a sprinkle of crushed peanuts or peanut butter chips for extra texture and flavor. The choice is yours, and that’s what makes this recipe so special.
If you’re looking for more inspiration for decadent desserts, check out this Heavy Cream Alfredo Sauce Recipe for savory applications, or explore this Heavy Cream Pasta Recipe for rich and satisfying mains. For side dishes that complement a dinner party, consider this Chickpea Salad Recipe or this Pickled Red Onion Recipe.
For additional inspiration and technique tips, I recommend checking out Bon Appétit for creative variations, Serious Eats for scientific approaches to pie making, and New York Times Cooking for elevated dessert inspiration. These resources will help you understand the ‘why’ behind each step, making you a more confident baker.
Ingredients
- 2 cups graham cracker crumbs (about 14-16 crackers)
- 1/2 cup granulated sugar, divided
- 6 tablespoons unsalted butter, melted
- 1 cup creamy peanut butter (not natural or powdered)
- 8 ounces cream cheese, softened to room temperature
- 4 tablespoons unsalted butter, softened to room temperature
- 1 1/2 cups powdered sugar, sifted
- 1 teaspoon vanilla extract
- 1/4 teaspoon salt
- 1 cup heavy whipping cream
- 2 tablespoons powdered sugar (for whipped cream)
- 1/2 teaspoon vanilla extract (for whipped cream)
- 1/2 cup chocolate sauce or melted chocolate for topping
- Crushed peanuts or peanut butter chips for garnish (optional)
- Chocolate shavings for garnish (optional)
Instructions
- Preheat your oven to 350°F (175°C). Line a 9-inch pie dish with parchment paper or lightly grease it with cooking spray to ensure easy removal if desired.
- In a medium mixing bowl, combine the graham cracker crumbs with 1/4 cup of the granulated sugar and stir until well combined.
- Pour the melted butter over the crumb mixture and stir vigorously until the mixture resembles wet sand and holds together when squeezed.
- Transfer the mixture to your prepared pie dish and press firmly into the bottom and up the sides, creating an even layer that’s about 1/4 inch thick. Use the bottom of a measuring cup to help compress it evenly.
- Bake the crust in the preheated oven for 12 minutes, or until it’s lightly golden and fragrant. Remove from the oven and set aside to cool completely.
- While the crust cools, prepare the filling by adding the softened cream cheese to a large mixing bowl. Beat it with an electric mixer on medium speed for about 2 minutes until it’s smooth and creamy, scraping down the bowl as needed.
- Add the softened butter to the cream cheese and continue beating for another minute until everything is well combined and fluffy.
- Add the peanut butter to the mixture, one tablespoon at a time, beating well after each addition to ensure it’s fully incorporated. The mixture should be smooth and homogeneous.
- Sift the powdered sugar into the peanut butter mixture, adding it gradually while beating on low speed to avoid creating a cloud of sugar.
- Once all the powdered sugar is incorporated, increase the speed to medium and beat for 2-3 minutes until the filling is light, fluffy, and pale in color.
- Add the vanilla extract and salt, and beat for another 30 seconds to ensure even distribution.
- Pour the filling into the cooled crust, smoothing the top with a spatula or the back of a spoon to create an even surface.
- Cover the pie loosely with plastic wrap and refrigerate for at least 4 hours, or preferably overnight. This chilling time is crucial for the flavors to meld and the texture to set properly.
- When you’re ready to serve, prepare the whipped cream by pouring the heavy whipping cream into a cold mixing bowl.
- Using an electric mixer on medium-high speed, whip the cream until soft peaks form, then gradually add the powdered sugar and vanilla extract.
- Continue beating until stiff peaks form and the whipped cream is thick and billowy.
- Remove the pie from the refrigerator about 15 minutes before serving to allow it to soften slightly for easier slicing.
- Slice the pie with a sharp knife, wiping the blade clean between cuts for neat slices.
- Top each slice generously with whipped cream and a drizzle of chocolate sauce.
- Garnish with crushed peanuts, peanut butter chips, or chocolate shavings if desired, and serve immediately.
Pro Tips
Peanut Butter Selection: Use creamy peanut butter rather than natural or powdered varieties. Natural peanut butter can separate and create an oily texture, while powdered peanut butter requires liquid to reconstitute. Regular creamy peanut butter is your best bet for consistent results.
Make-Ahead Magic: This pie actually improves with time as the flavors develop. You can make it up to 24 hours in advance, keeping it covered in the refrigerator. This makes it perfect for entertaining since you can prepare it the day before.
Crust Variations: While this recipe uses graham crackers, you can also use digestive biscuits, vanilla wafers, or even crushed gingersnaps for different flavor profiles. Adjust the sugar amount slightly if using a different biscuit.
Storage and Shelf Life: Keep your finished pie covered in the refrigerator for up to 3 days. It can also be frozen for up to 2 months if wrapped well in plastic wrap and foil. Thaw in the refrigerator before serving.
Slicing Tips: For the cleanest slices, use a sharp knife dipped in hot water and wiped dry before each cut. This prevents the filling from sticking to the blade and tearing the pie.
Whipped Cream Timing: If you’re making the whipped cream ahead of time, prepare it no more than 2 hours before serving. Store it in the refrigerator until you’re ready to use it.
Customization Options: Add a tablespoon of peanut butter powder to intensify the peanut flavor, or incorporate a teaspoon of espresso powder to complement the peanut butter and chocolate combination. Some people like to add a touch of honey for extra depth.
Serving Suggestions: This pie pairs beautifully with a cold glass of milk or a hot cup of coffee. For a more elegant presentation, serve with a small scoop of vanilla ice cream instead of whipped cream.
Troubleshooting: If your filling is too soft after chilling, you may have used natural peanut butter or had ingredients that were too warm. If it’s too stiff or dense, you may have over-mixed the filling. The filling should be creamy and mousse-like, not heavy or grainy.
Pingback: How to Make the BEST Keto Chicken Thigh Recipe! – Simple Recipe Finder