
There’s something absolutely magical about homemade pecan brittle that store-bought candy simply cannot match. This foolproof pecan brittle recipe is my go-to for holiday gifts, entertaining, or just satisfying those sweet cravings. The beauty of making brittle at home is that you control every single ingredient—no mysterious additives, just pure, buttery, nutty perfection.
What I absolutely adore about this recipe is how incredibly forgiving it is, even for candy-making beginners. I’ve taught this to friends who swear they can’t make candy, and they’ve all walked away with beautiful, crackling-crisp brittle. The secret isn’t complicated techniques or fancy equipment—it’s understanding a few simple principles and having confidence in the process.
This pecan brittle comes together in about thirty minutes, and the hardest part is honestly just waiting for it to cool completely so you don’t burn your fingers on the hot candy. The combination of brown sugar and butter creates this deep, complex caramel flavor that elevates the pecans from simple nuts into something truly special. I often make several batches during November and December, storing them in airtight containers to give as gifts to neighbors, teachers, and friends.
The beauty of homemade candy is that you can customize it endlessly. Want to add a pinch of sea salt on top? Absolutely. Prefer a hint of vanilla or bourbon? Go for it. This recipe is your blank canvas for creating something uniquely delicious. I’ve included several variations and tips below to help you make this recipe your own.
One of my favorite things about this recipe is how it teaches you about the stages of candy making without being intimidating. You’ll learn to recognize the hard-crack stage by simply watching and listening to your candy—no fancy candy thermometer required, though I do recommend having one. This knowledge serves you well for making other candies like homemade caramels and toffee.
I genuinely believe that making pecan brittle is one of those cooking projects that builds confidence. When you pull that beautiful, golden brittle out of the oven and snap it into pieces, there’s a real sense of accomplishment. It’s the kind of recipe that makes you feel like a legitimate candy maker, even if you’ve never made candy before in your life.
Let me walk you through every step of this process, sharing all my tricks and techniques so your brittle turns out absolutely perfect every single time.
Ingredients
- 2 cups raw pecans, roughly chopped
- 1 cup (2 sticks) unsalted butter
- 1 cup granulated sugar
- 3/4 cup packed brown sugar
- 1/4 cup light corn syrup
- 1/4 teaspoon sea salt, plus more for topping if desired
- 1 teaspoon pure vanilla extract
- 1/2 teaspoon baking soda
Instructions
- Preheat your oven to 350°F (175°C). Spread the chopped pecans on a baking sheet and toast them for about 5-7 minutes, stirring occasionally, until they become fragrant and slightly darker. This step is absolutely crucial—toasting the pecans brings out their rich, complex flavors and prevents them from tasting raw in the final candy. Remove from the oven and set aside.
- Line a large baking sheet with parchment paper or a silicone baking mat, making sure it covers the entire surface. This prevents sticking and makes cleanup infinitely easier. If you don’t have parchment paper, you can lightly butter the baking sheet, though parchment really is the superior choice here.
- In a heavy-bottomed saucepan (this is important—a thin pan will cause hot spots and uneven cooking), combine the butter, granulated sugar, brown sugar, corn syrup, and salt. Place the pan over medium heat and stir occasionally with a wooden spoon or heat-resistant spatula until the butter is completely melted and the sugars dissolve.
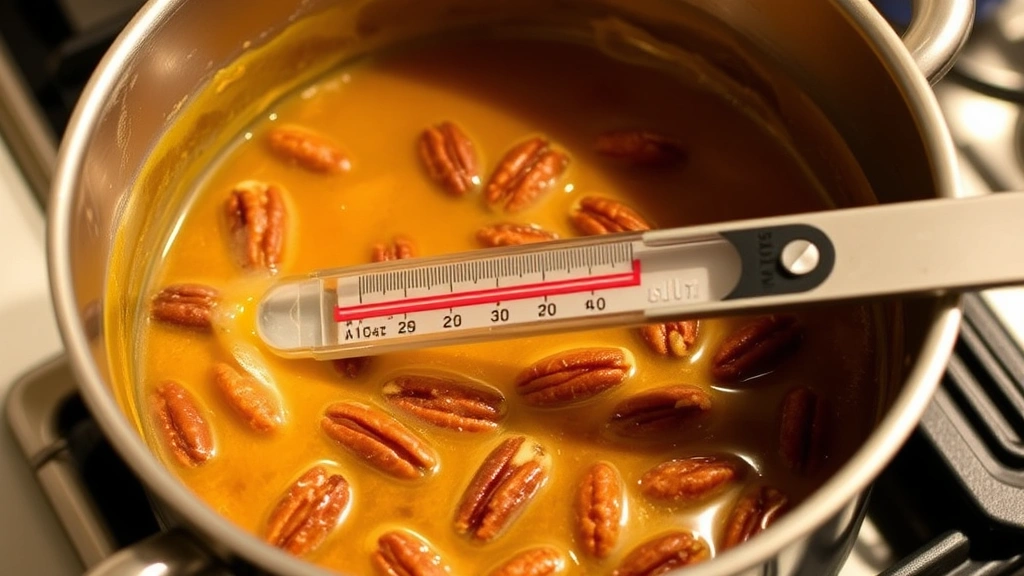
- Once the mixture is melted and combined, stop stirring. Attach a candy thermometer to the side of the pan, making sure it’s not touching the bottom. This is where the magic happens—you’re going to let the mixture cook undisturbed so it reaches the proper temperature. If you don’t have a candy thermometer, you can use the cold water test: drop a small amount of the hot mixture into ice water; it should crack and break apart when cooled.
- Let the candy mixture bubble and cook, watching the color gradually deepen from light amber to a richer golden brown. This usually takes about 12-15 minutes. The temperature should rise to approximately 300-310°F (149-154°C)—this is the hard-crack stage, where the candy becomes brittle once it cools. Don’t walk away; stay nearby and keep an eye on the thermometer.
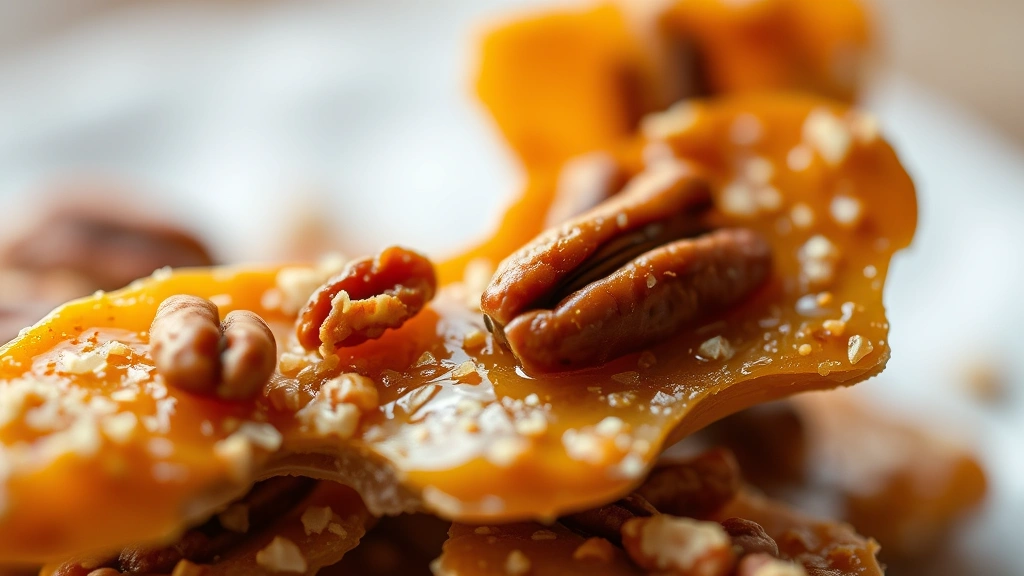
- When the mixture reaches 300°F and has turned a beautiful golden-amber color, immediately remove it from the heat. Quickly stir in the toasted pecans, vanilla extract, and baking soda. The baking soda will cause the mixture to bubble up slightly—this is completely normal and actually creates a lighter, airier texture in your brittle. Stir continuously for about 30 seconds to coat all the pecans evenly.
- Immediately pour the hot candy mixture onto your prepared baking sheet, working quickly but carefully since the candy is extremely hot. Use a heat-resistant spatula to spread it into an even layer, but don’t press down too hard—you want the brittle to stay light and airy. If you’re adding sea salt for topping, sprinkle it generously over the surface right now while the candy is still hot.
- Let the brittle cool completely at room temperature—this usually takes 30 minutes to an hour depending on how thick you’ve spread it. Do not try to break it apart or move it until it’s completely cooled and hardened. Breaking it too early will result in sticky, gooey candy instead of crisp brittle.
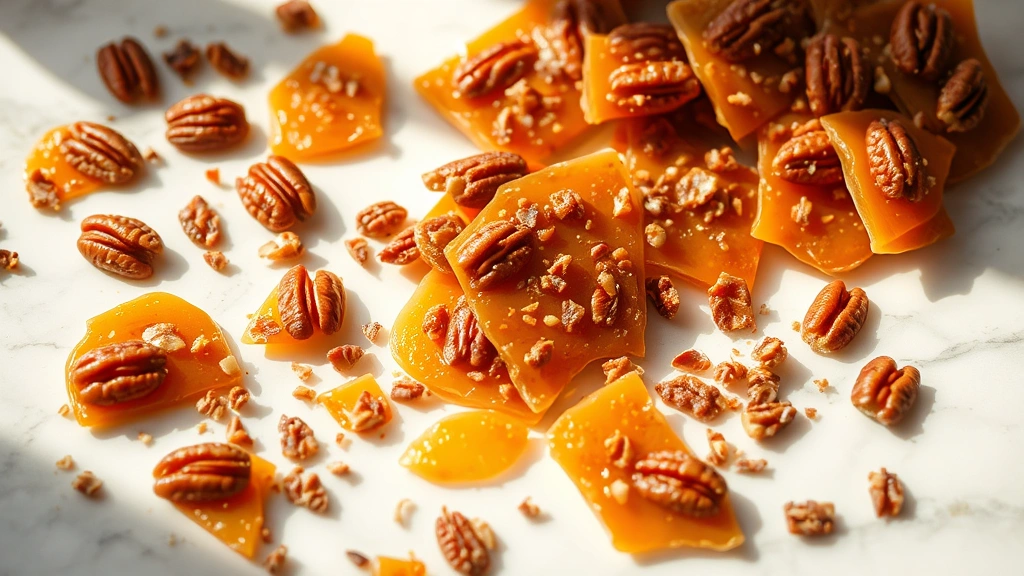
- Once fully cooled and hardened, break the brittle into bite-sized pieces with your hands. Don’t worry if some pieces are larger than others—the irregular shapes are part of the charm. If you prefer smaller, more uniform pieces, you can break it into smaller chunks.
- Store your pecan brittle in an airtight container at room temperature. Parchment paper between layers helps prevent sticking. Properly stored brittle will keep for up to 2 weeks, though honestly, it rarely lasts that long in my house.
Pro Tips
- Temperature is absolutely everything in candy making. If your mixture doesn’t reach 300°F, your brittle will be chewy instead of crisp. If it goes above 320°F, it can become hard and slightly bitter. Invest in a reliable candy thermometer—it’s one of the best kitchen purchases you can make.
- The baking soda is essential, not optional. It creates a light, airy structure that makes the brittle snap satisfyingly rather than shatter harshly. Don’t skip this ingredient.
- Humidity is the enemy of brittle. On very humid days, your brittle may not set up as crisply. Store it in an airtight container immediately after it cools completely, and include a desiccant packet if you’re in a humid climate.
- Customize this recipe endlessly: add a teaspoon of bourbon or rum instead of vanilla, use a combination of pecans and almonds, sprinkle with dark chocolate once cooled, or add cayenne pepper for a spicy kick.
- If your candy crystallizes before reaching the proper temperature, you can salvage it. Add a splash of water and reheat gently, stirring until the sugar dissolves again. This sometimes happens with the cold water test—just wipe your thermometer clean before continuing.
- Make sure all your equipment is completely dry before starting. Even a tiny bit of moisture can cause crystallization. Also, don’t let any sugar crystals from the sides of the pan fall into the mixture—use a pastry brush dampened with water to wipe down the sides if needed.
- This recipe doubles beautifully if you’re making large quantities for gifts. Just use a larger saucepan and watch the thermometer carefully, as larger batches may take slightly longer to reach temperature.
- For gift-giving, package the brittle in clear cellophane bags tied with ribbon, or layer it in decorative boxes with parchment paper. Homemade candy gifts are always appreciated far more than store-bought alternatives.
- If you have trouble with sticking, try brushing your parchment paper very lightly with neutral oil before pouring. Some people swear by silicone baking mats, which are fantastic and reusable.
- Don’t be discouraged if your first batch isn’t perfect. Candy making is as much art as science, and even experienced candy makers have occasional batches that don’t turn out quite right. Each attempt teaches you something valuable about how your stove and equipment work.