
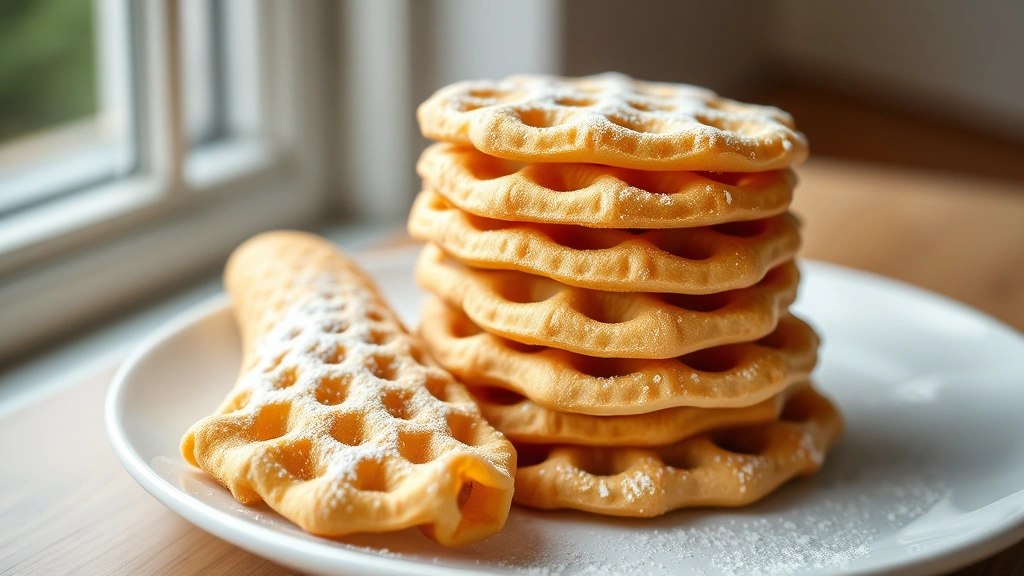
Pizzelles are delicate Italian waffle cookies that look absolutely stunning on any dessert table! These thin, crispy treats are flavored with vanilla and anise, making them perfect for dunking in coffee or enjoying with afternoon tea. The secret to perfect pizzelles is using a quality pizzelle iron and not overfilling it—a little practice goes a long way. I absolutely love making these for the holidays, and they’re such a showstopper when you arrange them in a cone shape while they’re still warm.
These cookies have been a staple in Italian households for generations, and for good reason. They’re elegant, delicious, and surprisingly easy to make once you get the hang of them. The batter comes together quickly with simple pantry ingredients, and the whole process takes just about 20 minutes from start to finish. If you’re looking to impress guests or want to create a special treat for yourself, homemade desserts like these are always a wonderful choice.
What I love most about pizzelles is their versatility. You can serve them plain, dust them with powdered sugar, dip them in chocolate, or even shape them into cones and fill them with whipped cream. They also make fantastic gifts when packaged in a pretty box. For more inspiration on creating beautiful treats, check out our collection of special occasion recipes.
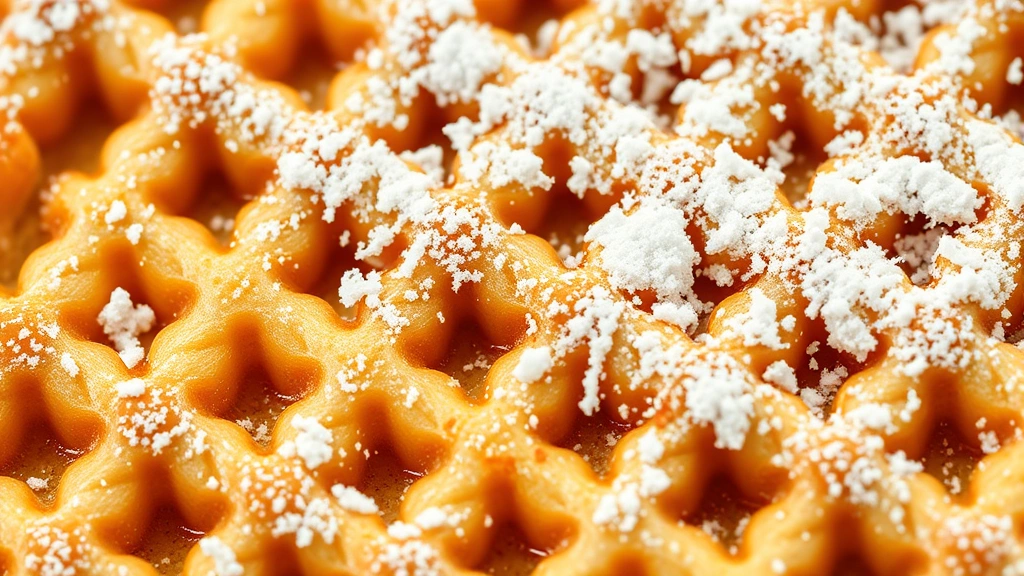
The texture is absolutely perfect—crispy on the outside with a delicate interior that practically melts in your mouth. I’ve shared this recipe with friends and family countless times, and everyone asks for it! The combination of vanilla and anise gives them that authentic Italian flavor that’s so hard to resist. If you’re a fan of these cookies, you’ll also want to try other elegant desserts and treats from our recipe collection.
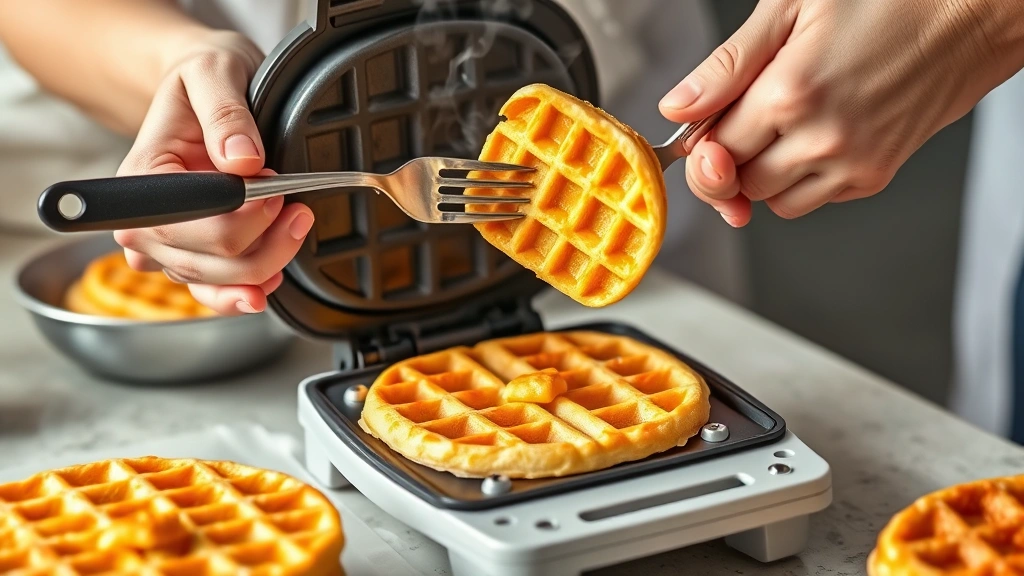
One important tip: make sure your pizzelle iron is properly preheated and greased before you start. This ensures even cooking and prevents sticking. I recommend testing the first pizzelle to see how your particular iron works—every iron is a bit different! For more helpful cooking tips, visit our tips and tricks section. You can also find excellent guidance on Bon Appétit’s pizzelle recipes and Serious Eats’ Italian dessert collection. For more inspiration, check out New York Times Cooking’s pizzelle guide.
Ingredients
- 2 cups all-purpose flour
- 1½ teaspoons baking powder
- ¼ teaspoon salt
- 6 large eggs
- ¾ cup granulated sugar
- ½ cup (1 stick) unsalted butter, melted
- 2 tablespoons vegetable oil, plus more for the iron
- 2 teaspoons vanilla extract
- 1 tablespoon anise extract (or ½ teaspoon anise seeds, ground)
- Powdered sugar for dusting (optional)
- Chocolate for dipping (optional)
Instructions
- Preheat your pizzelle iron according to manufacturer’s instructions. This usually takes about 5 minutes. While it’s heating, prepare your batter.
- In a medium bowl, whisk together the flour, baking powder, and salt. Set this dry mixture aside.
- In a large mixing bowl, beat the eggs and granulated sugar together using an electric mixer on medium-high speed for about 3-4 minutes, until the mixture becomes pale and fluffy.
- With the mixer on low speed, slowly pour in the melted butter and vegetable oil, mixing until fully combined and smooth.
- Add the vanilla extract and anise extract to the wet ingredients, stirring to combine thoroughly.
- Gently fold the dry flour mixture into the wet ingredients using a spatula or wooden spoon until just combined. Do not overmix—the batter should be smooth but not overworked.
- Once your pizzelle iron is preheated, lightly brush or spray both the top and bottom plates with vegetable oil or cooking spray.
- Spoon about 1 tablespoon of batter into the center of the bottom plate, being careful not to overfill as the batter will spread when you close the iron.
- Close the lid gently and cook for about 30-45 seconds, until the pizzelle is golden brown. The exact time depends on your iron, so check the first one carefully.
- Using a fork or small spatula, carefully remove the pizzelle from the iron and place it on a clean kitchen towel or cooling rack.
- If you want to shape the pizzelles into cones while they’re still warm and pliable, quickly wrap each one around a cone-shaped form or roll it by hand. They’ll crisp up as they cool.
- If you prefer them flat, simply lay them on a cooling rack and let them cool completely, which will take about 5-10 minutes.
- Repeat steps 8-12 with the remaining batter, lightly oiling the iron before each pizzelle to prevent sticking.
- Once all pizzelles are cooled and crisp, you can dust them with powdered sugar, dip them in melted chocolate, or enjoy them plain.
- Store cooled pizzelles in an airtight container at room temperature for up to one week, layering them between parchment paper to prevent breaking.
Pro Tips
- **Pizzelle Iron Selection**: Invest in a quality pizzelle iron for best results. Traditional electric pizzelle irons are more reliable than stovetop versions and heat more evenly. Brands like Villaware and Cucina Pro are excellent choices.
- **Batter Consistency**: Your batter should be smooth and pourable, similar to pancake batter. If it seems too thick, add a tablespoon of milk at a time until you reach the right consistency. Too thick and the pizzelles won’t cook evenly; too thin and they’ll be fragile.
- **Temperature Control**: If your pizzelles are browning too quickly and burning, lower the heat setting on your iron. If they’re pale and taking too long to cook, increase the temperature. Finding the sweet spot takes practice!
- **Timing is Everything**: The window between perfectly crisp and burnt is small, usually just 10-15 seconds. Set a timer for your first few pizzelles to get the hang of it.
- **Shaping While Warm**: If you want to shape pizzelles into cones or rolls, work quickly as they harden within seconds of coming out of the iron. Have your cone form or rolling tool ready before you remove each pizzelle.
- **Flavor Variations**: Try replacing anise extract with ½ teaspoon of ground anise seeds, or experiment with almond extract, lemon zest, or even a pinch of cardamom for unique flavors.
- **Oil Application**: Use a silicone brush or cooking spray to oil your iron before each pizzelle. Too much oil can make them greasy; too little causes sticking.
- **Make-Ahead Options**: You can prepare the batter up to 2 hours in advance and refrigerate it. Let it come to room temperature before cooking. Already-made pizzelles keep well in an airtight container for up to one week.
- **Gift Idea**: Package cooled pizzelles in a pretty box or tin with tissue paper between layers. They make wonderful holiday gifts or special treats for coffee lovers.
- **Troubleshooting**: If pizzelles stick to the iron, the temperature might be too low. If they break when removing, they might be too thin or not cooked long enough. Adjust your batter amount and cooking time accordingly.
- **Serving Suggestions**: Serve pizzelles alongside espresso or coffee, with whipped cream and berries, dipped in chocolate, or dusted with powdered sugar and cinnamon.
Pingback: How to Make the Perfect Tomahawk Steak Recipe! – Simple Recipe Finder