
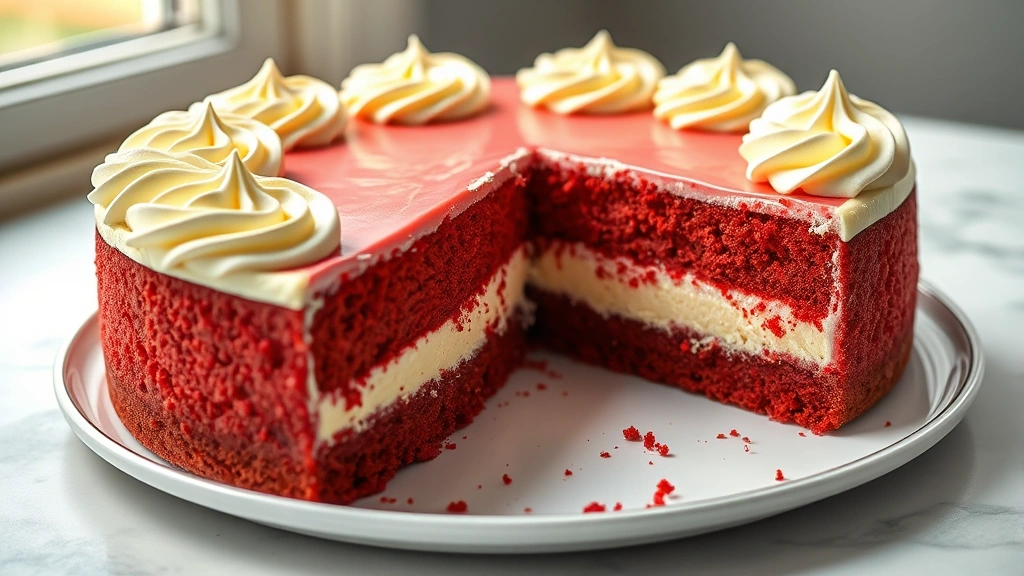
Red velvet cheesecake is the ultimate show-stopper dessert that combines two beloved classics into one absolutely divine creation. This elegant treat features a velvety red velvet cake layer, a creamy cheesecake filling, and a tangy cream cheese frosting on top. It’s the perfect dessert for special occasions, holiday gatherings, or whenever you want to impress your guests with something truly spectacular.
What I absolutely love about this red velvet cheesecake recipe is how it balances the subtle cocoa notes and buttermilk tang of red velvet cake with the rich, luxurious texture of creamy cheesecake. The result is a dessert that’s elegant enough for a formal dinner party but approachable enough that even home bakers can master it. The beautiful deep red color makes it visually stunning, and the combination of flavors creates an unforgettable taste experience.
This recipe has become a staple in my kitchen, especially around Valentine’s Day and Christmas. I love serving it to guests because it always receives compliments and requests for the recipe. The key to success is using quality cream cheese, not overmixing the cheesecake filling, and allowing proper baking and cooling time. Don’t skip the cooling steps, as they’re essential for achieving that perfect creamy texture without cracks.
One of the best parts about making this at home is that you can customize it to your preferences. Some people prefer a thicker cake layer, while others want more cheesecake filling. You can also adjust the amount of red food coloring based on how vibrant you’d like the color to be. For a more sophisticated look, I sometimes reduce the coloring slightly for a deeper burgundy shade.
This dessert is also incredibly versatile for entertaining. You can make it a day or two ahead, which takes the pressure off on the day of your event. It stores beautifully in the refrigerator and actually tastes even better the next day once all the flavors have melded together. Whether you’re a seasoned baker or trying your hand at cheesecake for the first time, this recipe is foolproof and guaranteed to impress. For more decadent dessert inspiration, check out our guide to rich cream-based recipes for other elegant dishes.
The combination of textures in this dessert is what makes it truly special. The tender red velvet cake layer provides a subtle chocolate backdrop, the smooth cheesecake filling is rich and creamy, and the cream cheese frosting adds another layer of indulgence. Each bite is a perfect harmony of flavors that will have your guests asking for seconds. This is definitely a recipe worth mastering, and I’m excited to share all my tips and tricks with you to ensure your success. Check out our other cream-based dessert recipes for more inspiration on working with rich, creamy ingredients.
Ingredients
- 1 cup all-purpose flour
- 1/2 cup unsweetened cocoa powder
- 1 teaspoon baking soda
- 1/2 teaspoon salt
- 1/2 cup (1 stick) butter, softened
- 1 cup granulated sugar
- 1 large egg
- 1/2 cup buttermilk
- 1 teaspoon vanilla extract
- 1-2 tablespoons red food coloring
- 32 ounces (four 8-oz packages) cream cheese, softened to room temperature
- 1 cup granulated sugar (for cheesecake filling)
- 1/4 cup all-purpose flour
- 4 large eggs, room temperature
- 1/2 cup sour cream
- 1/4 cup buttermilk
- 2 teaspoons vanilla extract
- 1-2 tablespoons red food coloring (for cheesecake)
- 8 ounces cream cheese, softened
- 1/4 cup (1/2 stick) butter, softened
- 2 cups powdered sugar
- 1 teaspoon vanilla extract
- 1 tablespoon red food coloring (for frosting)
- Pinch of salt
Instructions
- Preheat your oven to 350°F. Line a 9-inch springform pan with parchment paper on the bottom and wrap the outside with aluminum foil to prevent water from seeping in during the water bath.
- Make the red velvet cake layer by whisking together 1 cup flour, 1/2 cup cocoa powder, 1 teaspoon baking soda, and 1/2 teaspoon salt in a small bowl.
- In a large bowl, cream 1/2 cup softened butter and 1 cup sugar together until light and fluffy, about 2-3 minutes.
- Add 1 large egg to the butter mixture and beat well, then add the flour mixture alternately with 1/2 cup buttermilk, starting and ending with the flour mixture.
- Stir in 1 teaspoon vanilla extract and 1-2 tablespoons red food coloring until the batter is a beautiful red velvet color.
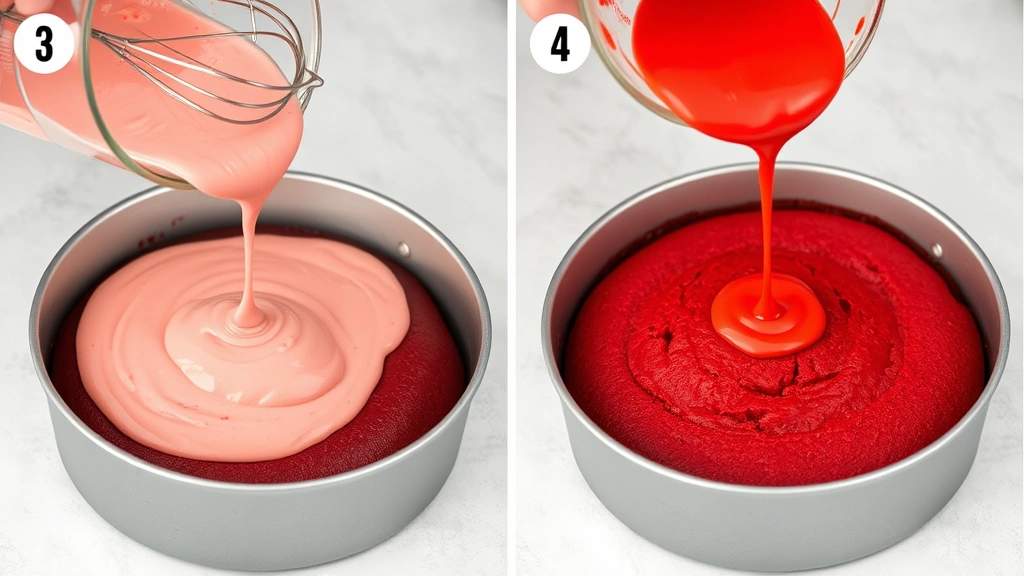
- Pour the cake batter into the prepared springform pan and spread evenly.
- Bake the cake layer for 15-18 minutes until a toothpick inserted in the center comes out clean. Remove from oven and let cool while preparing the cheesecake filling.
- For the cheesecake filling, beat 32 ounces softened cream cheese in a large bowl with an electric mixer on medium speed for about 2 minutes until smooth and creamy.
- Add 1 cup sugar and 1/4 cup flour to the cream cheese and beat on low speed until just combined, being careful not to overmix.
- Add 4 room temperature eggs one at a time, beating on low speed after each addition until just combined. Do not overmix, as this can incorporate too much air and cause cracks.
- Gently fold in 1/2 cup sour cream, 1/4 cup buttermilk, 2 teaspoons vanilla extract, and 1-2 tablespoons red food coloring until just combined and evenly colored.
- Pour the cheesecake filling over the cooled cake layer in the springform pan.
- Place the springform pan inside a larger roasting pan. Pour hot water into the roasting pan until it reaches halfway up the sides of the springform pan to create a water bath.
- Bake at 350°F for 55-65 minutes. The cheesecake is done when the edges are set but the center still jiggles slightly when gently shaken, about a 2-inch diameter circle in the middle.
- Turn off the oven and crack the door open about 4 inches. Leave the cheesecake in the oven for 1 hour to cool gradually. This prevents sudden temperature changes that cause cracking.
- Remove the cheesecake from the oven and let it cool to room temperature on the counter for about 1 hour.
- Once cooled, refrigerate the cheesecake for at least 4 hours or preferably overnight before frosting.
- Make the cream cheese frosting by beating 8 ounces softened cream cheese and 1/4 cup softened butter together until smooth and creamy.
- Add 2 cups powdered sugar gradually while beating, then add 1 teaspoon vanilla extract, 1 tablespoon red food coloring, and a pinch of salt.
- Beat until the frosting is light, fluffy, and a beautiful red color, about 2-3 minutes.
- Remove the cheesecake from the refrigerator and run a warm knife around the edges to loosen it from the pan before opening the springform.
- Spread or pipe the cream cheese frosting over the top of the chilled cheesecake in decorative swirls.
- Refrigerate until serving. This cheesecake is best served chilled and will keep in the refrigerator for up to 5 days.

Pro Tips
Do not skip the water bath. It ensures even, gentle cooking and prevents the cheesecake from cracking or drying out. Make sure the foil wrapper is sealed well so water doesn’t seep in.
Overmixing the cheesecake batter after adding the eggs will incorporate too much air and cause unsightly cracks. Mix on low speed and stop as soon as ingredients are just combined.
The gradual cooling method is crucial. Don’t skip the oven door cracking step, as rapid temperature changes are the primary cause of cheesecake cracks.
If your cheesecake cracks slightly, don’t worry. The frosting will cover most imperfections, and the taste will still be absolutely delicious.
For the most vibrant red color, use gel food coloring rather than liquid coloring, as it provides better color without adding extra moisture.
You can make this cheesecake 1-2 days ahead and frost it just before serving, or frost it and refrigerate until ready to serve.
For a twist, add 1/4 teaspoon of cream of tartar to the filling for subtle tang, or incorporate a layer of chocolate ganache between the cake and cheesecake layers.
Slice with a warm, wet knife for the cleanest cuts. Wipe the knife between each slice.
This dessert pairs beautifully with whipped cream, fresh berries, or a simple raspberry sauce for serving.
Pingback: How to make the BEST Korean Chicken Recipe! So Tasty! – Simple Recipe Finder
Pingback: How to make the BEST Stuffed Cabbage Soup Recipe! – Simple Recipe Finder