
Making homemade rhubarb jam is easier than you might think, and the results are absolutely delicious! This classic preserve captures the tart, bright flavor of spring rhubarb with just the right amount of sweetness. Whether you’re spreading it on warm toast, swirling it into yogurt, or using it as a filling for pastries, this jam recipe will become a kitchen staple.
Rhubarb jam is one of those recipes that feels fancy but requires minimal effort. With just three simple ingredients—rhubarb, sugar, and lemon—you’ll create something that tastes like it came from a gourmet kitchen. The natural pectin in rhubarb means you don’t need any special additives, and the whole process takes less than an hour from start to finish.
I love making this jam in early spring when fresh rhubarb is at its peak. The vibrant pink color and tangy-sweet flavor are simply unbeatable. This recipe yields about four half-pint jars, perfect for gift-giving or stocking your pantry. Plus, the technique is so straightforward that even beginner jam makers will have success.
The key to the best rhubarb jam is using fresh, firm stalks and not overcooking the mixture. You want to preserve that fresh rhubarb flavor while still achieving the perfect gel consistency. Follow these steps, and you’ll have beautiful jars of jam ready to enjoy all season long.
What makes this jam-making process so foolproof is understanding the science behind it. Rhubarb naturally contains pectin, which helps the jam set without any additional gelling agents. The ratio of sugar to fruit is crucial—it not only sweetens the jam but also acts as a preservative. This recipe strikes the perfect balance between tartness and sweetness.
Many home cooks are intimidated by jam making, but this rhubarb jam recipe proves it doesn’t have to be complicated. You’ll need a heavy-bottomed pot, a candy thermometer (though not absolutely essential), and basic canning supplies if you want to preserve your jam long-term. Even if you’re just making a small batch to enjoy fresh, the process is the same.
The beauty of homemade jam is that you control the ingredients and sweetness level. Unlike store-bought versions that often contain high-fructose corn syrup or artificial flavors, your homemade rhubarb jam will taste pure and authentic. You can even adjust the recipe to your preferences—add more lemon for extra tartness, or increase the sugar if you prefer sweeter preserves.
Once you master this basic jam technique, you’ll want to try variations. Some people add fresh ginger for warmth, while others mix in a splash of vanilla extract. You could even create a strawberry-rhubarb jam by using equal parts of each fruit. The possibilities are endless once you understand the fundamentals.
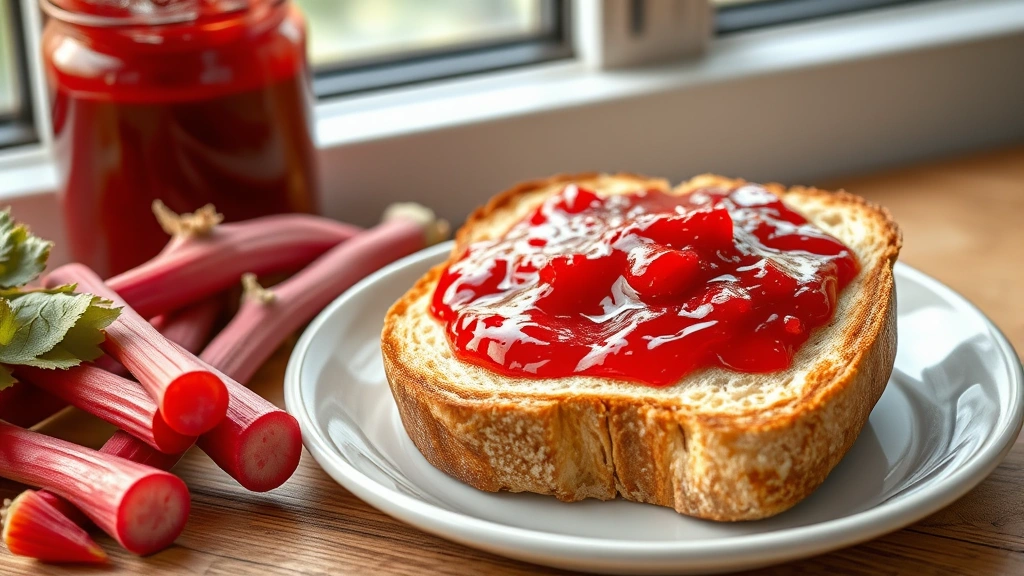
This rhubarb jam is perfect for so many applications. Spread it on buttered toast for a simple breakfast, swirl it into oatmeal, layer it in cakes and pastries, or use it as a filling for thumbprint cookies. You can even thin it with a little water to create a glaze for roasted meats or a topping for vanilla ice cream. The versatility makes it a must-have in any well-stocked kitchen.
For the best results, start with quality rhubarb. Choose firm, brightly colored stalks with no soft spots. Wash them thoroughly and trim away any leaves (which are toxic) and woody ends. The fresher your rhubarb, the better your jam will taste. If you can’t get fresh rhubarb, frozen works well too—just thaw it first and drain any excess liquid.
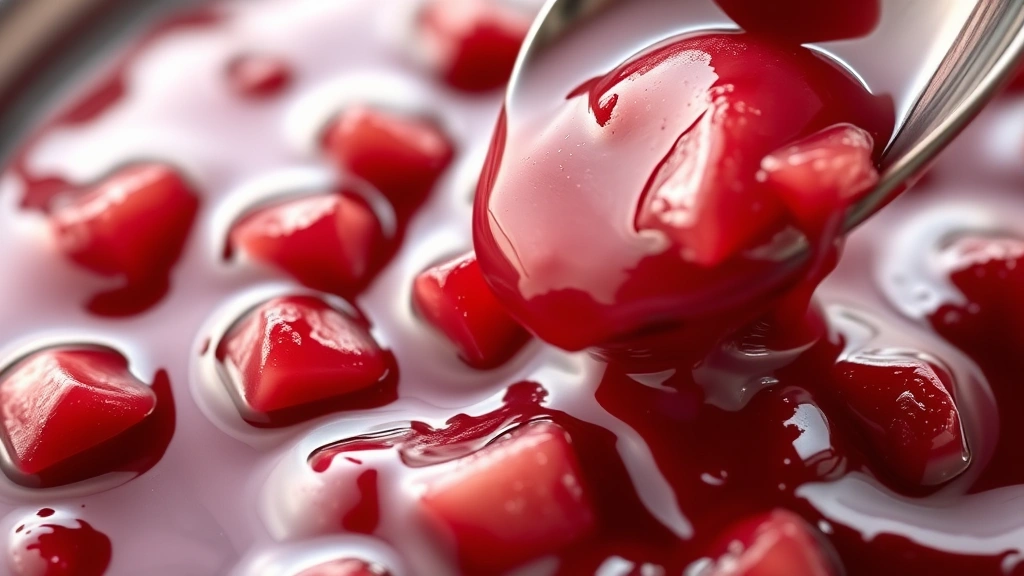
Understanding the jam-setting point is essential for success. The traditional way to test this is using the cold plate method: place a small spoonful of jam on a chilled plate and let it cool for a minute. If it wrinkles when you push it with your finger, it’s ready. Alternatively, use a candy thermometer and look for 220°F (104°C). This recipe will reach the proper consistency around 30-35 minutes of cooking.
Learn more about home canning and preserving to ensure your jam stays fresh longer. Proper sterilization of jars and correct storage are important for shelf stability. If you’re not planning to can your jam for long-term storage, simply store it in the refrigerator for up to three weeks.
For detailed canning instructions and safety information, check out Serious Eats’ guide to jam making. You’ll find helpful tips on sterilizing jars and achieving the perfect set. Another excellent resource is the Bon Appétit rhubarb jam recipe, which offers professional insights.
For those interested in the chemistry of jam setting, New York Times Cooking’s rhubarb jam provides detailed explanations. Understanding why jam sets helps troubleshoot any issues. Temperature control and ingredient ratios are the two most important factors in jam success.
This recipe is naturally vegan and gluten-free, making it suitable for various dietary preferences. It’s also lower in sugar than many store-bought jams, so you get the true flavor of the rhubarb. The tartness of rhubarb means you need less sugar than with sweeter fruits, resulting in a more sophisticated, complex flavor profile.
Once you’ve made this basic rhubarb jam, you’ll gain confidence in the kitchen. Jam making teaches valuable skills that transfer to other cooking projects. You’ll understand how heat transforms ingredients, how timing affects flavor, and how to work toward a specific consistency. These lessons apply to caramel making, candy production, and sauce preparation.
The satisfaction of making jam from scratch is unmatched. There’s something special about opening a jar months later and tasting spring in every spoonful. Your family and friends will be impressed when you tell them you made it yourself. Plus, homemade jam makes an excellent gift, packaged in pretty jars with custom labels.
I encourage you to try this rhubarb jam recipe soon. It’s the perfect project for a lazy spring afternoon, and the rewards far outweigh the minimal effort required. Soon you’ll be making batch after batch, experimenting with variations, and wondering why you ever bought jam from the store. Welcome to the wonderful world of homemade preserves!
Ingredients
- 2 pounds fresh rhubarb, trimmed and cut into ½-inch pieces (about 6 cups)
- 3 cups granulated sugar
- 3 tablespoons fresh lemon juice
- 1 tablespoon lemon zest (optional, for extra flavor)
- ¼ teaspoon sea salt
- Water (1-2 tablespoons if rhubarb seems very dry)
Instructions
- Prepare your rhubarb by rinsing it thoroughly under cold water. Trim away the woody ends and remove any leaves (which are toxic). Cut the stalks into ½-inch pieces and measure out about 6 cups.
- Combine the cut rhubarb and granulated sugar in a large, heavy-bottomed pot or Dutch oven. Stir well to combine, ensuring the sugar coats all the rhubarb pieces.
- Add the fresh lemon juice, lemon zest (if using), and sea salt to the pot. Stir everything together until well combined.
- Let the mixture sit at room temperature for 15-30 minutes. This allows the sugar to draw out the rhubarb’s natural juices, creating a syrup that will help the jam cook evenly.
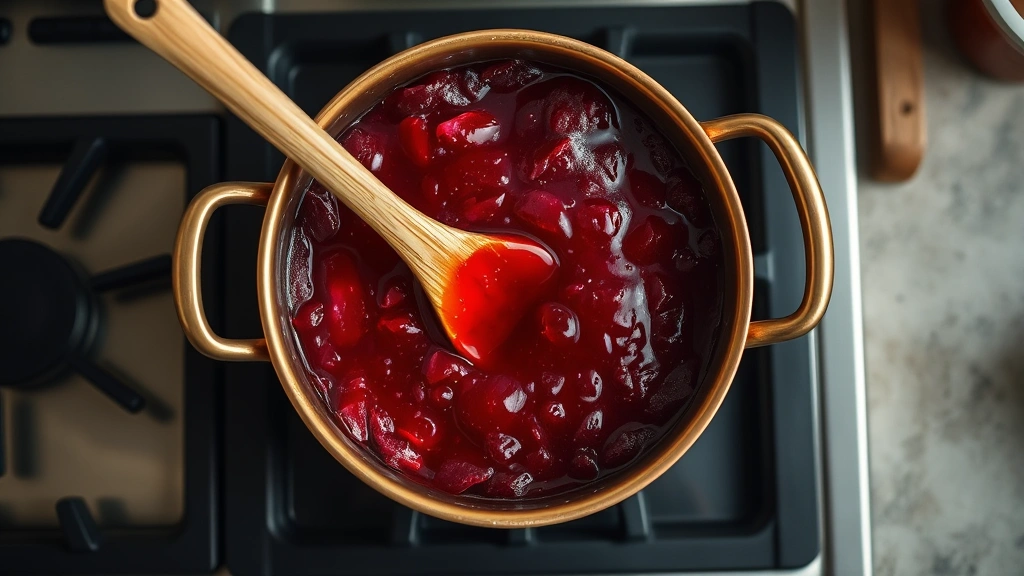
- Place the pot over medium-high heat. Stir occasionally as the mixture heats up to prevent sticking and ensure even cooking.
- Once the mixture comes to a boil, increase the heat to high and maintain a rolling boil. Stir frequently to prevent scorching on the bottom of the pot.
- Set a timer for 30 minutes and begin checking the jam for doneness around the 25-minute mark using the cold plate method.
- To use the cold plate method: place a small spoonful of jam on a chilled plate and let it cool for about 1 minute. Push it with your finger—if it wrinkles and doesn’t flow back, it’s ready. If it’s still runny, continue cooking and test again in 2-3 minutes.
- Alternatively, use a candy thermometer to monitor the temperature. The jam is ready when it reaches 220°F (104°C). This is the gel point for most jams.
- Once the jam reaches the proper consistency, remove the pot from the heat and let it cool for 5 minutes. This allows any foam to settle.
- Skim off any foam from the surface using a clean spoon or skimmer if desired (this step is optional and only affects appearance).
- If canning for long-term storage: sterilize your jars, lids, and bands according to USDA guidelines. Carefully ladle the hot jam into the hot jars, leaving ¼-inch headspace.
- Wipe the rims of the jars clean with a damp cloth and place the lids on top, then screw on the bands until just finger-tight.
- Process the jars in a boiling water bath for 10 minutes (adjusting for altitude if necessary according to USDA guidelines).
- Remove the jars from the water bath and place them on a clean kitchen towel. Let them cool completely at room temperature—you should hear a gentle ‘pop’ as each jar seals.
- If not canning: simply ladle the jam into clean jars and let cool to room temperature. Cover with lids and store in the refrigerator for up to 3 weeks.
- Label your jars with the date and contents. Store in a cool, dark place if canned, or in the refrigerator if not processed.
- Before serving, run a knife around the inside of the jar to ensure proper seal if canned. The jam should be glossy and spreadable with a beautiful deep pink color.
Pro Tips
- This recipe works best with fresh rhubarb at peak season (spring), though frozen rhubarb that’s been thawed works well too.
- The natural pectin in rhubarb means you don’t need any commercial pectin or gelling agents for this recipe to set properly.
- If your jam doesn’t set after cooling completely, you can re-cook it. Add the jam back to the pot with a squeeze of lemon juice and boil for another 5-10 minutes before jarring again.
- For a smoother jam, you can mash the rhubarb pieces with a potato masher during or after cooking. This recipe produces a chunky-style jam by default.
- Adjust the sugar amount to your taste preference. Some people prefer less sugar for a more tart jam, while others like it sweeter. Keep the ratio roughly 1 part rhubarb to ½ part sugar for best results.
- Lemon juice not only adds flavor but also increases the acidity of the jam, which helps it set and improves shelf stability.
- Store unopened canned jars in a cool, dark pantry for up to one year. Once opened, refrigerate and use within 3 weeks.
- This jam is delicious on toast, in pastries, swirled into yogurt, or as a filling for cakes. It can also be thinned with water to create a glaze.
- If you prefer a less tart jam, you can add a small amount of strawberry or another sweet fruit, though this changes the recipe’s simplicity.
- Always use clean, sterilized jars and equipment when canning to prevent contamination and ensure food safety.