
There’s something absolutely magical about s’mores – that perfect combination of toasted marshmallow, melted chocolate, and crispy graham cracker that takes us back to campfires and simpler times. But what if I told you that you could capture all of that nostalgic, gooey goodness in cookie form? Welcome to the ultimate s’mores cookie recipe that will absolutely steal the show at your next gathering!
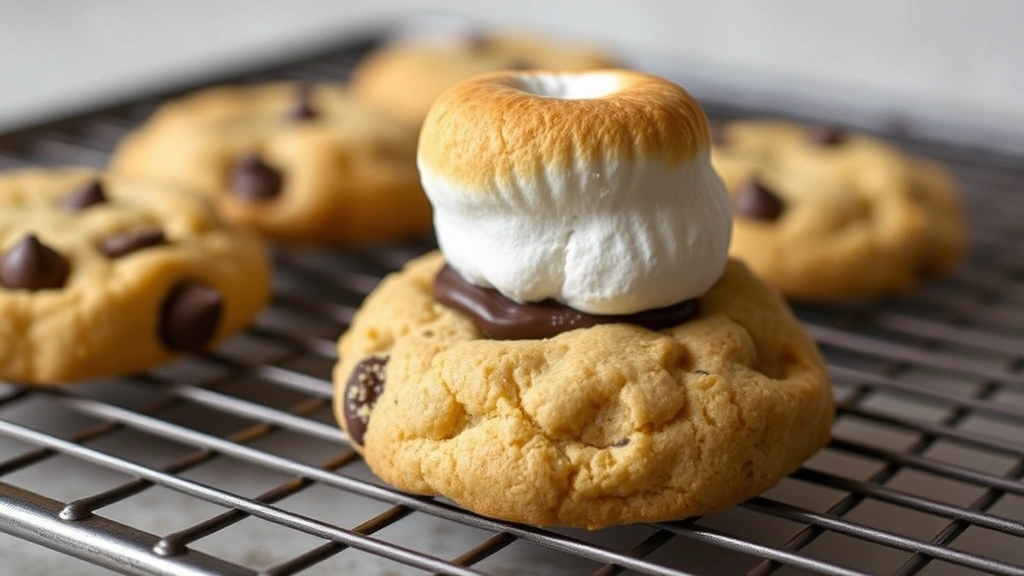
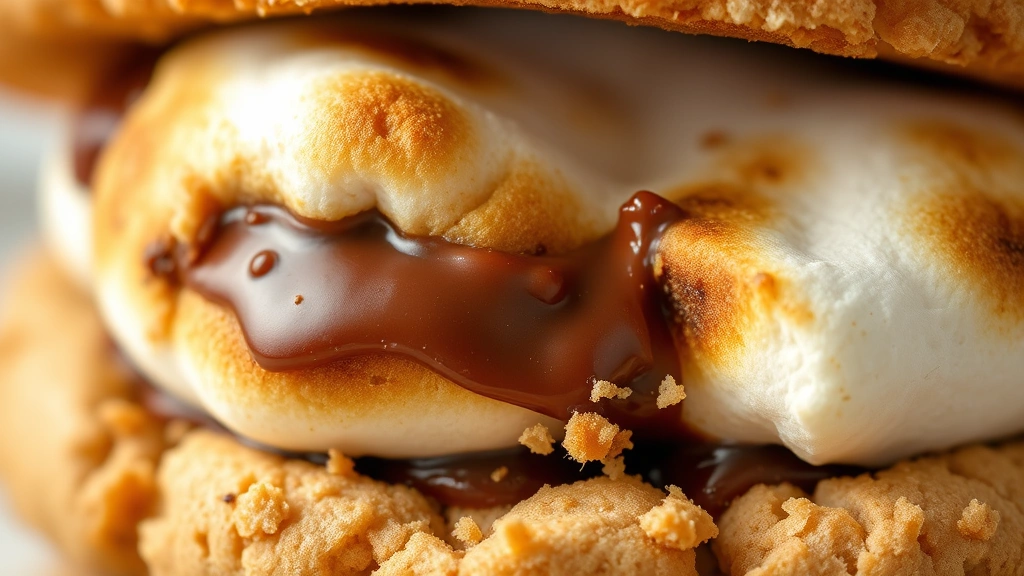
These aren’t just any cookies – they’re a showstopper dessert that combines buttery, soft-baked chocolate cookie dough loaded with graham cracker pieces, chunks of chocolate, and topped with a perfectly toasted marshmallow that gets golden and slightly charred, just like the real deal. The best part? You don’t need a campfire to enjoy them. Whether you’re baking for a crowd, looking for the perfect after-dinner treat, or wanting to impress someone special, this s’mores cookie recipe delivers on flavor, texture, and pure indulgence.
I’ve been perfecting this recipe for years, testing different ratios of chocolate to graham cracker, experimenting with various marshmallow techniques, and figuring out the exact baking time to achieve that perfect balance between crispy edges and a gooey center. The result is a cookie that’s crispy on the outside, wonderfully chewy in the middle, and absolutely loaded with all your favorite s’mores components. These cookies are perfect for serving at parties, bringing to potlucks, or simply enjoying with a cold glass of milk on a cozy evening.
What makes this recipe truly special is the attention to detail. We’re using high-quality chocolate, real graham crackers, and fresh marshmallows – because s’mores are all about quality ingredients. The cookies themselves are soft and buttery, providing the perfect canvas for all those delicious toppings. And that toasted marshmallow on top? It’s the cherry on the sundae, adding both visual appeal and that authentic s’mores flavor everyone craves.
One of my favorite things about this recipe is how versatile it is. You can make them as written for the classic s’mores experience, or you can get creative with different chocolate varieties, try dark chocolate for a more sophisticated flavor, or even add a drizzle of chocolate over the top after baking. They also store beautifully – just keep them in an airtight container and they’ll stay fresh for several days, making them perfect for meal prep or advance baking.
If you’re a fan of other chocolate desserts, you might also enjoy exploring our other indulgent recipes or checking out different flavor combinations that work beautifully with chocolate. But trust me – once you make these s’mores cookies, they’ll become a regular request from family and friends. Let’s dive in and create some cookie magic!
Ingredients
- 2 1/4 cups all-purpose flour
- 1 teaspoon baking soda
- 1/2 teaspoon salt
- 1 cup (2 sticks) unsalted butter, softened to room temperature
- 3/4 cup granulated sugar
- 3/4 cup packed brown sugar
- 1 large egg
- 1 large egg yolk
- 2 teaspoons vanilla extract
- 1 1/2 cups semi-sweet chocolate chips
- 1 1/2 cups milk chocolate chips
- 1 1/2 cups crushed graham cracker pieces (about 12 full crackers)
- 24 large marshmallows
- 2 tablespoons honey or light corn syrup (for brushing)
- 2 tablespoons crushed graham crackers (for optional topping)
Instructions
- Preheat your oven to 325°F (165°C). Line baking sheets with parchment paper or silicone baking mats, spacing them out so you have room to work.
- In a small bowl, whisk together the all-purpose flour, baking soda, and salt. Set this dry mixture aside.
- In a large mixing bowl, cream together the softened butter, granulated sugar, and brown sugar until light and fluffy, about 3-4 minutes. The mixture should be pale and increased in volume.
- Add the egg and egg yolk to the butter mixture one at a time, beating well after each addition. Then add the vanilla extract and mix until fully combined.
- Gradually add the flour mixture to the wet ingredients, mixing on low speed until just combined. Be careful not to overmix, as this can result in tough cookies.
- Fold in the semi-sweet chocolate chips, milk chocolate chips, and crushed graham cracker pieces using a spatula or wooden spoon until evenly distributed throughout the dough.
- Scoop the dough using a 2-tablespoon cookie scoop or ice cream scoop, spacing the dough balls about 2 inches apart on your prepared baking sheets. You should have about 24 cookies.
- Bake for 10-12 minutes, until the edges are lightly golden but the centers still look slightly underdone. The cookies will continue to cook after removal from the oven.
- Remove the baking sheets from the oven and immediately press one large marshmallow gently into the center of each warm cookie. Work quickly so the cookies are still warm enough for the marshmallow to adhere.
- Return the baking sheets to the oven for 2-3 minutes, just until the marshmallows are slightly soft and beginning to puff. Be careful not to burn them.
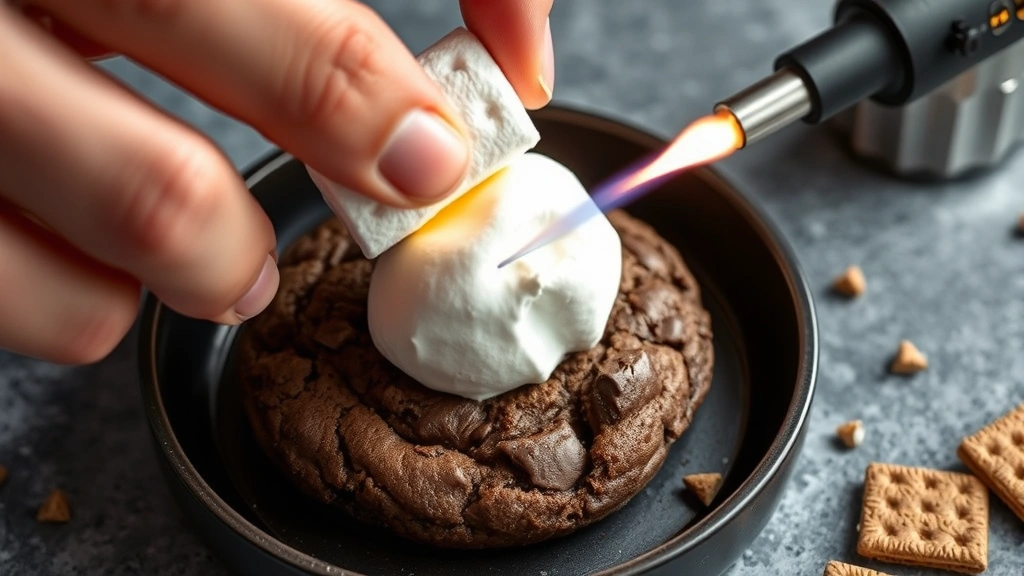
- Remove the baking sheets from the oven and use a kitchen torch to lightly toast the marshmallows, moving the torch continuously to avoid burning. Alternatively, you can place the baking sheets under the broiler for 30-60 seconds, watching carefully to prevent burning.
- If desired, brush the tops of the marshmallows lightly with honey or corn syrup for extra shine and a slight caramelized appearance.
- Sprinkle the optional crushed graham crackers over the top of each marshmallow while still warm if you want extra texture and visual appeal.
- Allow the cookies to cool on the baking sheets for 5 minutes before transferring them to a wire rack to cool completely. The marshmallows will firm up as they cool.
- Serve warm or at room temperature. These cookies are best enjoyed the day they’re made, but they can be stored in an airtight container for up to 3-4 days.
Pro Tips
Marshmallow Options: While traditional large marshmallows work best for this recipe, you can also use a marshmallow fluff and pipe it onto the cookies before toasting, or use mini marshmallows piled on top. If using mini marshmallows, reduce the toasting time to 1-2 minutes as they brown quickly.
Torching vs. Broiling: A kitchen torch gives you the most control and the best toasted marshmallow color, mimicking the campfire experience perfectly. If you don’t have a torch, the broiler works well but watch very carefully as it can quickly go from perfectly toasted to burnt. Keep the oven door open and stay nearby.
Chocolate Variations: Feel free to customize with different chocolate types. Dark chocolate (60-70% cocoa) adds sophistication, white chocolate chips provide a sweeter option, or try a combination of milk and dark chocolate. You can also use chocolate chunks instead of chips for larger pockets of chocolate throughout the cookie.
Graham Cracker Selection: Use quality graham crackers – they make a real difference in flavor. Honey graham crackers add extra sweetness, while regular varieties provide a more neutral taste. For a nuttier flavor, try using whole wheat graham crackers.
Baking Temperature Precision: This recipe uses a lower oven temperature (325°F instead of the typical 350°F) to ensure the centers stay soft and chewy while the edges set properly. If your oven runs hot or cold, consider using an oven thermometer for accuracy. The lower temperature also gives the marshmallow time to warm through without the cookies overbaking.
Storage Solutions: Keep finished cookies in an airtight container at room temperature for up to 4 days. Layer them between parchment paper to prevent sticking. They’re wonderful at room temperature but can also be gently reheated in the microwave for 10-15 seconds if you want that just-baked warmth.
Serving Suggestions: These cookies pair beautifully with cold milk, hot chocolate, or coffee. They’re perfect for dessert tables at parties, camping trips (if you can keep them cool), or as edible gifts wrapped in cellophane with twine. Consider making a double batch since they disappear quickly!
Troubleshooting: If your cookies spread too much, your butter was too warm or your flour might be too low in protein. If they’re too cakey, you may have added too much flour. If the marshmallows aren’t toasting evenly, rotate the torch or the cookie sheet during the process. Remember that these cookies continue cooking slightly after removal from the oven due to carryover heat.