

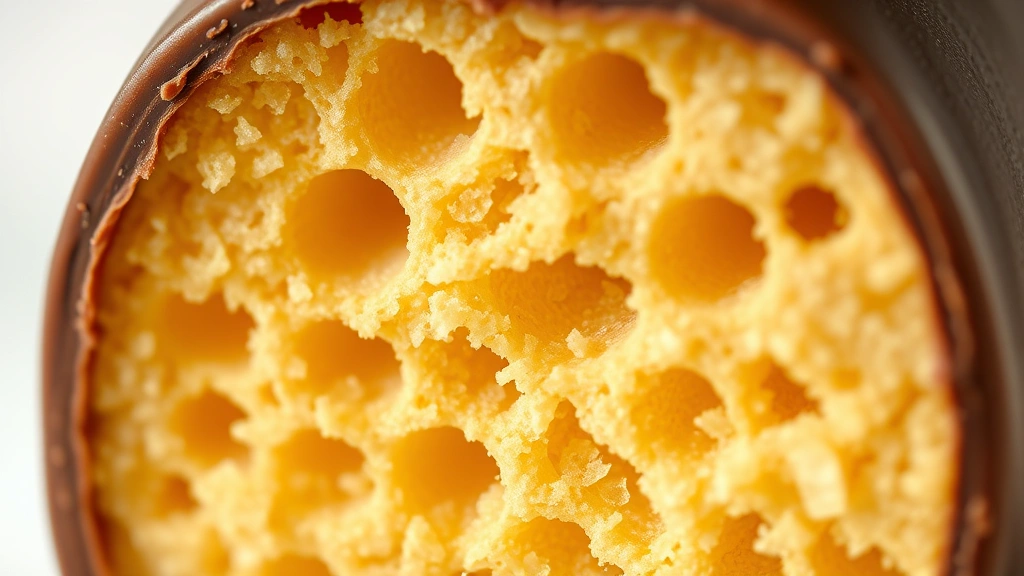
Sponge candy is one of those magical confections that seems impossibly fancy but is actually quite simple to make at home. This light, airy treat features a delicate honeycomb structure encased in dark chocolate—it’s the kind of candy that makes you look like a professional confectioner without requiring any special equipment or advanced techniques.
The beauty of sponge candy lies in its contrast of textures. The crispy, melting honeycomb interior literally dissolves on your tongue, while the chocolate shell provides a satisfying snap and rich flavor that balances the sweetness perfectly. It’s the ideal candy to make for gifting, holiday parties, or simply to satisfy a sweet craving with something a little more sophisticated than typical store-bought options.
What I love most about making sponge candy is how quickly it comes together. You’ll have finished candy in about thirty minutes, though most of that time is just letting the chocolate set. The actual hands-on time is minimal, making this an excellent project for beginners or anyone looking to impress their family with homemade candy.
If you enjoy making candies at home, you might also appreciate learning how to create other chocolate-covered treats. The techniques used here translate beautifully to complementary flavor profiles that can elevate any dessert spread. For those interested in candy-making more broadly, understanding the science behind sugar and chocolate will open up countless possibilities.
The key to perfect sponge candy is maintaining the right temperature for your sugar mixture and working quickly once you add the baking soda. The reaction between the baking soda and hot sugar creates the honeycomb structure through rapid carbon dioxide release. This is pure kitchen chemistry in action, and it’s absolutely fascinating to watch.
One thing that makes this recipe foolproof is that there’s very little that can go wrong. Unlike some candy recipes that require a candy thermometer and precise timing, this one is forgiving and almost impossible to mess up. Even if your sponge candy isn’t perfectly uniform or the chocolate coating isn’t flawless, it will still taste absolutely delicious.
For those who want to explore more sophisticated candy-making, check out Bon Appétit’s candy tutorials for advanced techniques. You might also enjoy exploring Serious Eats’ confection science articles to understand the chemistry behind candy-making.
This recipe makes approximately twenty pieces of sponge candy, which is perfect for a small gathering or to stash away for yourself over several weeks. Each piece is wonderfully satisfying, so a little goes a long way. Store your finished candy in an airtight container at room temperature, and it will keep for up to two weeks, though honestly, it rarely lasts that long.
Whether you’re a seasoned candy maker or attempting homemade confections for the first time, this sponge candy recipe will become a favorite in your collection. It’s the kind of treat that people request again and again, and the compliments you’ll receive will make you feel like you’ve spent hours in the kitchen when, in reality, you’ve invested minimal effort for maximum impact.
Ingredients
- 1 cup granulated sugar
- ¾ cup light corn syrup
- ¼ cup water
- 2 tablespoons butter
- 1½ tablespoons baking soda
- 1 teaspoon vanilla extract
- 8 ounces dark chocolate (60-70% cacao), chopped
- 2 tablespoons coconut oil or vegetable oil
- Pinch of sea salt for finishing (optional)
Instructions
- Combine sugar, corn syrup, water, and butter in a medium saucepan. Stir over medium heat until the sugar dissolves completely and the mixture comes to a gentle boil.
- Once boiling, stop stirring and let the mixture cook without disturbance for approximately 8-10 minutes until it reaches a light amber color. You can gently swirl the pan if needed, but avoid stirring as this can cause crystallization.
- Remove the saucepan from heat and immediately add the baking soda and vanilla extract. The mixture will bubble vigorously—this is exactly what you want. Stir quickly but carefully until the baking soda is fully incorporated and the mixture becomes lighter in color and frothy.
- Quickly pour the hot sponge mixture onto a parchment-lined baking sheet, spreading it out as evenly as possible with a spatula or the back of a spoon. Work fast because the mixture hardens quickly. Don’t worry about making it perfect—rustic is beautiful.
- Allow the sponge candy to cool completely at room temperature for about 10-15 minutes until it’s firm and no longer warm to the touch.
- Once cooled, break the sponge candy into bite-sized pieces by hand. They should snap cleanly if cooled properly. Don’t worry if some pieces are larger or smaller—this adds to the charm.
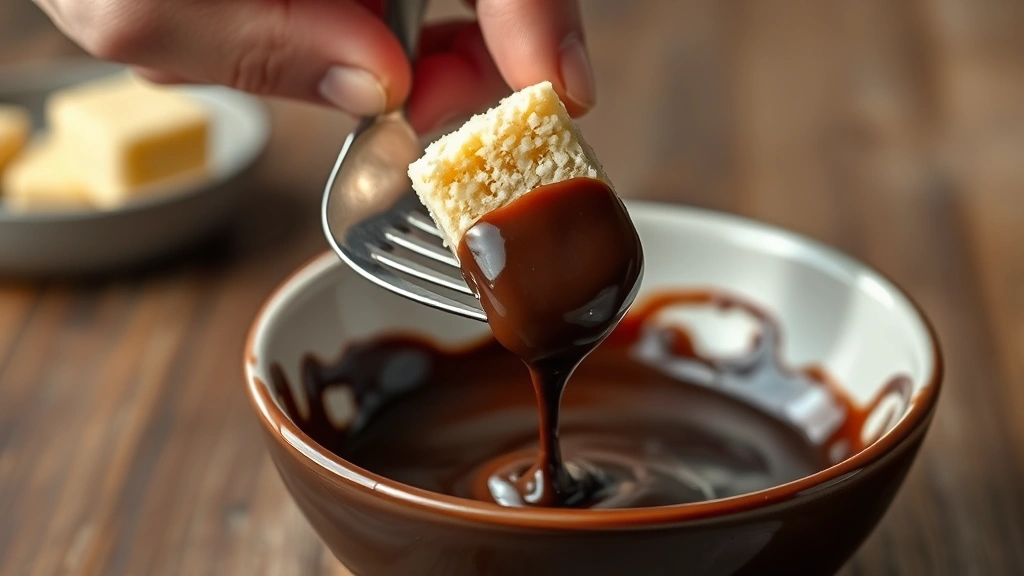
- Place the chopped dark chocolate and coconut oil in a microwave-safe bowl. Microwave in 30-second intervals, stirring between each interval, until the chocolate is completely melted and smooth.
- Line a baking sheet with parchment paper and set it nearby. Working with one piece at a time, use a fork to dip each sponge candy piece into the melted chocolate, allowing excess chocolate to drip back into the bowl.
- Place the chocolate-covered sponge candy on the prepared baking sheet. If desired, sprinkle a tiny pinch of sea salt on top of each piece before the chocolate sets.
- Allow the chocolate to set completely at room temperature, approximately 20 minutes, or speed up the process by refrigerating for 5-10 minutes until the chocolate is firm.
- Store finished sponge candy in an airtight container at room temperature for up to two weeks. Enjoy your homemade confection immediately or gift it to someone special.
Pro Tips
o Work quickly when adding the baking soda because the chemical reaction happens fast. The baking soda reacts with the hot sugar to create carbon dioxide bubbles, which gives sponge candy its signature honeycomb texture. Hesitation results in lost volume.
o The vanilla extract is optional but recommended, as it adds a subtle flavor dimension that complements the chocolate beautifully. You can also experiment with other extracts like almond or peppermint for variation.
o For chocolate coating, choose a chocolate you actually enjoy eating since it comprises about half the final candy’s flavor profile. Higher quality chocolate (60-70% cacao) provides better taste than milk chocolate and pairs beautifully with the sweet honeycomb interior.
o Coconut oil helps thin the chocolate to the perfect dipping consistency without affecting flavor. You can substitute with vegetable oil or even butter if needed, though coconut oil is preferred.
o If your sponge candy turns out too hard or brittle, your sugar cooked too long. If it’s too sticky, it didn’t cook long enough. Either way, it still tastes delicious and you’ll nail it next time.
o This recipe doubles easily if you want to make larger batches for gifting. Simply multiply all ingredients by two and use a larger saucepan to prevent overflow during the vigorous baking soda reaction.
o Sea salt on top is entirely optional but highly recommended if you enjoy sweet-and-salty flavor combinations. It elevates the candy from simple to sophisticated.
o Humidity affects how long sponge candy stays crispy. Store in an airtight container with a silica gel packet if you live in a humid climate to maintain that perfect snap.