
There’s something absolutely magical about squid ink pasta—it’s elegant, dramatic, and honestly, so much easier to make than you’d think! This showstopping dish brings restaurant-quality sophistication to your home kitchen, with that stunning deep black color and subtle briny flavor that makes everyone ask for the recipe.
I’ll let you in on a little secret: you don’t need to be a professional chef to master squid ink pasta. With quality ingredients and a bit of patience, you’ll create silky, luxurious noodles that taste like you spent hours perfecting them. The key is using real squid ink (not imitation), fresh eggs, and good technique. The flavor is delicate and oceanic without being fishy—it’s more about elegance and umami depth than anything else.
What I love most about this recipe is its versatility. You can dress it simply with butter and garlic, toss it with fresh seafood, or create a decadent sauce with cream and white wine. It’s the kind of pasta that elevates a Tuesday night dinner into something special, and it’s perfect for impressing guests at dinner parties. Plus, once you understand the basic technique, you’ll feel confident making all kinds of flavored pastas.
This squid ink pasta recipe makes enough for four generous servings as a main course or six as a starter. The dough comes together in about 30 minutes, and while it needs time to rest (which you can use to prep your sauce), the actual hands-on time is minimal. I promise you, once you taste homemade pasta infused with squid ink, you’ll never look at the boxed stuff the same way again.
If you’re new to pasta making, start with our Best Egg Noodles Casserole Recipe to get comfortable with dough basics, or check out our Best Cannelloni Recipe for another elegant pasta project. For the perfect pairing, try our Best Creamy Grits Recipe for a stunning surf-and-turf inspired meal.
Serious Eats has an excellent guide to pasta making fundamentals that complements this recipe beautifully. For sauce inspiration, Bon Appétit’s pasta collection offers countless elegant options. And if you want to dive deeper into seafood pasta, the New York Times has a wonderful collection of squid ink recipes worth exploring.
Ingredients
- 3 cups all-purpose flour or tipo 00 flour
- 4 large eggs, room temperature
- 1 teaspoon squid ink (about 1 packet, 4 grams)
- 1/2 teaspoon fine sea salt
- 1 tablespoon extra virgin olive oil
- Water as needed (1-2 tablespoons)
- Extra flour for dusting
Instructions
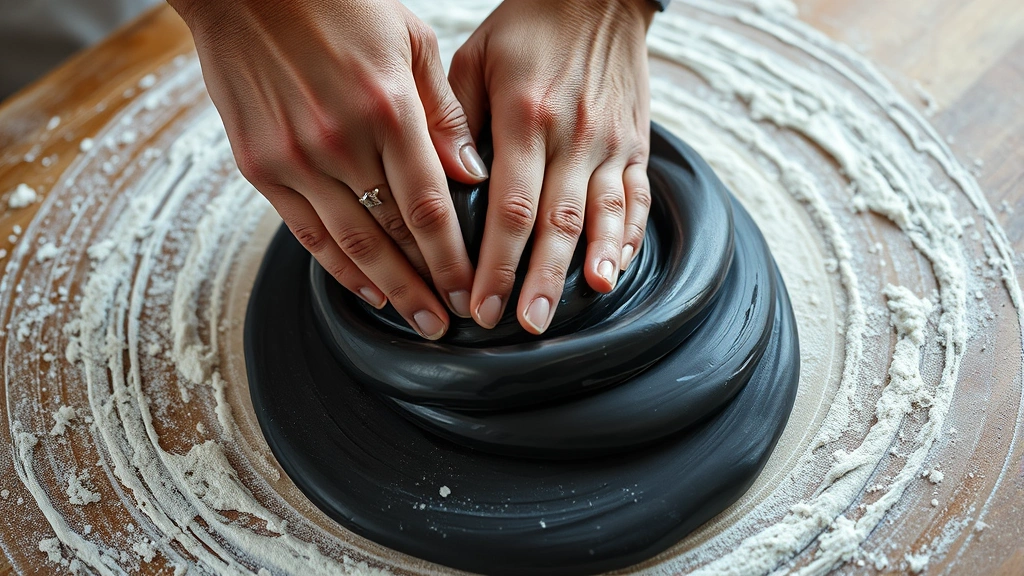
- Mound the flour on a clean work surface, creating a well in the center like a volcano. Crack your eggs directly into this well and add the squid ink, salt, and olive oil.
- Using a fork, gently beat the eggs together just like you’re making scrambled eggs, being careful not to break through the flour walls.
- Once the eggs are combined, begin incorporating flour from the inner walls of your well, working gradually and stirring with your fork. This takes patience—go slowly and steadily.
- When the mixture becomes too thick to work with a fork, begin bringing the remaining flour together with your hands, mixing until a shaggy dough forms.
- Knead the dough for about 10 minutes, working it against the counter with the heel of your hand. It should start out rough and slightly sticky, gradually becoming smoother and more elastic.
- If the dough is too dry and crumbly, wet your hands slightly and continue kneading. If it’s too wet and sticky, dust with a tiny bit of flour. You’re aiming for a smooth, supple texture that doesn’t stick to your hands.
- Form the dough into a ball, wrap tightly in plastic wrap, and let it rest at room temperature for at least 30 minutes. This allows the gluten to relax and the dough to hydrate fully—don’t skip this step!
- After resting, divide the dough into 4 equal portions. Keep the portions you’re not working with covered with plastic wrap to prevent drying.
- Working with one portion at a time, flatten it slightly with your palm, then begin rolling it out with a pasta rolling pin or on a pasta machine, starting at the widest setting.
- If using a pasta machine, run the dough through the widest setting (usually #1) a few times, folding it in thirds between passes, until it becomes smooth and pliable.
- Then pass it through settings #2, #3, #4, and #5, running it through each setting twice. You’re aiming for thin, even sheets that you can almost see through.
- Once your sheet is rolled to the desired thickness, lay it flat on a lightly floured surface. Let it dry for 2-3 minutes—not too long or it will crack, but long enough that it won’t stick to itself when cut.
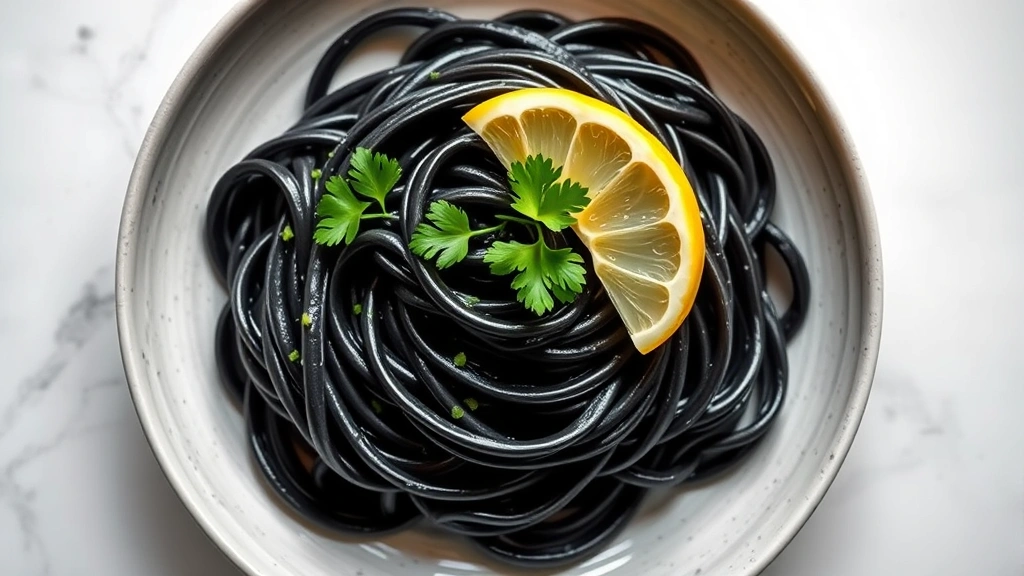
- Using a sharp knife or pizza wheel, cut the pasta sheet into your desired shape: long fettuccine ribbons (about 1/4 inch wide), pappardelle (wider ribbons), or nest-like portions.
- As you cut each piece, dust it lightly with flour and nest it loosely on a parchment-lined baking sheet. This prevents sticking and makes cooking easier.
- Repeat with remaining dough portions. You can cook the pasta immediately or let it dry for a few hours (up to 24 hours if stored in an airtight container).
- Bring a large pot of salted water to a rolling boil. Add the squid ink pasta and stir gently to prevent sticking.
- Fresh pasta cooks very quickly—start checking at 2 minutes. It’s done when it tastes tender but still has a slight al dente texture in the center.
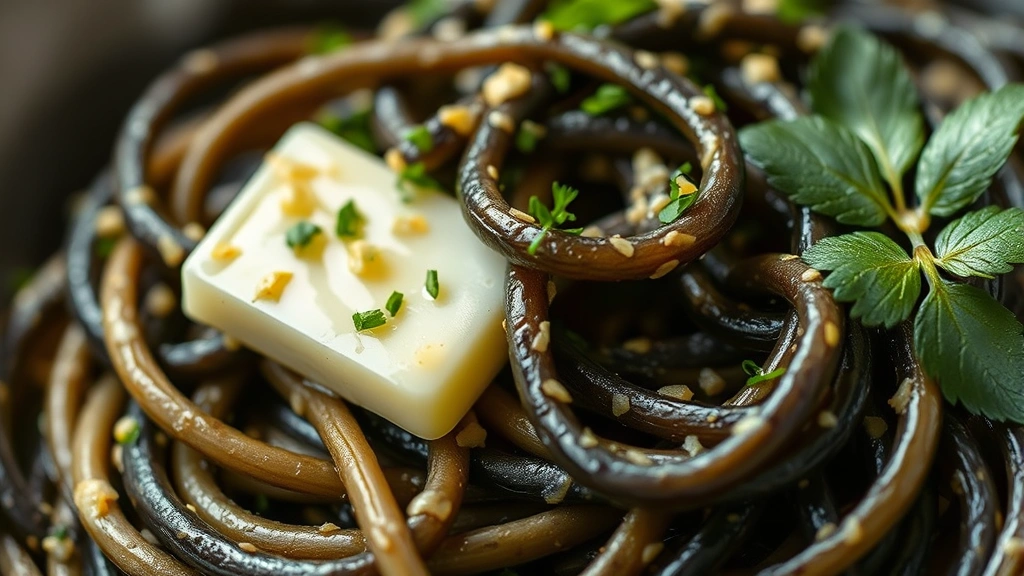
- Reserve 1 cup of pasta cooking water before draining, then immediately dress your pasta with your chosen sauce.
- Toss the pasta gently with sauce, adding pasta water a splash at a time if needed to create a silky, cohesive sauce that coats each strand beautifully.
Pro Tips
Flour Matters: While all-purpose flour works beautifully, Italian tipo 00 flour (doppio zero) creates slightly silkier, more delicate pasta. It’s worth seeking out if you plan to make pasta regularly. The finer milling makes a real difference in texture.
Room Temperature Ingredients: Cold eggs won’t incorporate smoothly into the flour. Let them sit on the counter for 30 minutes before starting. This small detail prevents a dry, crumbly dough.
Resting is Non-Negotiable: The 30-minute rest allows gluten to develop and the dough to relax. This makes rolling easier and creates better texture in the final pasta. If you’re short on time, 20 minutes is the absolute minimum.
Kneading Technique: Knead firmly and consistently—this develops gluten, which gives pasta its characteristic bite and texture. Your dough should feel like a baby’s skin when properly kneaded: smooth, supple, and slightly elastic.
Pasta Machine vs. Rolling Pin: A pasta machine ensures even thickness and is less labor-intensive than hand rolling. If you don’t have one, a long rolling pin works well, though it requires more arm strength and practice.
Drying Time: Fresh pasta doesn’t need to be completely dry before cooking, but letting it dry for 2-3 minutes prevents it from sticking to itself. Don’t let it dry completely or it becomes brittle and breaks when cooking.
Cooking Tips: Fresh pasta cooks in 2-4 minutes compared to 8-12 minutes for dried pasta. Taste test after 2 minutes to avoid overcooking. The cooking water is liquid gold—use it to adjust sauce consistency and help it cling to the pasta.
Sauce Pairing Ideas: Squid ink pasta pairs beautifully with simple preparations that let the pasta shine. Try buttered garlic sauce with fresh parsley, white wine and clam sauce, cream with smoked salmon, or a light tomato-based seafood sauce.
Make-Ahead Option: Fresh squid ink pasta can be made up to 24 hours ahead and stored on parchment-lined trays, loosely covered, in the refrigerator. You can also freeze it for up to 3 months on a baking sheet, then transfer to freezer bags. Cook straight from frozen, adding 1-2 minutes to cooking time.
Troubleshooting: If dough is too sticky, dust with tiny amounts of flour gradually rather than adding it all at once. If it tears while rolling, let it rest for a few minutes—the gluten may need to relax. If it won’t stretch, it may need more rest time.