

Summer sausage is a classic charcuterie board staple that’s surprisingly easy to make at home! This recipe creates that perfect balance of smoky, savory, and slightly sweet flavors that make store-bought versions pale in comparison. Unlike fresh sausages, summer sausage is cured and often smoked, giving it that distinctive deep flavor and firm texture that keeps well throughout the season.
The beauty of making your own summer sausage is having complete control over the ingredients—no mysterious additives or preservatives, just quality meat, spices, and a little patience. Whether you’re a seasoned charcuterie enthusiast or a curious home cook, this recipe walks you through every step of the process, from mixing your meat blend to the final smoking stage.
What makes this recipe special is the combination of pork and beef, which creates complexity in flavor that pure pork sausage simply can’t achieve. The curing process develops those deep, savory notes while the smoking adds dimension and that coveted smoky undertone. Pair your homemade summer sausage with creamy sides for a complete charcuterie experience, or enjoy it sliced thin on fresh salads.
This recipe requires about 5-7 days total from start to finish (mostly hands-off curing time), but the active cooking time is minimal. The result is restaurant-quality summer sausage that rivals anything you’d find at a gourmet market. Once you master this technique, you’ll be making batch after batch for entertaining and gift-giving. For more inspiration on curing and smoking techniques, check out Serious Eats’ meat curing guide.
The smoking process is where the magic truly happens. Using quality wood chips—hickory, apple, or oak work beautifully—infuses the sausage with that signature summer sausage character. If you don’t have a smoker, you can use a regular oven with smoke boxes, though the traditional smoked version is definitely worth the effort. Learn more about different smoking techniques at Bon Appétit’s smoking guide.
Once finished, your summer sausage will keep for weeks in the refrigerator and even longer if frozen, making it perfect for meal prep or unexpected entertaining. Slice it thick for snacking, thin for charcuterie boards, or cube it for creative pasta dishes. The versatility of homemade summer sausage means you’ll find yourself reaching for it constantly.
Ingredients
- 2 pounds ground pork (80/20 blend preferred)
- 2 pounds ground beef (80/20 blend preferred)
- 2 tablespoons pink curing salt (Prague Powder #1)
- 2 tablespoons kosher salt
- 2 tablespoons sugar
- 1 tablespoon black pepper (coarsely ground)
- 1 tablespoon garlic powder
- 1 tablespoon paprika
- 2 teaspoons mustard seed
- 1 teaspoon cayenne pepper
- 1 teaspoon onion powder
- ½ teaspoon ground coriander
- ¼ teaspoon ground ginger
- ¼ teaspoon liquid smoke (optional, for extra depth)
- ½ cup ice water
- 32mm hog casings (soaked in warm water for 30 minutes)
- Wood chips for smoking (hickory, apple, or oak)

Instructions
- Prepare your workspace by chilling all equipment—grinder parts, mixing bowl, and casings—in the freezer for at least 30 minutes. Cold equipment prevents the fat from smearing and keeps your mixture properly textured.
- Cut the pork and beef into 1-inch cubes and spread on a sheet pan. Freeze for 1-2 hours until very cold but not completely frozen.
- Combine all dry ingredients—pink curing salt, kosher salt, sugar, pepper, garlic powder, paprika, mustard seed, cayenne, onion powder, coriander, and ginger—in a small bowl and mix thoroughly to distribute evenly.
- Grind the chilled pork and beef using the fine grind setting on your meat grinder, allowing pieces to fall directly into your chilled mixing bowl.
- Add the dry spice mixture to the ground meat and begin mixing with your hands (wearing clean food-safe gloves) for about 3-4 minutes until the mixture becomes sticky and begins to hold together. This develops the protein structure necessary for proper binding.
- Add the ice water slowly while continuing to mix for another 2-3 minutes until the mixture becomes tacky and uniform, resembling a thick paste.
- If using liquid smoke, add it now and mix thoroughly for 30 seconds.
- Cover the meat mixture and refrigerate for 24 hours to allow the curing salts to work and flavors to develop.
- After 24 hours, run the hog casings under cool water to remove excess salt and check for any holes or tears.
- Set up your sausage stuffer with a medium horn attachment and feed the hog casings onto the horn, leaving about 4 inches hanging off the end.
- Stuff the cured meat mixture into the casings, filling firmly but not so tight that they might burst—there should be slight give when you press gently.
- As you finish each length of casing, tie off the ends securely with kitchen twine, leaving about ½ inch between the tie and the meat.
- Prick the surface of each sausage log with a sterile needle every inch or so to prevent air pockets and ensure even smoking.
- Place the sausages on a clean surface and allow them to rest uncovered in the refrigerator for 12-24 hours, which helps the casing adhere properly to the meat.
- Prepare your smoker by bringing it to 130°F using your preferred wood chips—hickory provides traditional smoky flavor while apple offers something slightly sweeter.
- Hang the sausages on smoker racks, ensuring they don’t touch each other to allow smoke circulation.
- Smoke at 130°F for 2-3 hours, then increase the temperature to 160°F and continue smoking until the internal temperature reaches 152°F, which typically takes another 4-5 hours.
- Remove the sausages from the smoker and allow them to cool to room temperature on a clean surface, about 1-2 hours.
- Once cooled, hang the sausages in a cool, humid environment (like a curing chamber or cold garage) for 24-48 hours, which allows the exterior to dry slightly and develop a slight casing.
- Wrap each sausage log individually in butcher paper or vacuum seal them, then refrigerate for up to 3 weeks or freeze for up to 3 months.
- To serve, slice with a sharp knife into ¼-inch thick rounds and arrange on a charcuterie board with cheeses, crackers, and pickled vegetables, or enjoy as part of your favorite meal.
Pro Tips
The ratio of pork to beef is crucial—using all pork creates a milder flavor while all beef can be too heavy. The 50/50 blend creates the most balanced, complex flavor profile that defines excellent summer sausage. Make sure your butcher grinds it fresh or grind it yourself for optimal results.
Temperature control during smoking is absolutely critical. Too high heat too quickly can cause the casing to burst or the fat to render out too fast. The gradual increase from 130°F to 160°F allows the meat to cure gently while developing smoke flavor. Invest in an accurate meat thermometer for both the smoker and the sausage itself.
Mustard seed adds a subtle spice that shouldn’t be overlooked—it’s the secret ingredient that makes homemade summer sausage taste more complex and interesting than store versions. Don’t skip it even though it’s a small amount.
Proper casing preparation prevents mold and ensures the final product has that authentic appearance. Always check casings for holes before using by gently filling with water and looking for leaks. Soak them properly to remove excess salt that would make them brittle and difficult to work with.
The resting and curing times aren’t optional—they’re what transform basic ground meat into legitimate summer sausage. Skipping these steps results in a product that lacks the depth of flavor and proper texture. Patience is the secret ingredient here.
If you don’t have a dedicated smoker, you can create a makeshift smoking setup in a regular oven using smoke boxes or by placing soaked wood chips in a foil packet with holes poked in it near the heating element. Results won’t be quite as authentic, but the sausage will still be delicious.
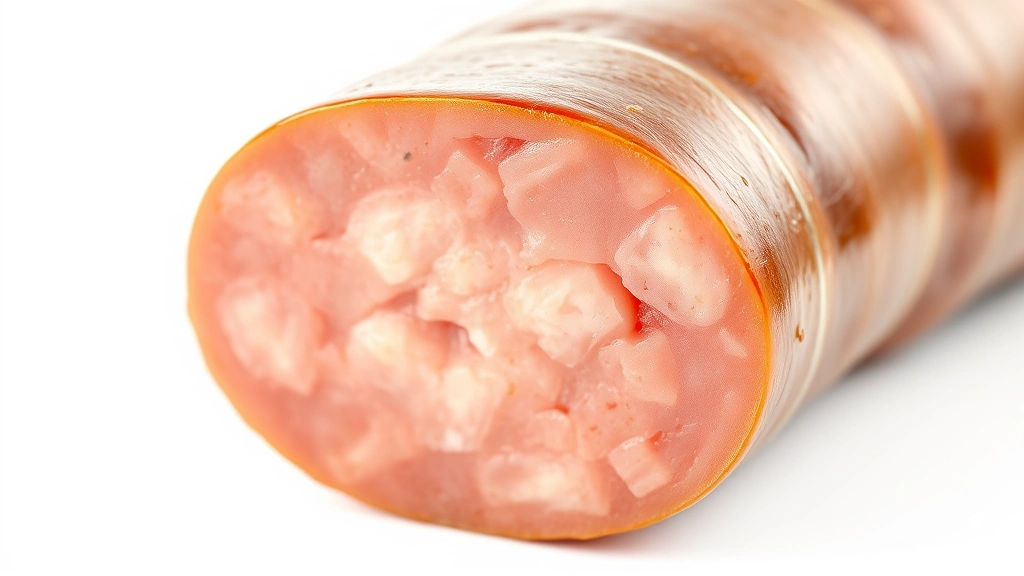
The finished sausages should have a dark mahogany exterior and a pinkish interior when sliced. The color difference between exterior and interior is completely normal and indicates proper smoking and curing. If the interior is gray or brown throughout, the sausage wasn’t properly cured.
Store-bought summer sausage often contains glucose, corn syrup, or other fillers. Making your own means you know exactly what you’re eating—just quality meat and spices. This also means your version may have a slightly different texture than commercial versions, which is actually a good thing indicating fewer additives and binders.
If you’re nervous about the curing process, know that the combination of salt, pink curing salt, and smoking creates a hostile environment for harmful bacteria. The USDA guidelines for cured meat production are well-established and safe when followed properly. Do your research and follow tested recipes like this one.