
Making homemade teriyaki jerky is easier than you might think, and the results are absolutely spectacular! This savory and umami-rich recipe delivers restaurant-quality jerky that’s sweet, salty, and perfectly chewy. The secret lies in using quality beef, a perfectly balanced teriyaki marinade, and patience during the drying process.
I’ve been making this teriyaki jerky recipe for years, and it never fails to impress. Whether you’re preparing snacks for a road trip, packing lunch boxes, or simply indulging in a protein-packed treat, this homemade version beats store-bought every single time. The beauty of making jerky at home is that you control every ingredient—no mysterious preservatives or excessive sodium here, just pure, delicious flavor.
The magic happens in the marinade, where soy sauce, ginger, garlic, and a touch of honey create that addictive teriyaki taste we all crave. Unlike other marinades that require hours of preparation, this one comes together in minutes. The key to achieving that perfect jerky texture is selecting the right cut of beef—I recommend using lean cuts like flank steak or sirloin tip, which yield the best results when sliced thin and dried properly.
What makes this recipe truly special is the combination of traditional Asian flavors with American jerky-making techniques. The result is a snack that’s sophisticated enough for entertaining yet simple enough for everyday enjoyment. Once you master this basic teriyaki jerky recipe, you’ll find yourself making batch after batch. Trust me, your friends and family will be asking for your secret!
For the best results, invest in a quality meat slicer or ask your butcher to slice the meat for you. This ensures consistent thickness, which leads to even drying and that perfect chew. You can use either an oven or a food dehydrator—both methods work wonderfully. The oven method is more accessible for most home cooks, while a dehydrator gives you more control over temperature and timing.
This recipe is incredibly versatile, allowing you to adjust the heat level, sweetness, and intensity of flavors to suit your preferences. If you love spicy food, add sriracha or red pepper flakes. Prefer it sweeter? Increase the honey or add a splash of pineapple juice. The beauty of homemade jerky is complete customization.
Making teriyaki jerky also makes an excellent gift for the food lovers in your life. Package it in cute jars with labels, and you’ve got an impressive homemade present that costs a fraction of specialty jerky from gourmet shops. It’s the kind of thoughtful gift that shows real effort and care.
One important note: proper food safety is crucial when making jerky at home. The drying process must bring the internal temperature of the meat to 160°F to eliminate harmful bacteria. This recipe follows USDA guidelines to ensure your jerky is safe to eat and store. As with any protein-based recipe, proper handling and storage are essential.
I absolutely love making this jerky for meal prep because it’s packed with protein and satisfying enough to serve as a quick snack or even a light meal component. Pair it with fresh salads or grain bowls for a complete meal. The umami-rich flavor complements so many dishes!
Once you’ve made this teriyaki jerky recipe successfully, you’ll understand why jerky-making is such a beloved hobby for food enthusiasts everywhere. The combination of anticipation during the marinating and drying process, followed by that first bite of perfectly chewy, flavorful jerky, is truly unbeatable. This is the kind of recipe that becomes a regular part of your cooking rotation. Ready to get started? Let’s make some amazing teriyaki jerky!
Ingredients
- 2 pounds lean beef (flank steak, sirloin tip, or top round), partially frozen
- ½ cup soy sauce
- ¼ cup honey or brown sugar
- 3 tablespoons rice vinegar
- 2 tablespoons sesame oil
- 4 cloves garlic, minced
- 2 tablespoons fresh ginger, minced
- 1 tablespoon mirin (sweet rice wine)
- 1 teaspoon red pepper flakes (optional, for heat)
- ½ teaspoon black pepper
- 1 teaspoon cornstarch
- 2 tablespoons water
- 1 tablespoon sesame seeds (optional, for topping)
- Green onions, chopped (optional, for garnish)
Instructions
- Slice the partially frozen beef into ¼-inch thick strips, cutting against the grain for maximum tenderness. Trim any excess fat, as this can cause the jerky to spoil faster. Pat the strips dry with paper towels.
- In a medium bowl, combine soy sauce, honey, rice vinegar, sesame oil, garlic, ginger, mirin, red pepper flakes, and black pepper. Whisk until the honey is fully dissolved and all ingredients are well combined.
- In a small bowl, mix cornstarch with water to create a slurry. This will help thicken the marinade slightly and ensure it coats the beef evenly.
- Add the cornstarch slurry to the marinade and stir until smooth, making sure there are no lumps.
- Place the sliced beef strips in a large resealable plastic bag or glass container. Pour the marinade over the beef, ensuring every strip is completely submerged and coated.
- Seal the bag or cover the container, then refrigerate for at least 12 hours, preferably 18-24 hours. This long marinating time allows the flavors to penetrate deeply into the meat.
- Remove the marinated beef from the refrigerator and let it sit at room temperature for 15 minutes.
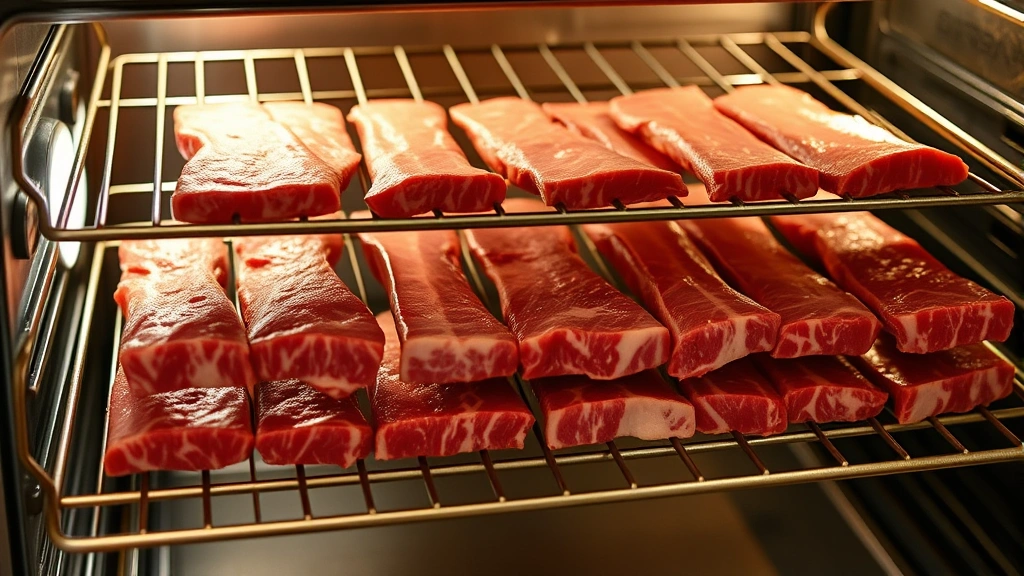
- Line baking sheets with aluminum foil and place oven-safe wire racks on top. Alternatively, arrange racks directly on the baking sheets if using a dehydrator.
- Remove each beef strip from the marinade, allowing excess marinade to drip off. Arrange the strips on the prepared racks in a single layer, making sure they don’t touch or overlap.
- If using an oven: Preheat to 160°F. Place the baking sheets in the oven with the door slightly ajar (prop it open with a wooden spoon). Dry for 4-6 hours, checking after 3 hours.
- If using a dehydrator: Set to 160°F and arrange the jerky strips on the dehydrator trays. Dry for 5-8 hours, rotating trays halfway through if your dehydrator doesn’t have even airflow.
- The jerky is done when it bends slightly but doesn’t break completely. It should have no moisture when you bend it in half—this indicates it’s reached the safe internal temperature of 160°F.
- Remove the jerky from the oven or dehydrator and let it cool completely on the racks for about 30 minutes.
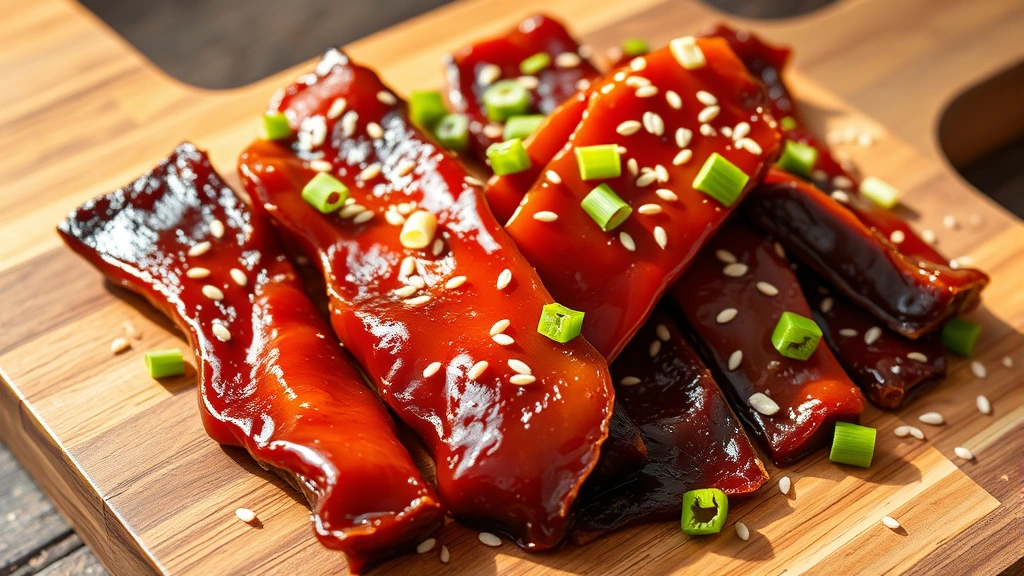
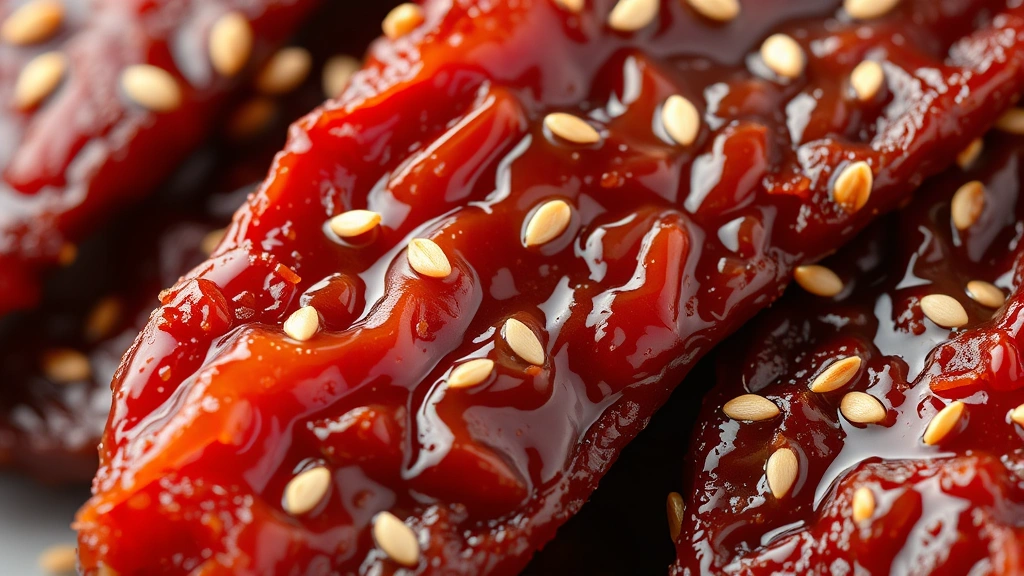
- If desired, sprinkle sesame seeds and chopped green onions over the cooled jerky for extra flavor and presentation.
- Store the cooled teriyaki jerky in an airtight container at room temperature for up to 2 weeks, in the refrigerator for up to 3 weeks, or in the freezer for up to 3 months.
Pro Tips
- **Meat Selection**: Choose lean cuts like flank steak, sirloin tip, or top round. Ask your butcher to slice it ¼-inch thick, or use a meat slicer at home. Partially freezing the meat makes slicing against the grain much easier and more uniform.
- **Marinade Timing**: While 12 hours is the minimum, marinating for 18-24 hours gives significantly better flavor penetration. Don’t skip this step—it’s what makes homemade jerky superior to store-bought versions.
- **Temperature Control**: The 160°F temperature is crucial for food safety, as it eliminates harmful bacteria. Use an oven thermometer to ensure your oven maintains this temperature accurately, as most ovens have temperature fluctuations.
- **Oven vs. Dehydrator**: Ovens work perfectly for this recipe, though you’ll need to prop the door open slightly to allow moisture to escape. A food dehydrator provides more consistent results and uses less energy, making it ideal if you plan to make jerky regularly.
- **Doneness Test**: The jerky should bend slightly without breaking completely. If it snaps cleanly, it’s overdone and will be too brittle. If it feels moist or pliable, it needs more drying time.
- **Flavor Customization**: Add sriracha (1-2 tablespoons) for heat, increase ginger for intensity, or add ¼ teaspoon cayenne pepper for smokiness. You can also substitute ¼ cup pineapple juice for some of the soy sauce for tropical notes.
- **Sesame Seeds**: Toast sesame seeds lightly in a dry pan before sprinkling on the jerky for enhanced nutty flavor. This is optional but adds a nice finishing touch.
- **Storage**: Store in airtight containers with oxygen absorbers for longer shelf life. Proper storage prevents moisture absorption and keeps the jerky fresh and chewy.
- **Batch Making**: This recipe easily doubles or triples for larger quantities. Just ensure your oven or dehydrator has enough space for even drying without overcrowding.
- **Food Safety**: Always handle raw meat carefully, wash surfaces and utensils thoroughly, and never leave marinating meat at room temperature for extended periods. Keep marinating in the refrigerator at all times.
- **Consistency**: For uniform drying, try to slice all pieces to the same thickness. Thicker pieces take longer to dry, while thinner pieces may overdry before thicker ones are ready.
- **Make-Ahead**: You can prepare the marinade up to 3 days in advance. Store it in the refrigerator and add the beef when ready to marinate.