
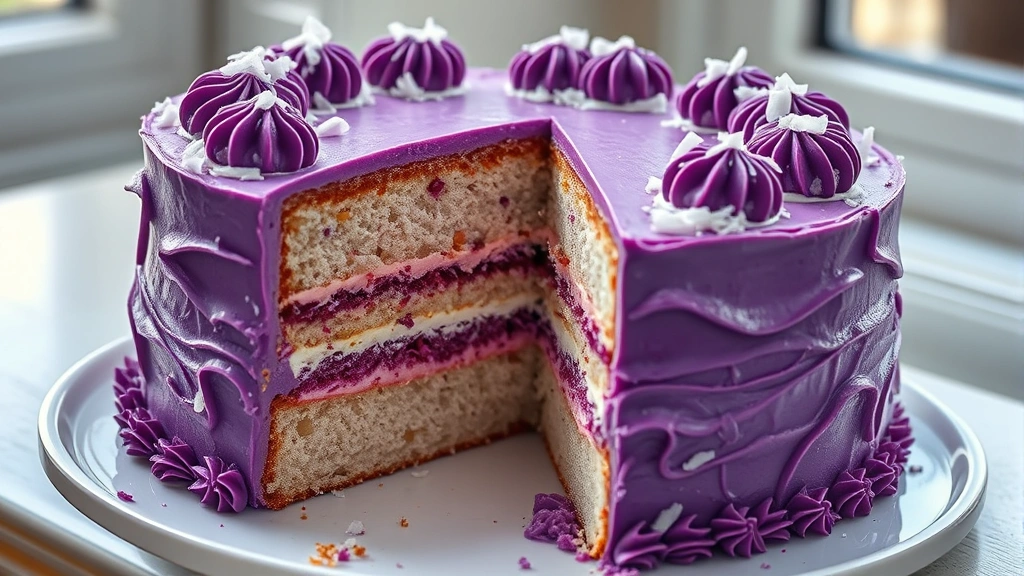
There’s something truly magical about ube cake – that stunning purple hue, the delicate nutty flavor, and the way it transports you straight to the Philippines with every bite. This isn’t just any cake recipe; this is THE ube cake recipe that will have everyone asking for your secret.
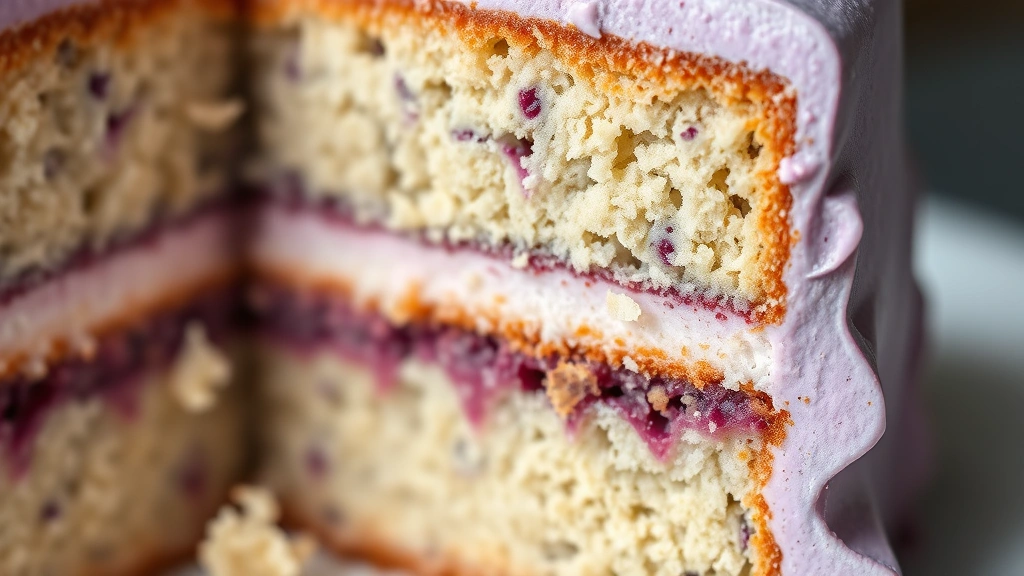
Ube, also known as purple yam, is a beloved ingredient in Filipino desserts, and for good reason. It’s naturally sweet, slightly earthy, and creates the most beautiful violet color without any artificial dyes. When you bake with ube, you’re not just making a cake – you’re creating an edible work of art.
I’ve perfected this recipe over years of testing, and I’m thrilled to share it with you today. The key to the BEST ube cake is using quality ube extract or fresh ube puree, getting the right balance of flavors, and creating a moist, tender crumb that stays fresh for days. This recipe uses a combination of techniques that professional bakers swear by, and I’m confident this will become your go-to ube cake recipe.
Whether you’re baking for a special celebration, a family gathering, or simply because you’re craving something extraordinary, this ube cake delivers every single time. The fluffy vanilla-forward sponge cake base is infused with ube goodness, creating layers of flavor that work beautifully with the creamy frosting. I recommend pairing this with our Heavy Cream Alfredo Sauce Recipe base technique for understanding cream consistency, or exploring Heavy Cream Pasta Recipe for inspiration on working with rich, creamy components.
The beauty of this ube cake lies in its versatility. You can serve it at room temperature, slightly chilled, or even make it ahead and freeze the layers for up to two months. The flavor actually deepens after a day or two, making it perfect for advance baking. With simple ingredients you probably have in your pantry and clear, foolproof instructions, you’ll create a showstopping dessert that tastes like it came from a professional bakery.
For more inspiration on building layers of flavor in your baking, check out our Chicken Alfredo Recipe for tips on balancing complementary flavors. You might also enjoy the brightness that Pickled Red Onion Recipe brings to dishes, or the fresh, vibrant approach of our Chickpea Salad Recipe.
Ready to bake? Let’s create some magic. This ube cake recipe is about to become your new favorite dessert, and I promise your family will be begging for seconds. For expert baking tips and techniques, check out Bon Appétit’s baking section and Serious Eats’ comprehensive baking guides. You can also find wonderful ube inspiration at The New York Times Cooking for international dessert techniques.
Ingredients
- 2 1/4 cups all-purpose flour
- 2 1/2 teaspoons baking powder
- 1/2 teaspoon salt
- 1/2 cup (1 stick) unsalted butter, softened to room temperature
- 1 1/2 cups granulated sugar
- 4 large eggs, room temperature
- 1 cup whole milk, room temperature
- 1/3 cup ube extract or 3/4 cup fresh ube puree
- 2 teaspoons vanilla extract
- 1/4 teaspoon almond extract (optional but recommended)
- 1/2 cup ube jam or additional ube puree for swirling (optional)
- For the Frosting: 1 cup (2 sticks) unsalted butter, softened
- 3 1/2 cups powdered sugar, sifted
- 1/4 cup heavy cream or whole milk
- 2-3 tablespoons ube extract or 1/2 cup ube puree
- 1/2 teaspoon vanilla extract
- Pinch of salt
- Purple or violet food coloring (optional, for deeper color)
- Toasted coconut flakes for garnish (optional)
- Fresh berries for garnish (optional)
Instructions
- Preheat your oven to 350°F (175°C). Prepare two 9-inch round cake pans by greasing them thoroughly with butter or baking spray, then line the bottoms with parchment paper. This ensures your cakes release perfectly without sticking.
- In a medium bowl, whisk together the all-purpose flour, baking powder, and salt. Set this dry mixture aside – whisking it together aerates the flour and distributes the leavening agents evenly throughout.
- In a large mixing bowl, cream together the softened butter and granulated sugar using an electric mixer on medium-high speed for 3-4 minutes until the mixture is light, fluffy, and pale in color. This is a crucial step that incorporates air into the batter, creating a tender crumb.
- Add the room-temperature eggs to the butter mixture one at a time, beating well after each addition. Make sure each egg is fully incorporated before adding the next one. Room-temperature eggs blend more smoothly and create a more homogeneous batter.
- In a small bowl, whisk together the milk, ube extract (or puree), vanilla extract, and almond extract if using. Stir until the mixture is well combined and the ube is evenly distributed throughout the liquid.
- Alternate adding the dry ingredients and the ube-milk mixture to the butter mixture, beginning and ending with the dry ingredients. Add about one-third of the dry ingredients, mix on low speed until just combined, then add half of the ube-milk mixture and mix until just combined. Repeat this pattern, finishing with the final third of dry ingredients. Mix on low speed only – overmixing develops gluten and creates a tough, dense cake.
- Divide the batter evenly between your prepared cake pans, smoothing the tops with a spatula. If using ube jam for swirling, drop spoonfuls of the jam onto the batter and swirl gently with a knife or skewer.
- Bake for 30-35 minutes, or until a toothpick inserted into the center of each cake comes out clean or with just a few moist crumbs. The cakes should spring back when lightly touched and be golden-purple in color.
- Remove the cakes from the oven and let them cool in the pans for 10-15 minutes. This helps them set and makes them less fragile when turning out.
- Turn the cakes out onto wire cooling racks by running a thin knife around the edges, placing the rack on top of the pan, then flipping the whole thing over. Gently lift off the pan and peel away the parchment paper. Allow the cakes to cool completely to room temperature before frosting – about 1-2 hours.
- While the cakes cool, prepare the frosting by beating the softened butter in a large bowl using an electric mixer on medium-high speed for 2-3 minutes until it’s creamy and pale.
- Gradually add the sifted powdered sugar to the butter, one cup at a time, beating well after each addition. Start on low speed to prevent sugar clouds, then increase to medium speed once the sugar is mostly incorporated.
- Once all the powdered sugar is incorporated, add the heavy cream or milk, ube extract (or puree), vanilla extract, and salt. Beat on medium-high speed for 2-3 minutes until the frosting is light, fluffy, and spreadable. If the frosting is too thick, add more cream one tablespoon at a time. If it’s too thin, add more powdered sugar.
- Add a drop or two of purple or violet food coloring if you’d like a more vibrant, deeper purple color in the frosting. Mix thoroughly to distribute the color evenly.
- Place the first cooled cake layer on your cake stand or serving plate. Using an offset spatula or butter knife, spread a generous layer of frosting (about 1/2 to 3/4 inch thick) on top of the first layer.
- Carefully place the second cake layer on top, pressing gently to secure it. The frosting will help hold the layers together.
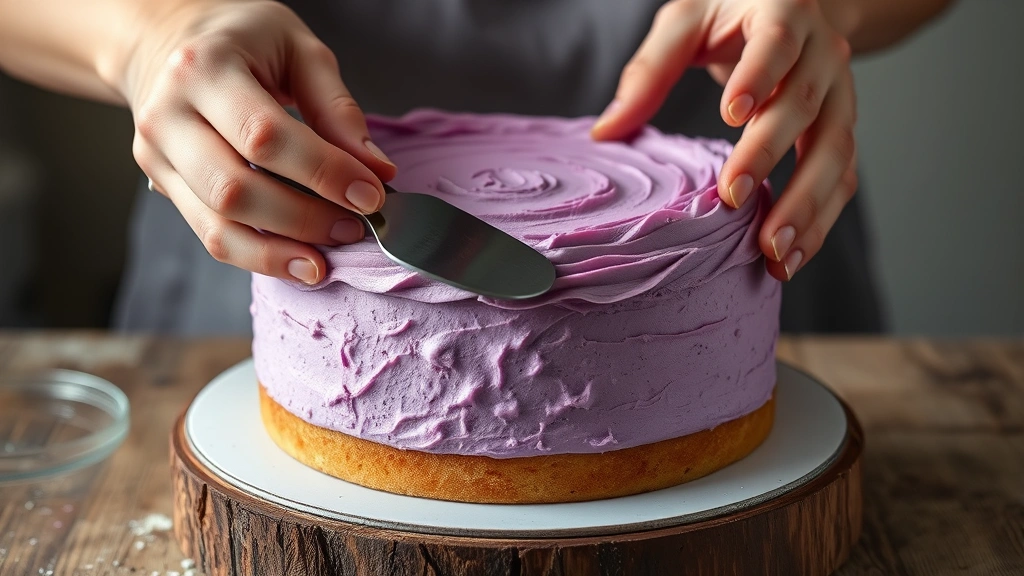
- Frost the top and sides of the assembled cake with the remaining frosting. Use an offset spatula dipped in hot water for smooth sides, or create texture with the back of a spoon for a more rustic look.
- Garnish the top with toasted coconut flakes, fresh berries, or additional ube puree swirls if desired. Refrigerate the finished cake for at least 30 minutes before serving to allow the frosting to set.
- Slice with a sharp knife dipped in hot water, wiping between each slice for clean cuts. Serve at room temperature or slightly chilled. Store any leftovers covered at room temperature for up to 2 days, or refrigerate for up to 5 days.
Pro Tips
Ube Extract vs. Ube Puree: Both work beautifully in this recipe. Ube extract provides a more concentrated flavor and a lighter color, while fresh or canned ube puree offers a richer, earthier taste and a deeper purple hue. If using fresh ube, you’ll need to peel, cook, and mash it yourself – canned ube puree from specialty stores is more convenient and gives consistent results.
Don’t Overmix the Batter: Overmixing develops gluten in the flour, which creates a tough, dense cake rather than the light, tender crumb we’re after. Mix on low speed and stop as soon as all ingredients are just combined. A few tiny streaks of flour are better than an overmixed batter.
Alternating Wet and Dry Ingredients: This technique prevents the batter from becoming dense or lumpy. It also helps the ingredients incorporate more evenly, resulting in a better texture throughout the cake.
Accurate Oven Temperature: Invest in an oven thermometer to ensure your oven is actually at 350°F. Many home ovens run hot or cold, which can affect baking time and cake texture. If your oven runs hot, your cakes may dome or bake too quickly on the outside before the inside is done.
The Toothpick Test: A toothpick inserted into the center should come out clean or with just a few moist crumbs. If wet batter clings to it, the cake needs more time. If it comes out completely dry, you may have overbaked slightly.
Cooling is Essential: Completely cooling the cakes before frosting prevents the frosting from melting off. Warm cakes will cause frosting to slide and may result in a messy presentation. This step takes time but is non-negotiable for success.
Frosting Consistency: The frosting should be smooth and spreadable, similar to peanut butter. If it’s too thick, add cream one tablespoon at a time. If it’s too thin, add more powdered sugar. The perfect consistency spreads easily without being runny.
Make-Ahead Options: You can bake the cake layers up to two days ahead – wrap them tightly in plastic wrap and store at room temperature. You can also freeze the unfrosted layers for up to two months. Thaw at room temperature before frosting. The frosting can be made up to three days ahead and stored in an airtight container in the refrigerator; bring it to room temperature and re-beat for a minute before using.
Storage and Shelf Life: Store the finished cake covered at room temperature for up to two days, or refrigerate for up to five days. The cake actually tastes even better on the second day as the flavors mellow and deepen. You can also freeze the frosted cake for up to one month – wrap it well in plastic wrap and place in an airtight container.
Personalization Ideas: Try adding a layer of ube jam between the cake layers for extra flavor, swirl melted white chocolate into the frosting for a marbled effect, or top with fresh berries, toasted nuts, or edible flowers. You can also make cupcakes with this recipe – reduce baking time to 18-22 minutes for standard cupcakes.
Troubleshooting: If your cake comes out dry, you may have overbaked it or used too much flour. Next time, measure flour by spooning and leveling rather than scooping directly from the bag. If the cake sinks in the middle, your oven temperature may be off. If the frosting is grainy, make sure the powdered sugar was sifted and beat the frosting longer to incorporate air.
Pingback: How to make the Best Keto Chicken Recipe in 30 Minutes! – Simple Recipe Finder