
There’s nothing quite like waking up to a stack of fluffy, golden waffles on a lazy Sunday morning—and yes, they can absolutely be vegan! This recipe proves that you don’t need eggs, dairy, or any animal products to create the most incredible, crispy-on-the-outside, tender-on-the-inside waffles that will have everyone at your breakfast table coming back for seconds. The secret is in the combination of aquafaba (chickpea liquid) for lift, a touch of vinegar for tang, and the right ratio of wet to dry ingredients.
I’ve been perfecting this vegan waffle recipe for years, and I’m thrilled to finally share it with you. What started as a challenge to create something that rivaled my grandmother’s classic buttermilk waffles has turned into my go-to weekend breakfast. The beauty of this recipe is that it’s incredibly versatile—you can dress these waffles up with fresh berries and coconut cream, or keep them simple with a drizzle of pure maple syrup. They’re also perfect for creating a chickpea-based brunch bowl that’s both satisfying and protein-packed.
What makes this recipe truly special is how forgiving it is. Unlike traditional waffles that require precise timing with beaten egg whites, this vegan version uses aquafaba, which creates a stable, reliable lift every single time. The batter comes together in just five minutes, and you’ll have restaurant-quality waffles on your table in under twenty minutes. Whether you’re vegan, plant-based curious, or simply looking to expand your breakfast repertoire, this recipe is an absolute must-try.
The technique here is all about not overmixing your batter—a common mistake that results in dense, tough waffles. We want to keep some lumps in there! We’re also using a combination of all-purpose flour and a touch of cornstarch, which creates that signature crispy exterior while maintaining a fluffy interior. I recommend investing in a good waffle iron if you don’t already have one; it makes such a difference in achieving that perfect texture.
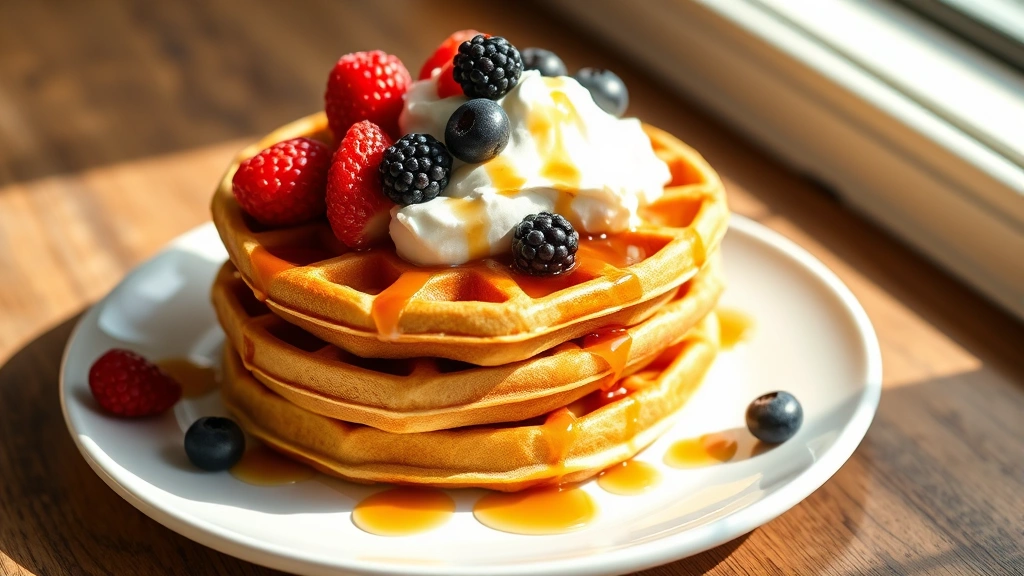
Serve these waffles immediately while they’re still warm and crispy. Top them with fresh berries, a dollop of vegan whipped cream, sliced bananas, or go the savory route with crispy bacon-style tempeh and avocado. You could even create a full brunch spread by pairing these with a simple creamy pasta side for an unexpected twist. The possibilities are truly endless, and your family and friends will be amazed that these are completely vegan.
Ingredients
- 1 ¾ cups all-purpose flour
- 2 tablespoons granulated sugar
- 2 tablespoons cornstarch
- 2 teaspoons baking powder
- ½ teaspoon salt
- ½ teaspoon vanilla extract
- ½ cup aquafaba (liquid from canned chickpeas, or homemade)
- 1 ½ cups unsweetened almond milk (or any plant-based milk)
- 1 tablespoon apple cider vinegar
- 3 tablespoons melted coconut oil or vegan butter
- 1 teaspoon lemon zest (optional, for brightness)
- Vegan cooking spray or oil for the waffle iron
- Fresh berries, maple syrup, vegan whipped cream, and fresh fruit for serving

Instructions
- Preheat your waffle iron to medium-high heat and lightly spray it with vegan cooking spray. This step is crucial—you want the iron hot enough to create that beautiful crispy exterior while keeping the interior fluffy.
- In a large mixing bowl, whisk together the all-purpose flour, granulated sugar, cornstarch, baking powder, and salt until well combined. Make sure there are no lumps in the baking powder, as this will ensure even rising throughout your waffles.
- In a separate medium bowl, combine the aquafaba, unsweetened almond milk, apple cider vinegar, and vanilla extract. Whisk these ingredients together for about one minute—the vinegar will react with the baking soda and create a slight curdling effect, which is exactly what you want.
- Pour the melted coconut oil into the wet mixture and whisk until everything is well incorporated. If you’re using lemon zest for added brightness and flavor, add it now and stir gently.
- Create a well in the center of your dry ingredients and pour the wet mixture into it. Using a spatula or wooden spoon, gently fold the ingredients together until just combined. This is the most important step—do not overmix! You want some lumps remaining in the batter, as overmixing will result in dense, tough waffles rather than light and fluffy ones.
- Let the batter rest for two to three minutes. This allows the baking powder to activate and creates lift in your waffles. You’ll notice the batter will become slightly thicker as it sits.
- Carefully pour or spoon about ½ to ¾ cup of batter into the center of your preheated waffle iron, depending on the size of your machine. Do not overfill—the batter will expand as it cooks, and you want it to reach the edges without overflowing.
- Close the waffle iron and cook for three to five minutes, depending on your machine’s heat level and how crispy you like your waffles. You’ll know they’re done when steam stops coming out of the sides and they’re golden brown on the outside.
- Carefully remove the waffle using a fork or the waffle iron’s release mechanism. Place it directly on a serving plate rather than stacking them, as stacking can trap steam and make them soggy.
- Repeat steps seven through nine with the remaining batter, making sure to re-spray your waffle iron between batches to prevent sticking.
- Serve your waffles immediately while they’re still warm and crispy. Top with your favorite toppings—fresh berries, maple syrup, vegan whipped cream, sliced bananas, or whatever your heart desires!

Pro Tips
- Aquafaba is the secret ingredient in this recipe—it’s the liquid from canned chickpeas and creates an incredible lift and fluffiness that rivals traditional eggs. If you’re using canned chickpeas, drain them and reserve the liquid. You’ll need about ½ cup. Alternatively, you can make your own aquafaba by cooking dried chickpeas from scratch, though canned is more convenient.
- The apple cider vinegar is crucial—it reacts with the baking powder to create additional lift and adds a subtle tang that enhances the overall flavor of your waffles. Don’t skip this ingredient.
- Different waffle irons have varying heat levels and thickness settings. The first waffle you make might not be perfect as you calibrate to your machine. This is completely normal! By the second or third waffle, you’ll have the timing down.
- For extra crispy waffles, increase your waffle iron temperature slightly and cook for an additional minute. For more cake-like, fluffy waffles, use a lower heat setting and cook for a shorter time.
- You can make this batter ahead of time and store it in the refrigerator for up to 24 hours. The batter may thicken slightly as it sits, so whisk in a tablespoon of plant-based milk if needed before cooking.
- Leftover cooked waffles can be frozen for up to three months. Simply place them in a freezer-safe bag and reheat in your toaster oven or regular toaster until crispy. They won’t be quite as fresh as the day you made them, but they’re still delicious.
- Feel free to customize this recipe by adding mix-ins like chocolate chips, vegan blueberries, or chopped nuts directly into the batter. Just fold them in gently during the final mixing step.
- For a protein boost, consider making these waffles using chickpea flour instead of all-purpose flour, though you may need to adjust the liquid slightly.
- This recipe is naturally gluten-free if you substitute the all-purpose flour with a one-to-one gluten-free flour blend.
- Serve these waffles alongside savory options like dairy-free pasta for an unexpected brunch experience.
Pingback: How to make the Best Vegan Casserole Dish Recipe! – Simple Recipe Finder