
There’s nothing quite like a perfectly cooked venison backstrap—it’s the crown jewel of any hunter’s harvest and absolutely deserves to be treated with the reverence it commands. This elegant yet surprisingly simple recipe transforms this lean, flavorful cut into a restaurant-quality masterpiece that will have your guests asking for seconds. The key to the BEST venison backstrap lies in respecting the meat itself: not overcooking it, seasoning it generously, and giving it a beautiful sear that locks in all those wonderful, natural flavors.
Venison backstrap, also called the loin, is the most tender cut from a deer, making it perfect for quick-cooking methods like searing and roasting. Unlike tougher cuts that benefit from long braises, the backstrap shines when you treat it like you would a premium beef tenderloin. The meat has a naturally rich, slightly gamey flavor that pairs beautifully with classic preparations featuring garlic, herbs, and a touch of richness. This recipe walks you through each step to ensure you achieve that perfect medium-rare center with a gorgeous, caramelized crust.
What makes this venison backstrap recipe truly special is its simplicity combined with technique. We’re not masking the meat’s natural flavor with heavy sauces or complicated preparations. Instead, we’re highlighting it through proper seasoning, careful temperature control, and a few elegant touches like fresh rosemary and butter basting. Whether you’re cooking for a special dinner party or preparing a celebratory meal after a successful hunting season, this recipe delivers impressive results every single time.
The beauty of cooking venison at home is that you get to control exactly how it’s prepared—no guesswork, no wondering if your restaurant got it right. You can source your own meat, know its history, and prepare it with intention. This recipe is forgiving enough for beginners but refined enough to impress seasoned cooks. Pair it with your favorite side dishes for a complete meal that celebrates the hunter’s bounty.
For those looking to expand their venison repertoire, this technique works wonderfully as a foundation for other preparations. You might explore complementary flavors and pairings or try different finishing touches. The important thing is mastering this basic preparation first—once you understand how to cook venison backstrap perfectly, you can confidently adapt and experiment.
If you’ve never cooked venison before, don’t be intimidated. This meat is actually more forgiving than you might think, and the results are absolutely worth the effort. Many cooks find that venison backstrap is easier to cook than beef tenderloin because it’s so naturally tender. The key is bringing it to room temperature before cooking, using a screaming-hot pan, and not overdoing it on the cooking time. With this foolproof recipe, you’ll create a dish that’s worthy of fine dining standards right in your own kitchen.
This venison backstrap recipe serves 4-6 people as a main course and takes about 30 minutes from start to finish, making it perfect for weeknight elegance or special occasion entertaining. The actual cooking time is surprisingly brief—just 12-15 minutes in the oven—which means you can have a gourmet dinner on the table faster than you’d expect. Prepare your sides ahead of time, and you’ll have a stress-free cooking experience with show-stopping results.
Let’s talk about sourcing and preparing your venison backstrap. If you’re a hunter, you’ll want to properly butcher and age your meat for optimal tenderness and flavor. If you’re purchasing from a butcher or online specialty meat purveyor, ask for backstrap from younger animals when possible, as the meat will be more tender. The backstrap should look deep red, and there should be minimal silver skin (the tough connective tissue) on the surface. If there is silver skin, trim it carefully with a sharp knife before cooking.
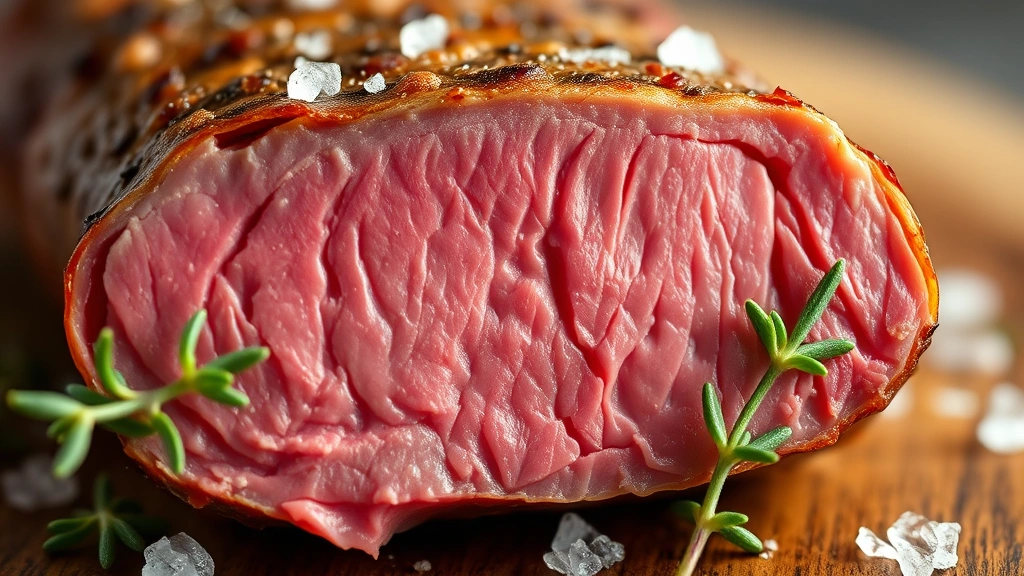
Temperature control is absolutely critical when cooking venison backstrap. This is a very lean meat with minimal fat, which means it can dry out quickly if overcooked. We’re aiming for a final internal temperature of 130-135°F for medium-rare, which is ideal for venison. Use an instant-read meat thermometer for accuracy—don’t rely on timing alone, as backstrap thickness varies. Remember that the meat will continue to cook slightly after you remove it from the heat, so pull it from the oven when it reaches 125-130°F and let it rest.
For more inspiration on cooking with premium meats and seasonal ingredients, check out expert techniques and detailed guides. You’ll find additional insights on meat preparation, cooking temperatures, and flavor development that complement this recipe perfectly. Additionally, professional cooking resources offer complementary perspectives on achieving restaurant-quality results at home.
The resting period after cooking is non-negotiable for tender, juicy venison backstrap. When you remove the meat from the oven, transfer it to a warm plate and tent it loosely with foil. Let it rest for 8-10 minutes—this allows the juices to redistribute throughout the meat rather than running out onto your cutting board. You’ll be amazed at the difference this simple step makes in the final texture and juiciness of your venison.
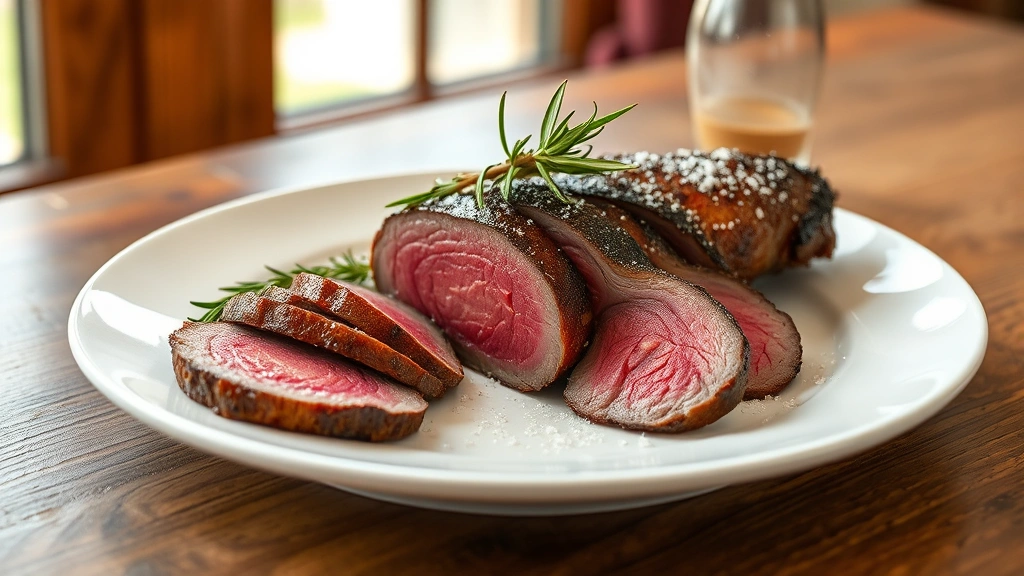
Slicing your venison backstrap properly is the final touch that elevates presentation. Use a sharp knife and cut against the grain into ½-inch to ¾-inch thick slices. This cuts through the muscle fibers and results in more tender bites. Arrange the slices on a warm platter, drizzle with any pan juices, and garnish with fresh herbs. The beautiful deep red color of properly cooked venison is absolutely stunning—don’t hide it under heavy sauces.
For entertaining ideas and complementary menu planning, explore elegant side dish options that pair beautifully with venison. Whether you choose something classic or contemporary, your venison backstrap will be the star of the show. And if you’re planning a dessert course, consider elegant finishing touches that provide a sophisticated conclusion to your meal.
This venison backstrap recipe has become a signature dish in many households, and once you master it, you’ll find yourself making it again and again. The combination of technique, quality ingredients, and proper execution creates a dish that’s both impressive and approachable. Your family and guests will be asking you to make it regularly, and you’ll love sharing this special preparation.
Ingredients
- 1 venison backstrap (2-3 pounds), brought to room temperature
- 2 tablespoons kosher salt
- 1 tablespoon freshly ground black pepper
- 2 tablespoons garlic powder
- 1 tablespoon dried thyme or 3 tablespoons fresh thyme
- 3 tablespoons olive oil, divided
- 4 tablespoons butter
- 6 cloves garlic, crushed
- 4-5 sprigs fresh rosemary
- ½ teaspoon red pepper flakes (optional)
- Fleur de sel or finishing salt for garnish

Instructions
- Remove your venison backstrap from the refrigerator 30-45 minutes before cooking. Pat it completely dry with paper towels—this is essential for achieving a proper sear. The drier the surface, the better the browning.
- Preheat your oven to 400°F. While the oven heats, combine kosher salt, black pepper, garlic powder, and dried thyme in a small bowl.
- Season the venison backstrap generously and evenly all over with your spice mixture, using about ¾ of the seasoning blend. Make sure to coat all sides, including the ends. Set aside.
- Place a heavy-bottomed skillet (cast iron or stainless steel work best) over medium-high heat for about 2-3 minutes until it’s screaming hot. You want it hot enough that a drop of water immediately sizzles and evaporates.
- Add 1½ tablespoons of olive oil to the hot pan, swirling to coat evenly. Let it heat for another 30 seconds until it’s shimmering but not smoking.
- Carefully place the venison backstrap in the hot pan. Do not move it for the first 2-3 minutes—this allows a proper crust to form through the Maillard reaction. You should hear a satisfying sizzle.
- After 2-3 minutes, turn the backstrap to sear the second side for another 2-3 minutes. If there are thinner ends, hold them upright briefly to sear those areas as well. All sides should have a deep golden-brown crust.
- Add the remaining 1½ tablespoons of olive oil to the pan if needed. Add the crushed garlic cloves, fresh rosemary sprigs, and red pepper flakes if using.
- Immediately add 4 tablespoons of butter to the pan. As it melts, tilt the pan and use a spoon to baste the venison repeatedly with the foaming butter and aromatics. Continue basting for 1-2 minutes.
- Transfer the skillet to your preheated 400°F oven. If your skillet handle is not oven-safe, transfer the venison to an oven-safe baking dish with the pan juices and aromatics.
- Roast for 10-14 minutes, depending on the thickness of your backstrap and desired doneness. Check the internal temperature after 10 minutes using an instant-read thermometer inserted into the thickest part.
- Remove the venison from the oven when it reaches 125-130°F internally. It will continue cooking slightly during resting and reach the perfect medium-rare temperature of 130-135°F.
- Transfer the venison backstrap to a warm plate and tent loosely with foil. Let it rest for 8-10 minutes. Do not skip this step—it’s crucial for retaining juices.
- While the venison rests, strain the pan juices through a fine-mesh sieve to remove the herbs and garlic. Season the jus with a pinch of salt and pepper if needed.
- After resting, slice the venison backstrap against the grain into ½-inch to ¾-inch thick slices using a sharp knife.
- Arrange the slices on a warm serving platter. Drizzle with the reserved pan jus and garnish with fresh thyme or rosemary and a sprinkle of fleur de sel.
- Serve immediately while the venison is still warm, with your choice of sides.
Pro Tips
- The most critical factor in cooking venison backstrap is not overcooking it. This lean meat becomes tough and dry if cooked beyond medium-rare. Use a reliable instant-read thermometer and trust it over timing.
- Bringing the venison to room temperature before cooking ensures even cooking throughout. Cold meat will have a cold center by the time the outside reaches the proper temperature.
- Trimming silver skin (the thin connective tissue layer) before cooking is important. Use a sharp knife and work carefully to remove just the silver skin while preserving the meat beneath.
- The butter-basting step isn’t just for flavor—it also helps conduct heat evenly to the surface of the meat and creates a beautiful, caramelized crust.
- Fresh herbs make a significant difference in this recipe. If you only have dried herbs, use about one-third the quantity called for fresh.
- Cast iron and stainless steel skillets work best for searing because they retain and distribute heat evenly. Nonstick pans don’t get hot enough for proper browning.
- Don’t be alarmed by the deep red color of venison—it’s perfectly normal and indicates proper cooking. The meat will darken slightly as it rests.
- Venison pairs beautifully with side dishes featuring strong, complementary flavors like roasted root vegetables, creamed spinach, mushroom risotto, or polenta. Avoid overly delicate sides that might get overwhelmed.
- Leftover venison backstrap (if you have any!) makes an incredible addition to sandwiches, salads, or grain bowls. Store it in an airtight container for up to 3 days.
- For a sauce option, create a simple red wine reduction by deglazing your pan with ½ cup red wine and ½ cup beef broth after searing, then reducing by half. Strain and season before serving.
- If your backstrap is particularly thick (over 2 inches), increase the oven temperature to 425°F and check for doneness starting at 8 minutes rather than 10.
- Some hunters prefer to marinade venison beforehand to enhance tenderness and flavor. If marinating, do so for 4-8 hours in a mixture of olive oil, balsamic vinegar, garlic, and herbs. Pat completely dry before cooking.
- The quality of your venison matters significantly. Younger animals (up to 2 years old) produce more tender meat than older animals. Ask your butcher or hunting guide about the age of the animal when possible.