
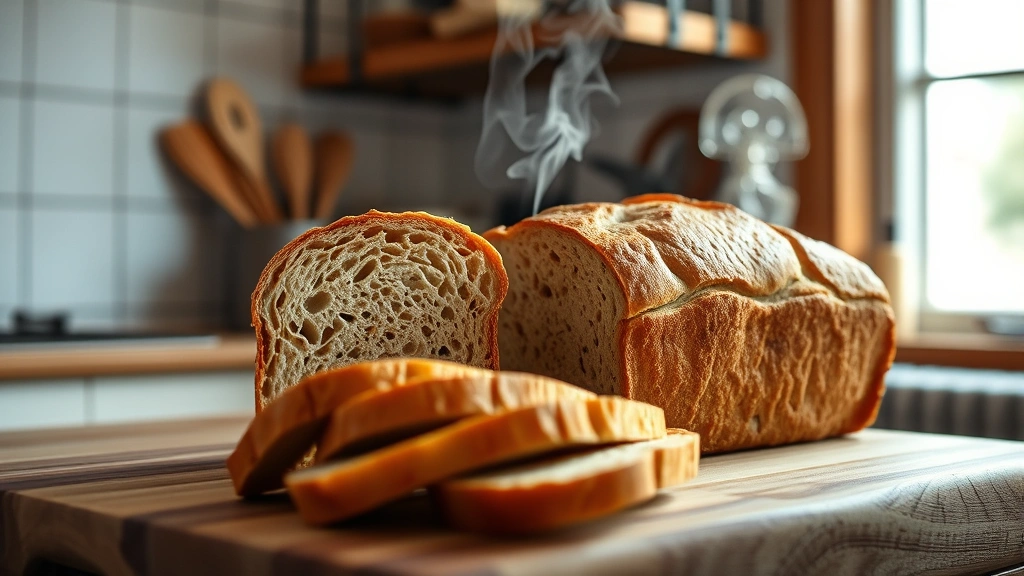
There’s nothing quite like the aroma of freshly baked whole wheat bread wafting through your kitchen, and the best part? Your bread machine does most of the work! This whole wheat bread machine recipe is my go-to for achieving that perfect balance of nutty flavor, tender crumb, and beautiful golden crust. I’ve spent years perfecting this recipe, testing different ratios of whole wheat to all-purpose flour, adjusting water content for humidity variations, and experimenting with various sweeteners to enhance the natural grain flavor.
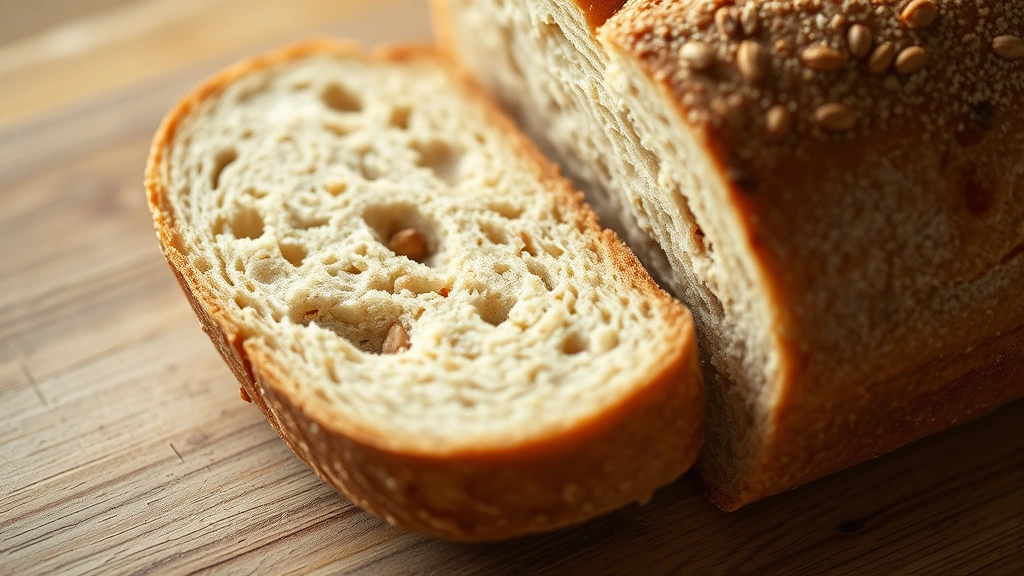
Whole wheat bread can sometimes be dense and heavy, but not this one. The secret lies in using a combination of bread flour and whole wheat flour, adding just a touch of honey for subtle sweetness, and incorporating vital wheat gluten to ensure a light, airy texture. This recipe works perfectly in any standard bread machine, whether you prefer a 1.5-pound or 2-pound loaf. I always recommend starting with the 1.5-pound version if you’re new to bread machine baking, as it’s more forgiving and easier to troubleshoot.
What makes this recipe truly special is its versatility. You can enjoy it as is, or customize it by adding pickled red onions and seeds for extra texture and flavor. For those looking to pair it with something more indulgent, try serving thick slices alongside a rich cream sauce or incorporate it into chicken alfredo.
I’m so excited to share this foolproof whole wheat bread machine recipe with you today. Whether you’re a seasoned bread baker or picking up your bread machine for the first time, this recipe will yield beautiful, delicious results every single time. The bread machine does the heavy lifting—the mixing, kneading, and even the rising—so all you have to do is measure, add, and push start. In just a few hours, you’ll have bakery-quality whole wheat bread ready to slice and enjoy.
For more baking inspiration and detailed guidance on bread machine techniques, I recommend checking out resources from Serious Eats and New York Times Cooking. You can also explore complementary recipes to build your meal planning. Happy baking!
Ingredients
- 1 1/4 cups warm water (110°F)
- 2 tablespoons honey or agave nectar
- 2 tablespoons unsalted butter, softened
- 1 3/4 cups whole wheat flour
- 1 1/4 cups bread flour
- 1 1/2 teaspoons vital wheat gluten
- 1 1/2 teaspoons fine sea salt
- 1 1/2 teaspoons instant yeast
- 1 tablespoon sunflower seeds or flax seeds (optional, for topping)
Instructions
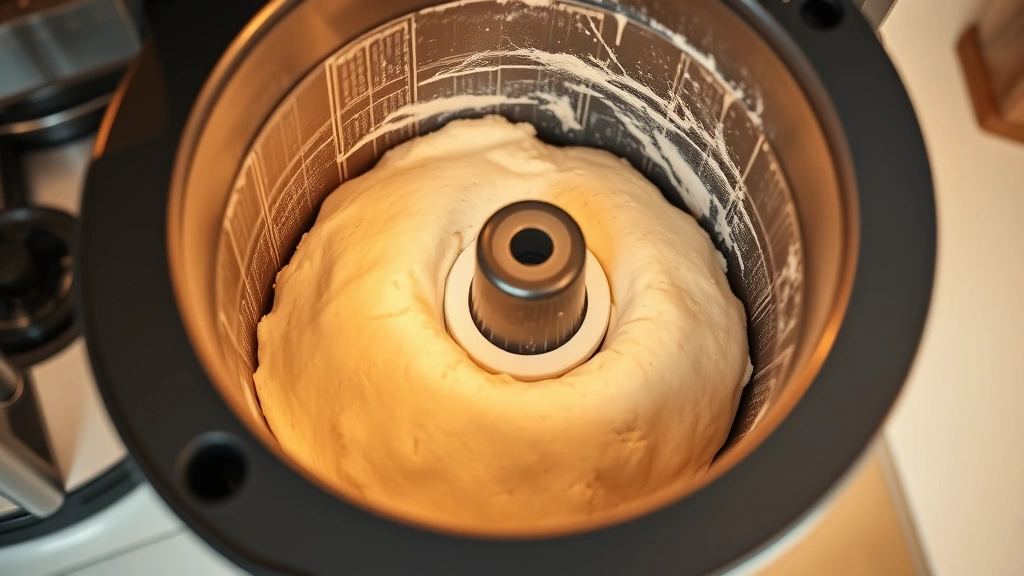
- Add warm water to your bread machine pan first, followed by the honey and softened butter. This order helps distribute the liquids evenly throughout the dough.
- In a small bowl, whisk together both flours, vital wheat gluten, and sea salt. Carefully add this dry mixture to the bread machine pan, making sure the flour creates a barrier between the liquid and the yeast.
- Make a small indent in the center of the flour mound and add the instant yeast directly into that indent. This prevents the yeast from activating prematurely.
- Close the bread machine lid and select the whole wheat cycle (or use a basic/white bread cycle if your machine doesn’t have a dedicated whole wheat setting). Choose the medium crust color setting for optimal browning.
- Press start and allow the machine to complete the first kneading cycle. Do not open the lid during the initial mixing and kneading phases, as this can disrupt gluten development.
- After approximately 10 minutes of kneading, pause the machine and observe the dough consistency. It should look like a shaggy ball with a slightly tacky surface. If it appears too dry and crumbly, add water one tablespoon at a time. If it seems too wet and sticky, add flour one tablespoon at a time.
- Resume the bread machine cycle and let it continue through the first rise. Your machine will handle all subsequent mixing, kneading, and rising automatically.
- When the cycle reaches the shaping phase (if your machine has one), the dough will be compressed and shaped inside the pan. If you’re using a basic cycle without a designated whole wheat setting, the machine will handle this automatically.
- If desired, add the sunflower or flax seeds approximately 5-10 minutes before the final baking phase begins. Many bread machines have a signal or beep to indicate when to add mix-ins.
- Allow the bread machine to complete its full cycle, including the final rise and baking. Do not open the lid during baking, as this will cause the bread to collapse and bake unevenly.
- When the cycle completes and the machine beeps, carefully remove the bread pan using oven mitts, as it will be extremely hot. Place the hot pan on a heat-safe surface.
- Let the bread cool in the pan for 5 minutes, then carefully invert the loaf onto a wire cooling rack. The bread will continue to bake slightly from residual heat.
- Allow the bread to cool completely on the wire rack for at least 30-45 minutes before slicing. This cooling time is crucial, as it allows the interior crumb to set properly and makes slicing much cleaner.
- Once cooled, slice with a sharp serrated bread knife using a gentle sawing motion. Store leftover slices in an airtight container or bread box at room temperature for up to 4 days.
Pro Tips
- **Water Temperature Matters**: Using water that’s too hot (above 120°F) can kill the yeast, while water that’s too cold won’t activate it properly. An instant-read thermometer is incredibly helpful for getting this just right.
- **Vital Wheat Gluten is Essential**: This ingredient prevents whole wheat bread from becoming dense and heavy. It strengthens the gluten network and allows the bread to rise properly. Don’t skip it!
- **Bread Machine Models Vary**: Different bread machine brands and models have slightly different cycle lengths and temperatures. Your first loaf might require minor adjustments. Keep notes on what works best for your specific machine.
- **Humidity Affects Dough Consistency**: On humid days, you may need to add less water or slightly more flour. Conversely, on dry days, you might need additional water. The dough should be slightly tacky but not wet.
- **Don’t Open the Lid**: Resist the urge to peek! Opening the lid releases heat and steam, which can negatively impact rising and baking. Trust the process and let your machine do its job.
- **Make It Your Own**: This recipe is incredibly versatile. Try adding a tablespoon of ground flaxseed, chia seeds, or rolled oats for additional nutrition and texture. You can also experiment with different honey types or add a touch of molasses for deeper flavor.
- **Whole Wheat Flour Selection**: Choose fresh whole wheat flour from a reputable source. Whole wheat flour has a higher fat content than white flour and can become rancid if stored improperly. Store in an airtight container in your freezer for extended shelf life.
- **Storage and Freezing**: This bread freezes beautifully for up to three months. Slice it first, wrap individual slices in plastic wrap, then place them in a freezer bag. Toast slices directly from frozen for the best results.
- **Perfect Toast**: This whole wheat bread makes exceptional toast! The nutty flavor becomes even more pronounced when toasted, making it perfect for chickpea salad or avocado toast.
- **Troubleshooting Dense Bread**: If your bread turns out too dense, you may need to increase the vital wheat gluten by another half teaspoon, or ensure your yeast is fresh and active.
- **Troubleshooting Collapsed Top**: If the loaf collapses during baking, the dough was likely too wet or over-proofed. Reduce water slightly in your next attempt or choose a shorter cycle if available.