
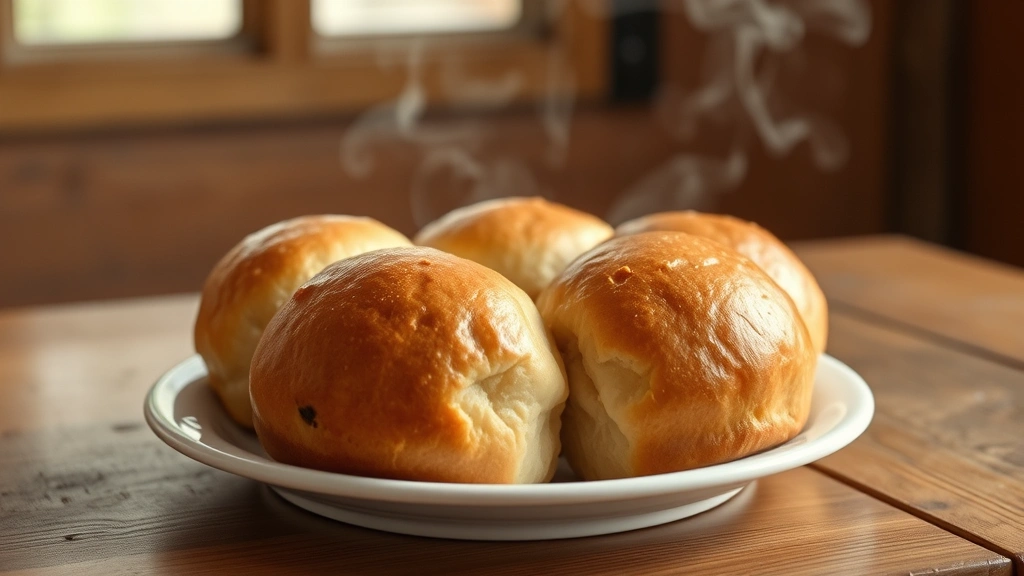
There’s nothing quite like the aroma of fresh yeast rolls baking in the oven, and I’m thrilled to share my absolute easiest yeast roll recipe with you today! These pillowy-soft rolls come together with minimal effort and maximum flavor, making them perfect for weeknight dinners, holiday gatherings, or whenever you want to impress your family with homemade baked goods.
I’ve been making these rolls for years, and I can honestly say they’ve become a staple in my kitchen. The secret to their ease is in the simple ingredient list and a foolproof technique that even beginning bakers can master. Unlike complicated yeast doughs that require multiple rises and constant attention, this recipe works beautifully with just one rise, making it ideal for busy home cooks.
These rolls pair beautifully with so many dishes. Serve them alongside a rich Best Heavy Cream Alfredo Sauce Recipe for an elegant dinner, or enjoy them with a comforting Delicious Heavy Cream Pasta Recipe. They’re also wonderful with Easy Chicken Alfredo Recipe for a complete meal. For a lighter option, try them with Best Shishito Peppers Recipe or a fresh Best Chickpea Salad Recipe.
What I absolutely love about this recipe is how forgiving it is. The dough is soft and easy to work with, the rise time is reasonable, and the results are consistently delicious. Whether you’re a seasoned baker or picking up a rolling pin for the first time, you’re going to crush this recipe. The rolls emerge from the oven with a beautiful golden-brown exterior and an incredibly soft, tender crumb that practically melts in your mouth. One bite and your family will be begging you to make them again!
For more inspiration on yeast-based baking, check out Serious Eats for comprehensive baking science, or visit NYT Cooking for creative recipe variations. Bon Appétit also offers excellent tips for perfecting your bread-baking technique.
Ingredients
- 1 cup whole milk, warmed (110°F)
- 2¼ teaspoons (1 packet) instant yeast
- 3 tablespoons granulated sugar
- 4 tablespoons unsalted butter, melted, plus more for brushing
- 1½ teaspoons kosher salt
- 1 large egg, room temperature
- 3 cups all-purpose flour
- Fleur de sel or coarse sea salt for topping (optional)
Instructions
- In a large mixing bowl or the bowl of a stand mixer, combine the warm milk, instant yeast, and granulated sugar. Stir gently and let sit for 5 minutes until the mixture becomes foamy and fragrant—this confirms your yeast is active and ready to work.
- Add the melted butter, kosher salt, and egg to the yeast mixture. Stir well to combine all ingredients until they’re evenly incorporated and the mixture is smooth.
- Add the all-purpose flour to the wet ingredients, one cup at a time, stirring after each addition. Mix until a shaggy dough forms. If using a stand mixer, use the dough hook attachment and mix on low speed.
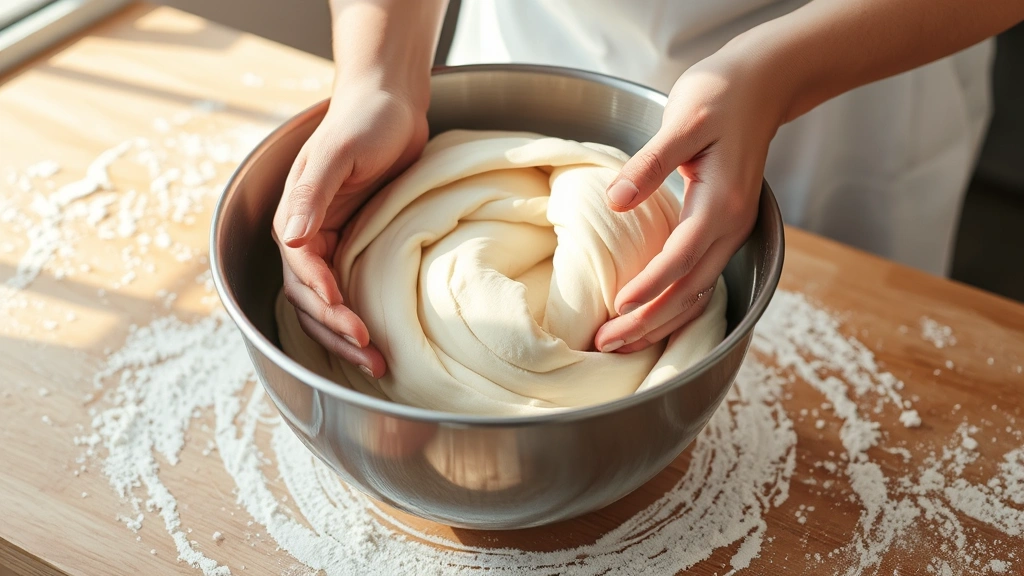
- Continue kneading the dough by hand or with the stand mixer for about 8-10 minutes until the dough becomes smooth, elastic, and slightly sticky. The dough should pull away from the sides of the bowl but still feel soft and a bit tacky to the touch.
- Form the dough into a ball and place it in a lightly oiled bowl, turning to coat all sides with oil. This prevents the dough from drying out during rising. Cover the bowl loosely with a clean kitchen towel or plastic wrap.
- Allow the dough to rise in a warm, draft-free location for approximately 1 hour, or until it has doubled in size. You can test if it’s ready by gently pressing your finger into the dough—if the indentation slowly springs back but leaves a slight impression, it’s perfectly risen.
- While the dough rises, line two large baking sheets with parchment paper or silicone baking mats. This makes cleanup easier and prevents sticking.
- Once the dough has doubled, turn it out onto a lightly floured work surface. Gently press and stretch the dough into a large rectangle, approximately 9 by 12 inches and about ½ inch thick.
- Using a sharp knife or a bench scraper, cut the dough into 12 equal pieces. You can cut it into a 3-by-4 grid pattern or whatever method feels most natural to you. The rolls don’t need to be perfectly uniform—rustic charm is part of their appeal!
- Place six rolls on each prepared baking sheet, spacing them about 2 inches apart. They’ll expand slightly as they rise and bake, so don’t crowd them too closely together.
- Cover the baking sheets loosely with plastic wrap or a clean kitchen towel and let the rolls rise for another 20-30 minutes at room temperature. They should puff up noticeably and feel soft when gently touched.
- While the rolls do their final rise, preheat your oven to 375°F (190°C). Make sure your oven racks are positioned so that the baking sheets will fit comfortably in the center of the oven.
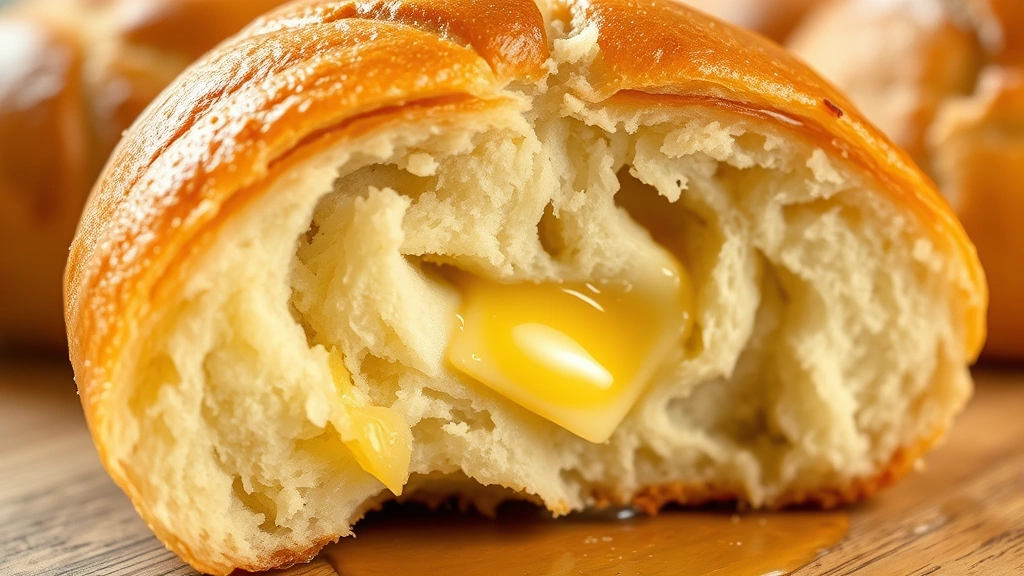
- Once the rolls have risen and your oven is preheated, brush the tops of each roll generously with melted butter. If desired, sprinkle with fleur de sel or coarse sea salt for a classic bakery-style finish and extra flavor.
- Bake the rolls for 18-22 minutes, until they’re a beautiful golden brown color on top. The exact time will depend on your oven, so start checking around the 18-minute mark.
- Remove the baking sheets from the oven and immediately transfer the hot rolls to a wire cooling rack or bread basket. Brush them once more with melted butter while they’re still warm—this keeps the exterior soft and delicious.
- Serve the rolls warm or at room temperature. They’re best enjoyed fresh on the day they’re made, but leftovers can be stored in an airtight container for up to two days and gently reheated in a 300°F oven for about 10 minutes.
Pro Tips
- Make-ahead option: You can prepare the dough through step 6, then refrigerate it overnight. The next day, simply bring it to room temperature, cut into rolls, and proceed with the final rise and baking. This is perfect for holiday meal planning!
- Freezer-friendly: Baked rolls can be frozen in an airtight container for up to three months. Thaw at room temperature and reheat gently in the oven for fresh-baked flavor.
- Milk temperature is crucial: If your milk is too hot (above 120°F), it can kill the yeast. If it’s too cold, the yeast won’t activate properly. Use a kitchen thermometer for best results, or simply test it on your wrist—it should feel warm but comfortable.
- Flavor variations: Add ½ teaspoon garlic powder and 1 teaspoon Italian seasoning for garlic herb rolls. Or mix in ½ cup grated Parmesan cheese for cheesy rolls. Cinnamon rolls can be made by spreading the dough with cinnamon-sugar before cutting.
- Humidity affects dough: On very humid days, you might need slightly less flour. On dry days, you might need a tiny bit more. Adjust gradually as you’re mixing until the dough reaches the right consistency.
- Don’t skip the final butter brush: This step is what gives store-bought yeast rolls their signature soft, buttery exterior. It’s truly the difference between good rolls and amazing rolls.
- Egg wash alternative: If you don’t have an egg on hand, brush the rolls with melted butter before baking instead. The results will be nearly identical.