
There’s something absolutely magical about perfectly baked potato wedges – crispy on the outside, fluffy and tender on the inside, and so much more elegant than regular fries. This recipe has become my go-to side dish for everything from casual weeknight dinners to impressive dinner parties, and honestly, once you master this technique, you’ll never go back to store-bought frozen wedges again.
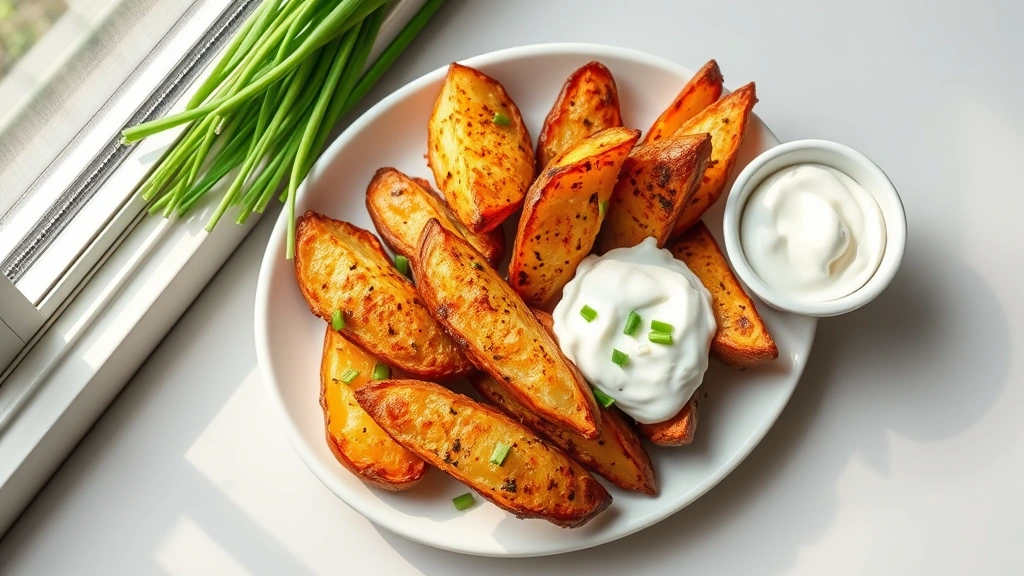
What I love most about this baked potato wedges recipe is how incredibly versatile it is. You can serve them alongside grilled chicken, use them as a base for loaded nachos, or simply enjoy them with a dollop of sour cream and fresh chives. The beauty of baking rather than deep-frying means these wedges are lighter, healthier, and just as satisfying – if not more so. Plus, your kitchen won’t smell like a deep fryer for days!
The secret to achieving those coveted crispy edges lies in three key elements: proper potato selection, adequate spacing on your baking sheet, and the right oven temperature. I always recommend using russet potatoes because they have the perfect starch content and texture. Waxy potatoes like red potatoes won’t give you that same fluffy interior, so don’t skip this step. The potato starch is what creates that beautiful golden crust when combined with oil and high heat.
One of my favorite tips is to soak the cut wedges in cold water for about 30 minutes before cooking. This removes excess starch and helps prevent them from sticking together while baking. It also contributes to that ultimate crispy-on-the-outside texture we’re all after. I learned this trick from exploring various cooking techniques, and it’s been a game-changer.
When it comes to seasoning, the possibilities are truly endless. While I’m providing you with a classic preparation, don’t be afraid to get creative. Try Serious Eats’ seasoning guides for inspiration, or experiment with everything from cajun spices to Italian herbs. The beauty of homemade wedges is that you control every element, from the oil type to the exact seasonings used.
These wedges pair beautifully with so many dishes. Serve them alongside a creamy bacon carbonara for an indulgent meal, or keep things light with a fresh salad. They’re also incredible as a side to burgers, grilled fish, or roasted vegetables. For a fun appetizer situation, pair them with a refreshing chickpea salad for a complete meal.
I also love topping these with everything from melted cheese and bacon to fresh herbs and garlic aioli. The neutral flavor profile means they work with virtually any topping or accompaniment you can imagine. Check out Bon Appétit’s potato recipes for more creative serving ideas.
One thing I cannot stress enough is the importance of preheating your oven properly. A fully preheated oven ensures that your wedges start cooking immediately, which is crucial for achieving that crispy exterior. This is where many home cooks go wrong – they pop the wedges in before the oven reaches temperature, and the result is soggy, disappointing wedges.
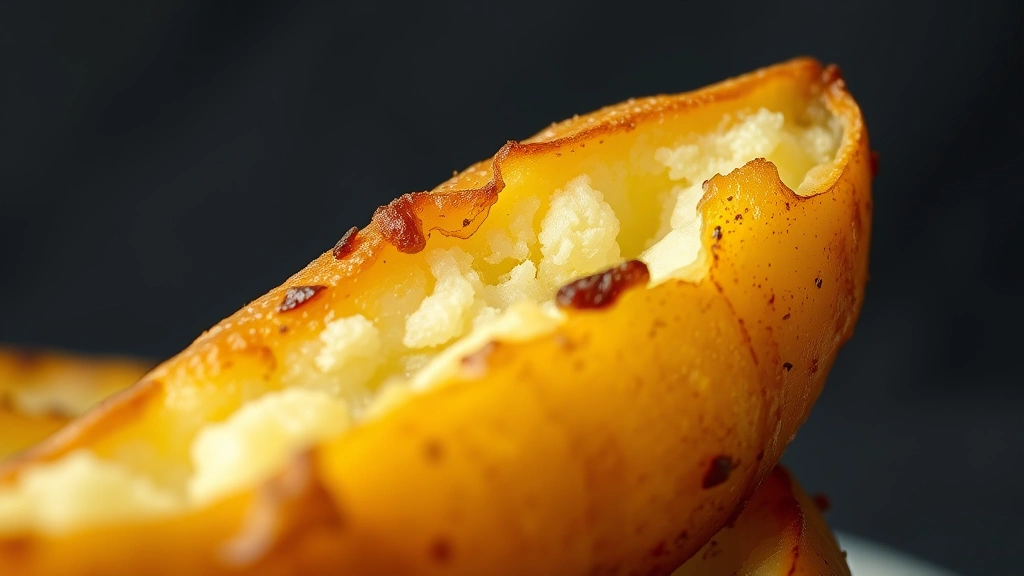
The texture you’re aiming for is crispy and golden brown on the outside with just the slightest bit of give when you bite into them. They should never be mushy or pale. If your wedges aren’t browning properly, your oven temperature might be off, or you might not have enough oil. Don’t be shy with the oil – it’s essential for that beautiful crust.
Another pro tip: don’t overcrowd your baking sheet. The wedges need space to circulate air and brown evenly. If you’re making a large batch, use two baking sheets and rotate them halfway through cooking. This ensures every single wedge gets equally crispy and golden.
For storage, leftover wedges can be kept in an airtight container in the refrigerator for up to three days. To reheat, place them on a baking sheet and pop them in a 375°F oven for about 10 minutes until they regain their crispiness. You can also freeze unbaked wedges on a baking sheet and then transfer them to a freezer bag for up to three months. Cook them directly from frozen, just add a few extra minutes to the cooking time.
This recipe truly represents comfort food at its finest – simple, satisfying, and absolutely foolproof once you understand the technique. I’ve served these to countless friends and family members, and they always ask for the recipe. Now you have it, and I’m confident you’ll be making these regularly. Let me know how yours turn out!
For more potato inspiration, check out New York Times Cooking for additional creative preparations and serving suggestions.
Ingredients
- 4 large russet potatoes, scrubbed clean
- 3 tablespoons olive oil or vegetable oil
- 1.5 teaspoons kosher salt
- 0.5 teaspoon freshly ground black pepper
- 0.5 teaspoon garlic powder
- 0.5 teaspoon paprika
- 0.25 teaspoon cayenne pepper (optional)
- Fresh chives or parsley for garnish
- Fleur de sel for finishing
Instructions
- Preheat your oven to 425°F and position the racks in the upper and lower thirds of the oven. Line two large baking sheets with parchment paper or silicone baking mats.
- Scrub the russet potatoes under cold running water to remove any dirt, then pat them completely dry with paper towels. Moisture is the enemy of crispy wedges, so don’t skip this step.
- Cut each potato in half lengthwise, then cut each half into 4-5 wedges, depending on the size of your potato. Aim for wedges that are roughly the same size so they cook evenly.
- Place the cut potatoes in a large bowl and cover them with cold water. Let them soak for 30 minutes to remove excess starch. This is crucial for achieving that crispy exterior.
- Drain the potatoes thoroughly in a colander and pat them completely dry with paper towels or a clean kitchen towel. Any remaining moisture will create steam, preventing browning.
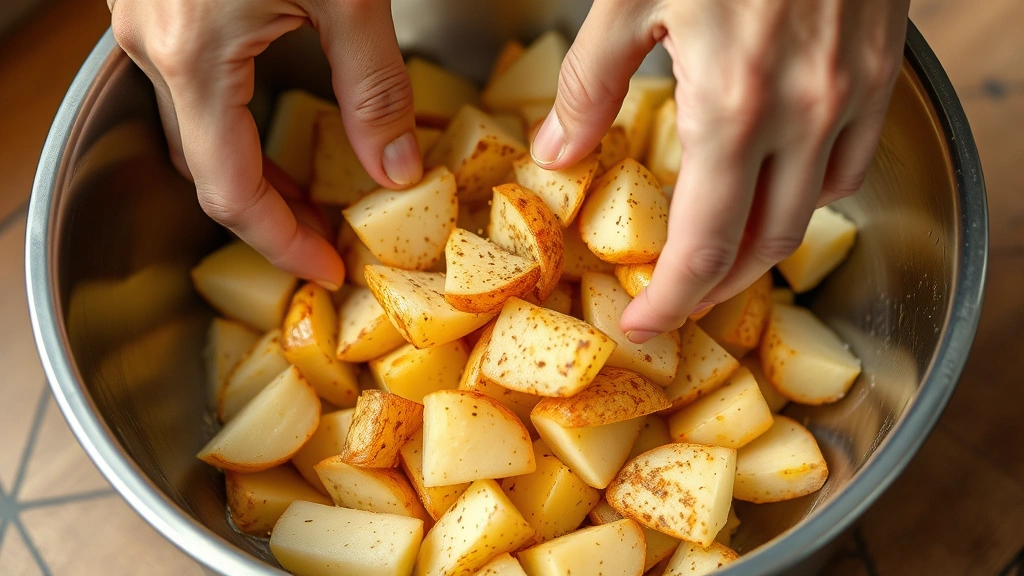
- Return the dried potatoes to the bowl and drizzle with the olive oil. Toss until every piece is evenly coated with oil.
- In a small bowl, combine the kosher salt, black pepper, garlic powder, paprika, and cayenne pepper (if using). Mix well to combine.
- Sprinkle the seasoning mixture over the oiled potatoes and toss gently but thoroughly, making sure every wedge gets coated with the seasoning blend.
- Arrange the wedges on the prepared baking sheets in a single layer, placing them skin-side down. Make sure they’re not overlapping or crowded – they need space for air circulation.
- Place one baking sheet on the upper rack and one on the lower rack in the preheated 425°F oven.
- Bake for 20 minutes, then rotate the baking sheets from top to bottom and turn each wedge over so the other side can brown.
- Continue baking for another 15-20 minutes, until the wedges are golden brown and crispy on all sides. The exact time depends on your oven and the size of your wedges.
- Remove the baking sheets from the oven and transfer the wedges to a serving platter. Sprinkle with fleur de sel and fresh chives or parsley while still warm.
- Serve immediately with your favorite toppings or dipping sauces like sour cream, garlic aioli, or ketchup.
Pro Tips
Don’t skip the soaking step – it removes excess starch and is essential for achieving crispy wedges. Even 15 minutes of soaking will help significantly.
Pat the potatoes completely dry after soaking. Any remaining moisture will steam instead of brown, resulting in soggy wedges.
Don’t overcrowd the baking sheets. The wedges need space for air circulation to brown evenly on all sides. Use two sheets if necessary.
Make sure your oven is fully preheated before adding the wedges. A cold oven will result in soggy, disappointing potatoes.
Rotate the baking sheets halfway through cooking for even browning. This ensures every wedge gets equally crispy and golden.
Feel free to experiment with seasonings – try ranch powder, Italian herbs, Cajun spices, or curried flavors for variety.
For loaded wedges, top with melted cheese, bacon bits, sour cream, and fresh chives after baking for an indulgent side dish.
Leftovers can be stored in an airtight container in the refrigerator for up to three days and reheated in a 375°F oven for about 10 minutes.
You can freeze unbaked wedges on a baking sheet, then transfer to a freezer bag for up to three months. Cook from frozen, adding a few extra minutes to the cooking time.
Different ovens vary in temperature accuracy, so watch your wedges carefully the first time you make them. Adjust timing as needed for future batches.
For extra crispy wedges, toss them halfway through baking to ensure even browning on all sides.
The size of your wedges matters – aim for uniform pieces so they cook at the same rate. Very thick wedges may need slightly longer cooking time.
Use a high-quality oil with a high smoke point like avocado oil or refined vegetable oil for best results.