
There’s nothing quite like the magic of a perfectly executed crumble topping—that golden, buttery, crunchy layer that transforms any fruit filling into something absolutely extraordinary. Whether you’re topping a classic apple crisp, a berry crumble, or even a savory vegetable bake, mastering this technique is an absolute game-changer in the kitchen.
I’ve been making crumble toppings for years, and I’ve learned that the secret isn’t complicated at all. It’s really about understanding a few key principles: the ratio of fat to flour, the importance of keeping everything cold, and knowing exactly when to stop mixing. Too many people overwork their crumble mixture, which results in a dense, cake-like topping instead of those beautiful, irregular clusters we’re all craving.
This recipe is my go-to formula that I’ve perfected through countless batches. It yields that perfect balance of crispy exterior and tender interior, with just the right amount of sweetness. The beauty of a crumble topping is its versatility—you can adjust the spices, add nuts, swap in different flours, or even incorporate oats for extra texture. But today, I’m sharing the classic version that works beautifully with virtually any filling.
What makes this topping so special is how quickly it comes together. In just a few minutes, you’ll have a mixture that looks almost too simple to be delicious, but trust me—once it bakes, it transforms into something magical. The butter creates those golden-brown, crispy bits, the brown sugar adds depth and complexity, and the cold temperature ensures everything stays separate and crumbly rather than becoming a solid crust.
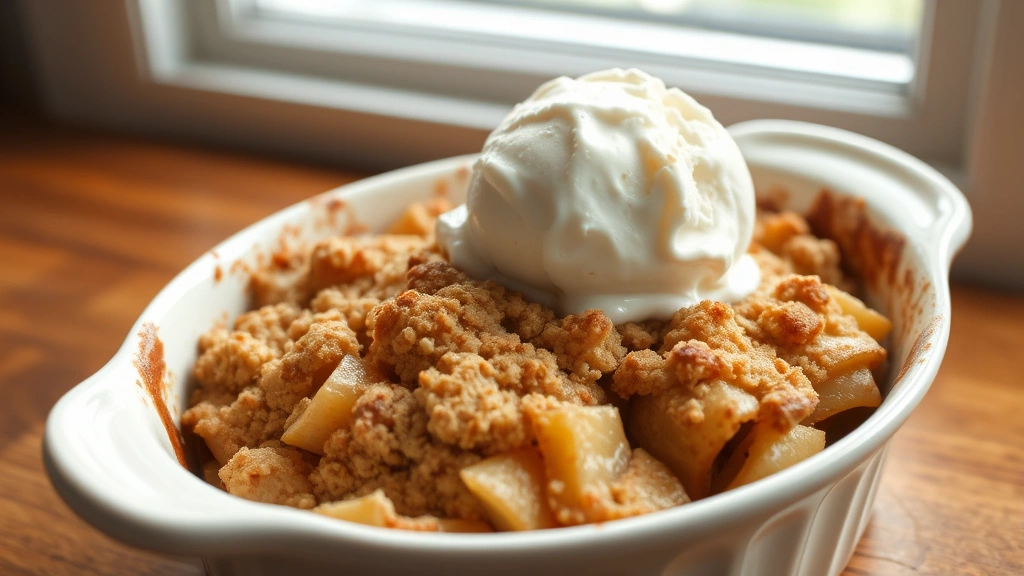
I love serving crumbles warm with a scoop of vanilla ice cream or a dollop of whipped cream. The contrast between the warm fruit filling, the crispy topping, and the cold cream is absolutely divine. This is the kind of dessert that feels fancy enough for guests but simple enough for a weeknight treat. Just like perfecting a cream sauce, the key is technique and quality ingredients.
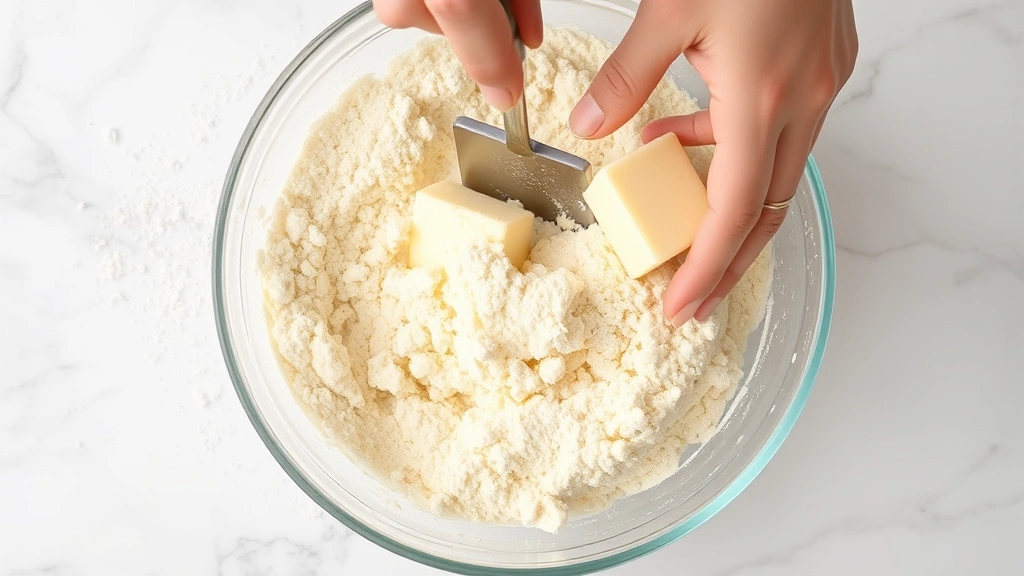
One thing I always emphasize is the importance of using cold butter. I keep mine in the freezer for at least 15 minutes before I start, and I cut it into small cubes rather than using softened butter. This is crucial for achieving those beautiful, irregular crumbles. When the cold butter hits the hot oven, it creates steam pockets that make everything wonderfully crispy.
Another pro tip: don’t be afraid to get your hands in there! Some people are intimidated by the mixing process, but a pastry cutter or even your fingertips are the best tools for this job. You want to break down the cold butter into tiny pieces throughout the flour mixture, creating that signature crumbly texture. It should look like coarse sand or breadcrumbs when you’re done.
I’ve found that the best crumble toppings have a little something extra—whether that’s a pinch of vanilla extract, a dash of cinnamon, or even a small amount of lemon zest. These little additions don’t overpower the topping but add a subtle sophistication that keeps people asking for the recipe.
The beauty of this topping is that it works with any fruit. From traditional fruit combinations to unexpected pairings, the crumble adapts beautifully. Apples, berries, stone fruits, pears—they all shine under a perfectly made crumble topping.
For more inspiration on building delicious layered desserts, check out Serious Eats’ dessert section, which has incredible techniques and variations.
This recipe makes enough topping for a standard 9×13 baking dish or an 8×8 square dish. If you’re making multiple desserts or want extra on hand, this recipe doubles beautifully. Just keep the extra topping in the freezer until you need it—frozen topping actually works even better than fresh because the butter stays colder longer in the oven.
I truly believe that once you master this crumble topping, you’ll be making it constantly. It’s one of those recipes that becomes a staple in your cooking rotation, something you reach for again and again. The combination of simplicity, versatility, and deliciousness is unbeatable.
Ingredients
- 1 cup all-purpose flour
- 3/4 cup rolled oats (old-fashioned or quick oats)
- 3/4 cup light brown sugar, packed
- 1/2 teaspoon kosher salt
- 1/2 teaspoon cinnamon
- 1/4 teaspoon vanilla extract
- 8 tablespoons cold unsalted butter, cubed
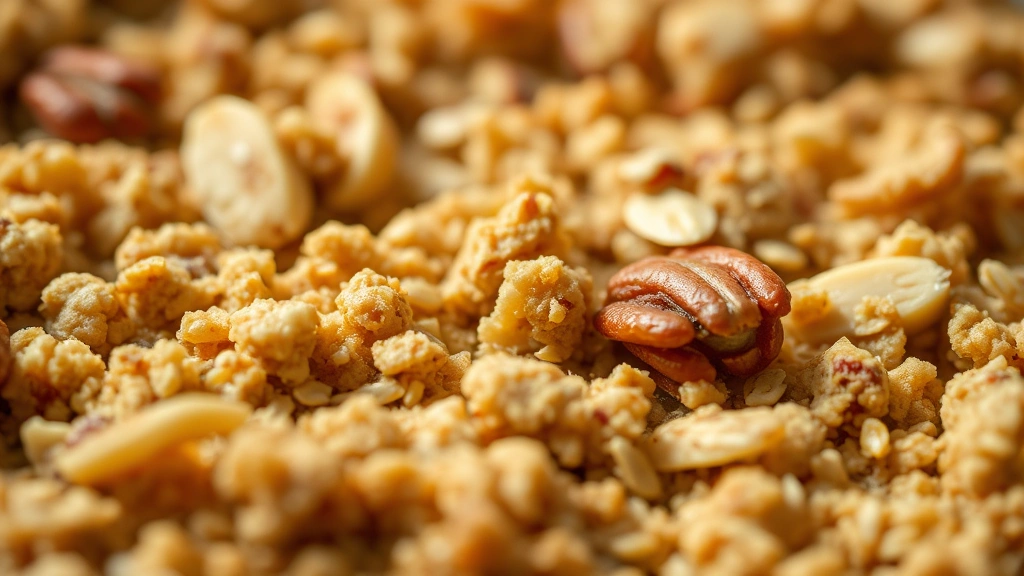
- 1/2 cup chopped pecans or walnuts (optional but recommended)
Instructions
- Start by gathering all your ingredients and preparing your workspace. Cut the cold butter into small cubes (about 1/2 inch each) and place them on a parchment-lined plate. Return them to the freezer while you prepare the dry ingredients. This step is absolutely crucial for achieving that perfect crumbly texture.
- In a large mixing bowl, combine the all-purpose flour, rolled oats, packed brown sugar, kosher salt, cinnamon, and vanilla extract. Whisk these ingredients together until everything is evenly distributed and you don’t see any lumps of brown sugar. Take your time with this step—it ensures consistent flavor throughout.
- Remove the cubed cold butter from the freezer. Add the butter pieces to the flour mixture all at once. Using a pastry cutter, two forks, or your fingertips, work the cold butter into the flour mixture. The goal is to break the butter down into tiny pieces throughout the mixture, creating a texture that resembles coarse sand or breadcrumbs.
- Continue mixing until the largest butter pieces are about the size of a small pea. You should still see small flecks of butter throughout—these will create the crispy, crumbly texture you’re looking for. Don’t overmix; stop as soon as the mixture comes together loosely.
- Fold in the chopped nuts at this point if you’re using them. Pecans and walnuts both add wonderful texture and flavor, but this is entirely optional. Toss them gently throughout the mixture until evenly distributed.
- At this point, your crumble topping is ready to use immediately, or you can refrigerate it for up to 24 hours. You can also freeze it for up to 3 months, which is perfect for having on hand whenever you need it. Frozen topping actually performs beautifully straight from the freezer—no need to thaw.
- When you’re ready to use the topping, prepare your fruit filling in your baking dish. Whether you’re using apples, berries, peaches, or any other fruit, simply arrange your filling in a 9×13 or 8×8 baking dish. The fruit should be tossed with any sugar, spices, and thickening agent (like cornstarch or tapioca starch) you prefer.
- Distribute the crumble topping evenly over your fruit filling, using your fingers to gently break up any larger clumps. Don’t press it down—you want it to stay loose and airy. The topping should cover the fruit but still have some texture and dimension.
- Place the baking dish in a preheated 350-degree Fahrenheit oven. Bake for 35 to 40 minutes, until the topping is golden brown and you can see some of the fruit bubbling around the edges. The exact baking time depends on your oven and the depth of your filling.
- Once the topping is golden and the fruit is bubbling, remove from the oven and let it cool for at least 10 minutes before serving. This resting time allows everything to set slightly and makes serving much easier.
- Serve warm with vanilla ice cream, whipped cream, or a dollop of Greek yogurt. The contrast between the warm crumble, cold cream, and tender fruit is absolutely divine. Leftovers can be refrigerated for up to 3 days and reheated gently in a 300-degree oven until warm.
Pro Tips
- The most important factor for a successful crumble topping is keeping your butter cold throughout the process. If your kitchen is warm or you’re having trouble keeping things cold, chill your mixing bowl and even your flour before starting.
- Don’t skip the vanilla extract—even though the amount seems small, it adds a subtle sophistication to the topping that makes people ask for your recipe.
- Feel free to customize the spices. Nutmeg, ginger, or allspice all work beautifully in place of or in addition to cinnamon. Start with 1/4 teaspoon and adjust to taste.
- Oats are optional but highly recommended. They add wonderful texture and help create those irregular, crunchy clusters. Use old-fashioned rolled oats for the best results—quick oats will make the topping denser.
- This topping works beautifully with any fruit filling. Apples mixed with cinnamon and brown sugar, mixed berries, peaches with vanilla, or even pears with ginger all shine under this crumble.
- For a savory version, omit the brown sugar and vanilla, add herbs like thyme or sage, and use grated Parmesan cheese. This works wonderfully over roasted vegetables.
- Make a double batch and freeze half. Having crumble topping on hand in your freezer means you can whip up a dessert in minutes whenever the craving strikes.
- If your topping starts browning too quickly, tent the baking dish loosely with aluminum foil and continue baking until the fruit is tender and bubbling.
- The best nuts for this topping are pecans and walnuts, but almonds, hazelnuts, or even macadamia nuts would work beautifully. Toast them lightly before adding for extra flavor.
- Store leftover crumble topping in an airtight container in the refrigerator for up to a week or in the freezer for up to three months. Use it straight from the freezer—no thawing necessary.
Pingback: How to make the Best Pickled Shrimp Recipe! So Tasty! – Simple Recipe Finder