
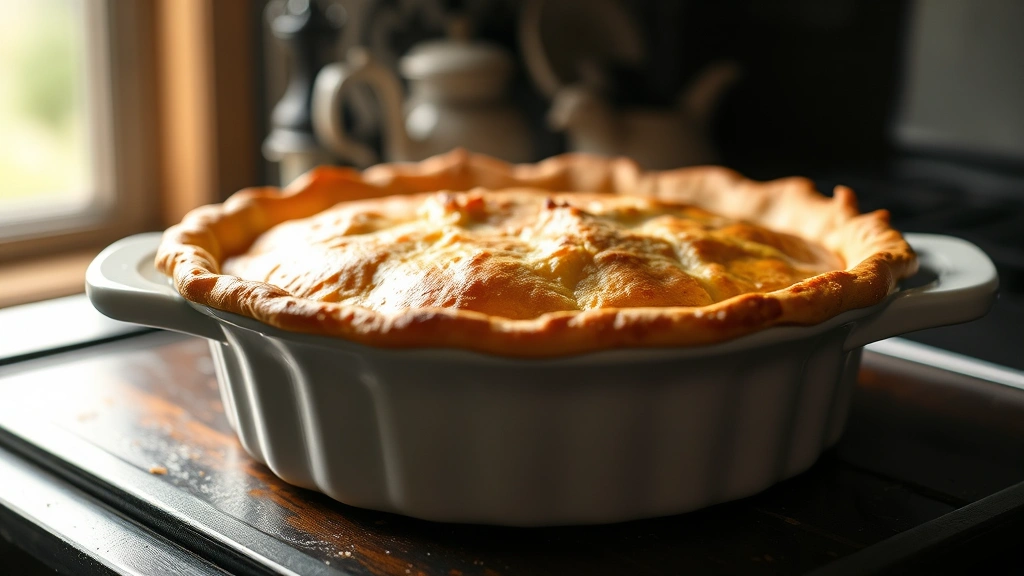
Making the perfect flaky pie crust is easier than you think, and once you master this technique, you’ll never go back to store-bought again! A truly exceptional pie crust is all about understanding the science behind those beautiful, delicate layers. The secret lies in keeping your butter cold, using the right ratio of ingredients, and handling the dough with a gentle touch.
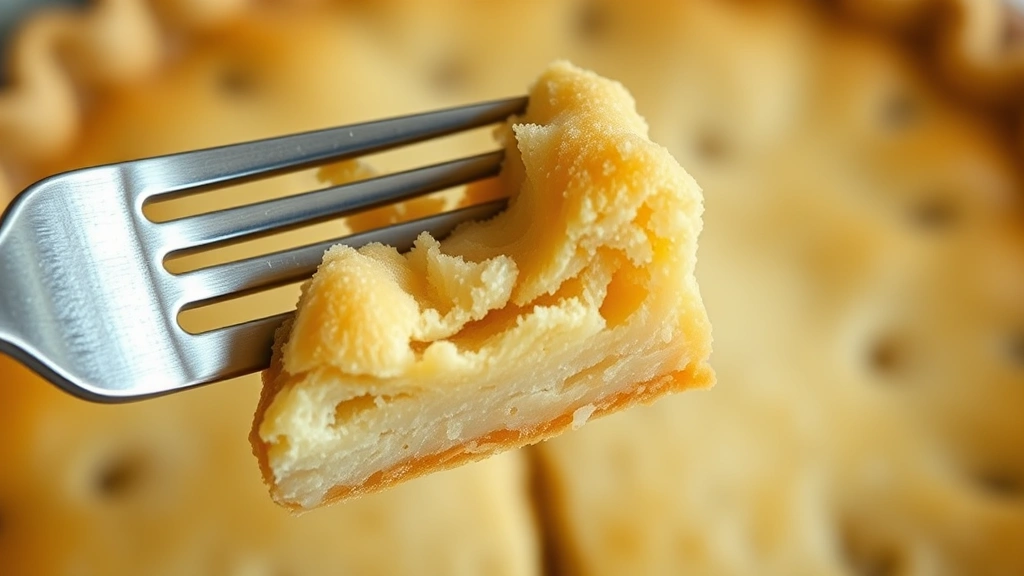
What makes a pie crust truly flaky is the presence of distinct butter pockets throughout the dough. When these cold butter pieces melt during baking, they create steam, which causes the layers to separate and puff up beautifully. This is why temperature control and technique are absolutely crucial. Many home bakers struggle with pie crust because they either overwork the dough or allow the butter to warm up too much.
In this comprehensive guide, we’ll walk you through every step of creating a pie crust that’s crispy on the outside, tender on the inside, and absolutely loaded with flaky layers. Whether you’re making a classic apple pie, a silky custard tart, or a savory quiche, this recipe will serve you beautifully. We’ll cover ingredient selection, the mixing method, chilling times, rolling techniques, and pro tips that will transform your pie-making forever.
The beauty of homemade pie crust is that it pairs wonderfully with both sweet and savory fillings. Try pairing your perfectly flaked crust with pickled red onions for a unique savory pie, or stick with traditional fruit fillings for dessert. You can also use this same dough for chickpea salad hand pies or rustic galettes.
One of the best parts about mastering pie crust is that the technique is completely transferable to other baked goods. Once you understand how to work with butter and flour, you’ll find yourself making croissants, biscuits, and puff pastry with confidence. The fundamentals remain the same across all laminated doughs.
This recipe makes enough dough for one double-crust pie or two single-crust pies. I highly recommend making a double batch and freezing extra dough disks for future baking adventures. Pie crust actually improves after a day or two in the refrigerator as the gluten relaxes, so don’t rush the process. For more creative applications, check out how roasted shishito peppers can be served in a savory pie shell for an elegant appetizer.
The key to success is respecting the dough and understanding that less is more when it comes to handling. Overworking develops gluten, which creates toughness rather than flakiness. You want just enough gluten development for structure, but not so much that you lose that tender, delicate crumb. This balance is what separates a mediocre pie crust from an extraordinary one.
Learn more about perfecting your baking technique with our guide to mastering dough techniques, which covers similar principles applicable across different dough types. The precision and care you develop making pie crust will enhance all your baking endeavors.
For external inspiration and detailed baking science, check out resources like Serious Eats’ comprehensive pie crust guide, which breaks down the chemistry beautifully. You can also find wonderful variations on Bon Appétit’s foolproof pie dough recipe, and The New York Times’ all-butter pie crust for additional techniques and troubleshooting tips.
Now let’s dive into creating your masterpiece! With patience, practice, and this foolproof method, you’ll be producing pie crusts that rival any professional bakery. The satisfaction of biting into a slice of pie with a crust you made from scratch is truly incomparable.
Ingredients
- 2 1/2 cups all-purpose flour, plus extra for dusting
- 1 teaspoon salt
- 1 teaspoon sugar
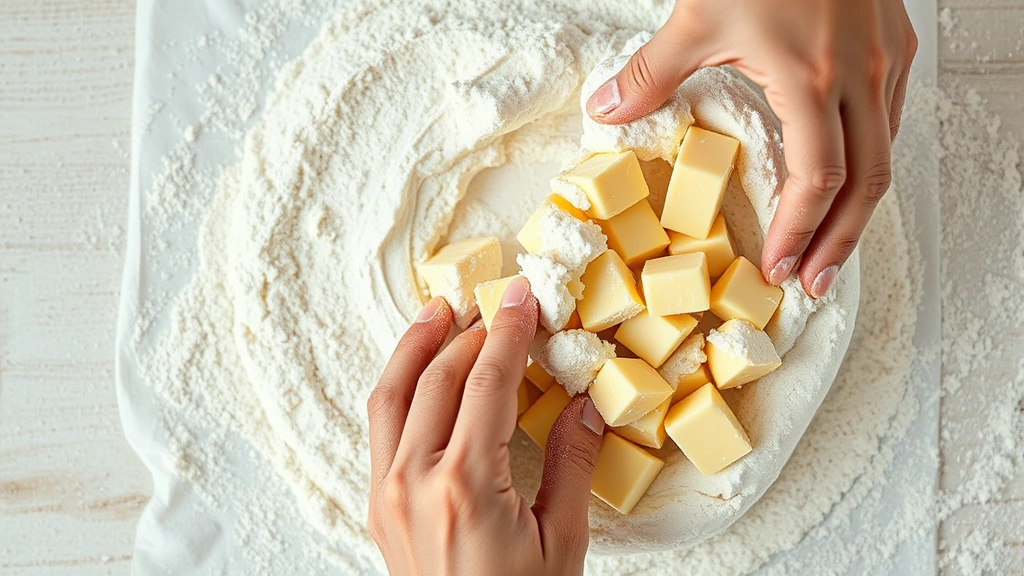
- 1 cup (2 sticks) cold unsalted butter, cut into small cubes
- 6 to 8 tablespoons ice water, plus more as needed
- 1 tablespoon apple cider vinegar or lemon juice (optional but recommended)
- 1 egg yolk mixed with 1 tablespoon water for egg wash (optional)
Instructions
- In a large mixing bowl, whisk together flour, salt, and sugar. These dry ingredients form the foundation of your crust, and mixing them ensures even distribution of salt throughout.
- Add the cold butter cubes to the flour mixture. Using a pastry cutter, two knives, or your fingertips, work the butter into the flour until the mixture resembles coarse breadcrumbs with some pea-sized butter pieces remaining. This step is crucial—you want visible butter pieces, not a smooth mixture.
- In a small bowl, combine ice water with apple cider vinegar. The acid helps relax gluten and enhances flavor without adding extra water.
- Drizzle 6 tablespoons of the ice water mixture over the flour-butter combination while gently tossing with a fork. Add more water one tablespoon at a time, just until the dough comes together when squeezed. The dough should look shaggy and hold together barely.
- Turn the dough out onto a lightly floured work surface. Gently gather it into a rough ball, being careful not to overwork it. The dough should still show visible butter streaks.
- Divide the dough in half, flatten each half into a disk about 1-inch thick, wrap tightly in plastic wrap, and refrigerate for at least 1 hour, preferably overnight. This resting period allows the gluten to relax and the butter to firm up.
- When ready to use, remove one dough disk from the refrigerator and let it sit at room temperature for 5 to 10 minutes until slightly softened but still cold.
- On a floured work surface, place the dough disk and tap it gently with your rolling pin to flatten slightly. Begin rolling from the center outward, rotating the dough a quarter turn after each few rolls to maintain an even circular shape.
- Continue rolling until the dough is about 1/8-inch thick and approximately 2 inches larger than your pie pan on all sides. If the dough becomes too warm or sticky, transfer it to a baking sheet and refrigerate for 10 minutes.
- Carefully roll the dough onto your rolling pin and transfer it to your pie pan, gently pressing it into the bottom and sides. Trim excess dough to 1-inch overhang around the edges.
- For a single-crust pie, fold the edges under and crimp decoratively with your fingers or a fork. For a double-crust pie, leave the overhang and proceed with filling and top crust.
- If not filling immediately, cover the pie shell with plastic wrap and refrigerate until ready to use. For blind baking (pre-baking an empty shell), line with parchment and fill with pie weights, then bake at 425°F for 15 minutes.
- For the top crust on a double-crust pie, repeat the rolling process with the second dough disk. Place it over your filling, trim edges to 1-inch overhang, then fold both edges under and crimp to seal.
- Brush the top crust with egg wash if desired for a beautiful golden finish. Cut several small slits in the top to allow steam to escape during baking.
- Refrigerate the assembled pie for at least 30 minutes before baking to prevent excessive shrinking. Follow your specific pie recipe for final baking temperature and time.
Pro Tips
o The vinegar or lemon juice is optional but highly recommended. The acid relaxes the gluten network, making the dough more tender and forgiving to work with, while also improving flavor complexity.
o Don’t skip the resting and chilling periods. These pauses allow gluten to relax, preventing shrinkage during baking, and they give the butter time to reabsorb moisture from the flour, creating better flake structure.
o If your dough becomes too warm while rolling, simply slide it onto a baking sheet and pop it back in the refrigerator. It’s better to work slowly and maintain cold temperatures than to rush and end up with a tough crust.
o For a truly foolproof approach, consider making the dough in a food processor. Pulse the butter into the flour until it resembles coarse crumbs, then add water while pulsing until just combined. The processor’s speed can actually help maintain lower temperatures.
o This dough freezes beautifully for up to three months. Wrap dough disks tightly in plastic wrap, then aluminum foil, and label with the date. Thaw overnight in the refrigerator before using.
o If you notice your dough shrinking significantly during baking, it likely needs more resting time. The gluten was probably stretched too much during rolling and needs to relax before baking.
o For the ultimate flaky crust, some bakers use a combination of butter and lard or shortening. While butter provides superior flavor, a small percentage of shortening (about 25 percent of the fat) can increase flakiness due to its different melting point.
o Don’t fear the cracking edges while rolling. Pie dough is forgiving—simply press cracks back together with your fingers or a small dough patch.
o If making savory pies, omit the sugar entirely or reduce it to just 1/2 teaspoon. For sweet applications, feel free to increase sugar to 2 teaspoons for subtle sweetness.
Pingback: Quick & Tasty Sautéed Shrimp Recipe! – Simple Recipe Finder
Pingback: How to make the BEST Traditional Beef Stroganoff Recipe! – Simple Recipe Finder
Pingback: How to make the BEST Chickpea Soup Recipe! So Tasty! – Simple Recipe Finder