

Fortune cookies are such a fun and elegant dessert to make at home! While they might seem intimidating, I promise they’re actually quite simple once you get the hang of the technique. These delicate, crispy cookies are perfect for dinner parties, special occasions, or just because you want to impress your guests with homemade treats.
The key to perfect fortune cookies is all about timing and temperature. You’ll need to work quickly once the cookies come out of the oven, as they harden rapidly. But don’t worry—I’ll walk you through every single step to ensure your success. The batter itself is incredibly easy and requires just a handful of pantry staples.
What makes homemade fortune cookies so special is that you can customize your fortunes! Write funny messages, romantic quotes, or genuine well-wishes. Your guests will absolutely love the personal touch. Plus, these cookies stay fresh for several days when stored in an airtight container, making them perfect for meal prep or gifting.
I love serving these after an Asian-inspired dinner, or even after a simple pasta night. Speaking of which, if you’re planning a full menu, you might want to check out this Easy Chicken Alfredo Recipe for the main course. For a lighter starter, try these Best Shishito Peppers or this Best Pickled Red Onion Recipe.
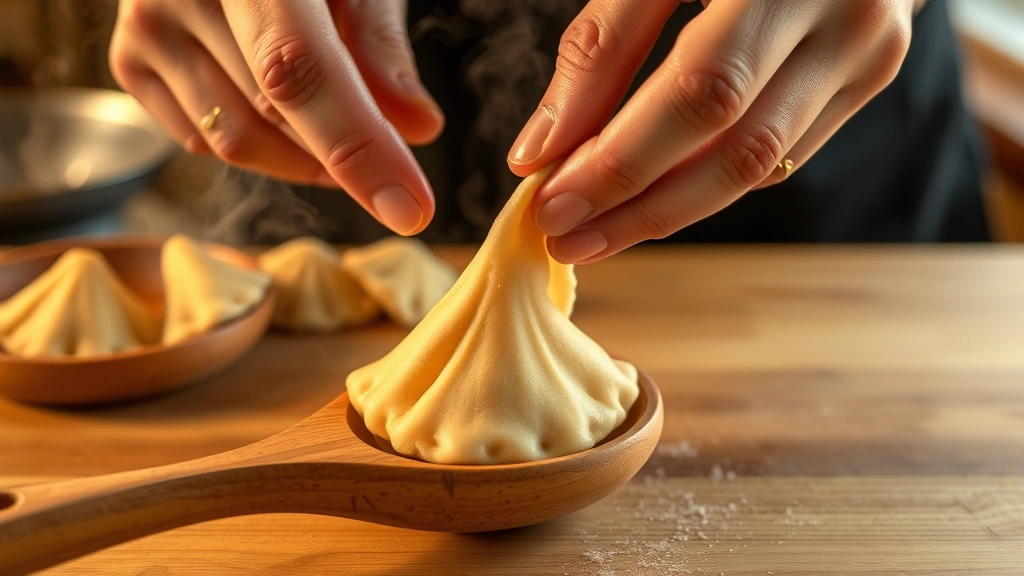
The technique for shaping these cookies is really the star of the show. Once you master it, you’ll be making batch after batch. The cookies need to be shaped while they’re still warm and pliable—this is crucial. If they cool too much, they’ll crack and break. I recommend having everything prepped and ready before you pull the first batch from the oven.
For more inspiration on delicate, impressive desserts, check out Serious Eats dessert section and Bon Appétit’s sweet treats. You’ll find tons of creative fortune ideas and variations there too!
These fortune cookies are naturally dairy-free and can easily be made vegan if you use plant-based butter. They’re also naturally gluten-free if you substitute the all-purpose flour with a 1:1 gluten-free blend. The possibilities are truly endless, and I encourage you to experiment once you’ve mastered the basic recipe.
My favorite part about making fortune cookies at home? The incredible aroma that fills your kitchen. It’s warm, buttery, and absolutely irresistible. Your whole family will be gathered around the oven waiting for them to cool just enough to sneak a taste!
Ingredients
- 2 large egg whites, room temperature
- 1/2 cup granulated sugar
- 1/4 cup unsalted butter, melted
- 1/4 cup all-purpose flour
- 1/2 teaspoon vanilla extract
- 1/4 teaspoon almond extract (optional but recommended)
- Pinch of sea salt
- Fortunes written on small strips of paper (about 3×1 inches)
Instructions
- Preheat your oven to 375°F (190°C). Line two baking sheets with parchment paper or silicone baking mats.
- Write your fortunes on small strips of paper before you start baking. Keep them nearby—you’ll need them immediately after the cookies bake. Some fun fortune ideas: ‘Adventure awaits in the next chapter of your life,’ ‘You will find happiness in unexpected places,’ or ‘Your kindness will return to you tenfold.’
- In a medium bowl, whisk together the egg whites and granulated sugar until the mixture is pale and slightly frothy, about 1-2 minutes.
- Add the melted butter to the egg white mixture and whisk until well combined.
- In a separate small bowl, sift together the all-purpose flour and sea salt.
- Gently fold the flour mixture into the wet ingredients using a spatula, stirring just until combined. The batter should be smooth with no lumps.
- Stir in the vanilla extract and almond extract (if using).
- Drop about 1 tablespoon of batter onto your prepared baking sheet, spacing the cookies about 3 inches apart. These cookies spread quite a bit, so don’t overcrowd the pan.
- Bake for 8-10 minutes, until the edges are golden brown but the center still looks slightly pale and underbaked.
- Remove the baking sheet from the oven and immediately work with one cookie at a time. Using an offset spatula or thin metal spatula, carefully loosen a cookie from the pan.
- Quickly place the fortune strip in the center of the hot cookie.
- Fold the cookie in half over the fortune, pressing gently to seal. You have about 10-15 seconds before it hardens, so work quickly but carefully.
- Immediately fold the half-moon cookie in half again over your finger or the edge of a wooden spoon handle to create the classic fortune cookie shape.
- Place the shaped cookie on a cooling rack. Repeat steps 10-13 with the remaining cookies on the pan, working as quickly as possible.
- If your cookies harden too quickly before you can shape them, pop the baking sheet back in the oven for 30 seconds to 1 minute to soften them again.
- Once all cookies from the first batch are shaped and cooled, repeat steps 8-14 with the remaining batter on your second prepared baking sheet.
- Allow all cookies to cool completely on a wire rack before serving or storing.
- Store in an airtight container at room temperature for up to 5 days. These cookies are best enjoyed fresh, but they’ll keep beautifully if sealed properly.

Pro Tips
- The most important tip for success: work quickly! The cookies harden within seconds of coming out of the oven. Have your workspace organized and your fortunes ready before you start baking.
- Room temperature egg whites are essential for the proper texture. Cold eggs won’t whip up properly and your cookies won’t have the right delicate structure.
- If you find your cookies are spreading too much and becoming too thin, your oven might be running hot. Lower the temperature by 25 degrees and increase the baking time by 1-2 minutes.
- For perfectly shaped cookies, practice makes perfect! Your first batch might look a little wonky, and that’s totally okay. By batch two or three, you’ll have the technique down.
- Want to get creative? Try adding 1/4 teaspoon of sesame oil for an authentic Asian flavor, or a pinch of cardamom for something unique.
- These cookies are naturally gluten-free if you use a 1:1 gluten-free flour blend. They’re also dairy-free if you use melted coconut oil instead of butter.
- Don’t throw away broken cookies! Crush them up and use them as a garnish for ice cream or mix them into yogurt for a delicious treat.
- If shaping by hand feels too hot, use a fork or wooden spoon handle to help you fold and shape the cookies without burning your fingers.
- Make these cookies the day before an event if you’d like. They’ll taste just as delicious and you’ll have one less thing to worry about.
- For fun variations, try dipping the edges in melted chocolate or drizzling white chocolate across the top for an elegant twist.
- Store these separately from other cookies, as they can absorb odors and moisture from other baked goods.