
A German pancake, also known as a Dutch baby pancake or Pfannkuchen, is an absolutely magical dish that seems far more complicated than it actually is. This puffy, golden creation emerges from your oven like edible architecture, with dramatic sides that rise up gloriously and a custardy center that’s pure comfort. The beauty of this recipe lies in its simplicity—just a handful of pantry staples combined in the right way creates something that tastes like you spent hours in the kitchen when really, you’ve barely lifted a finger.
I absolutely love making German pancakes for weekend breakfasts or brunch gatherings because they’re so impressive yet deceptively easy. The magic happens when you heat your butter in a cast-iron skillet until it’s smoking hot, pour in your batter, and watch it transform in the oven. Within minutes, you’ll have a stunning creation that’s crispy on the edges, tender in the middle, and ready for your favorite toppings. Whether you’re topping it with fresh berries, a drizzle of maple syrup, powdered sugar, or even savory additions like bacon and cheese, this recipe is endlessly versatile.
What I love most about German pancakes is how they challenge the notion that impressive breakfasts require complicated techniques. This is truly a recipe that works every single time if you follow a few simple guidelines. The key is having all your ingredients ready before you start, using a properly heated cast-iron skillet, and not opening that oven door while your pancake is cooking. The result is a restaurant-quality breakfast that your family will be requesting again and again.
According to culinary historians, the German pancake has roots in traditional European cooking, where resourceful cooks discovered that eggs, milk, and flour could create something far more interesting than a standard pancake. The technique of using a preheated skillet with butter creates the crispy, caramelized edges that make this dish so special. I’ve seen variations across different cultures—the Dutch call theirs a Dutch baby, and the technique is similar across Scandinavian and German cuisines. What makes each version special is the toppings and the slight variations in technique.
For the best results, I recommend using a 10 to 12-inch cast-iron skillet, which is the perfect size for a standard batch. If you don’t have cast-iron, a heavy-bottomed oven-safe skillet works beautifully too. The important thing is that your skillet can go from stovetop to oven without any issues. Room temperature ingredients are essential here—cold eggs and milk won’t incorporate as smoothly, and you want that silky batter for the best texture. You can prepare your batter while your oven and skillet are preheating, which makes this recipe incredibly efficient.
I also want to mention that this recipe is naturally gluten-free friendly if you use a quality gluten-free flour blend, and it can be made dairy-free with plant-based milk and butter alternatives. The versatility extends to how you serve it too. For brunch, try topping with fresh fruit, whipped cream, and a sprinkle of powdered sugar. For a more indulgent breakfast, consider caramelized apples or rich cream sauces. You could even go savory with sautéed vegetables and cheese, or top it like a salad with greens and vinaigrette for a unique lunch option.
One of the most common questions I get about German pancakes is whether they’ll stay puffy after coming out of the oven. The answer is that they’ll deflate slightly as they cool, which is completely normal and expected. That’s actually part of the charm—the edges remain crispy while the center becomes more like a tender custard. Some people prefer to serve them immediately while they’re still at their puffiest, while others don’t mind the slight deflation. Either way, they’re delicious. The key to success is timing your batter preparation so everything comes together at once—your oven is preheated, your skillet is smoking hot, and your batter is ready to go.
I’ve made this recipe hundreds of times, and I can tell you that the slight variations in batter consistency don’t really matter much. Some batters are thinner, some are thicker, and both produce gorgeous results. What matters is that your skillet is hot enough and your batter hits that sizzling butter. The butter will puff up your pancake through the magic of steam and the Maillard reaction, creating those beautiful golden edges. Don’t be intimidated by this recipe—embrace it as an easy win that makes you look like a culinary genius.
I especially love making this for guests because I can have it on the table in under 30 minutes from start to finish. You can prep the batter ahead of time and store it in the refrigerator for up to a few hours, then simply pour and bake when ready. This makes it perfect for entertaining. You might even try making individual German pancakes in smaller cast-iron skillets for a more elegant presentation, though the timing will be slightly shorter—check at around 12-15 minutes instead of the full 18-20.
For toppings, the options are truly endless. Fresh berries, lemon juice and sugar, maple syrup, honey, jam, Nutella, caramelized fruit, whipped cream, powdered sugar, or even a savory approach with creamy alfredo—it all works beautifully. I often keep a jar of pickled red onions on hand for savory versions, and fresh berries are always a go-to for the classic sweet approach. You could even serve it with a simple salad dressed in vinaigrette for a unique brunch dish.
This recipe has become a staple in my kitchen, and I think once you make it, it’ll become one of yours too. It’s the kind of recipe that seems fancy but is actually incredibly approachable, which is exactly what I’m all about. Let me walk you through exactly how to create this masterpiece in your own kitchen.
Ingredients
- 4 large eggs, room temperature
- 1 cup whole milk, room temperature
- 1 cup all-purpose flour
- 2 tablespoons granulated sugar
- 1/2 teaspoon salt
- 1/2 teaspoon vanilla extract
- 4 tablespoons unsalted butter
- Powdered sugar for serving
- Fresh berries for serving
- Maple syrup for serving
- Lemon wedges for serving
Instructions
- Preheat your oven to 425°F (220°C). Place a 10 to 12-inch cast-iron skillet inside the oven to heat for at least 5 minutes while you prepare the batter.
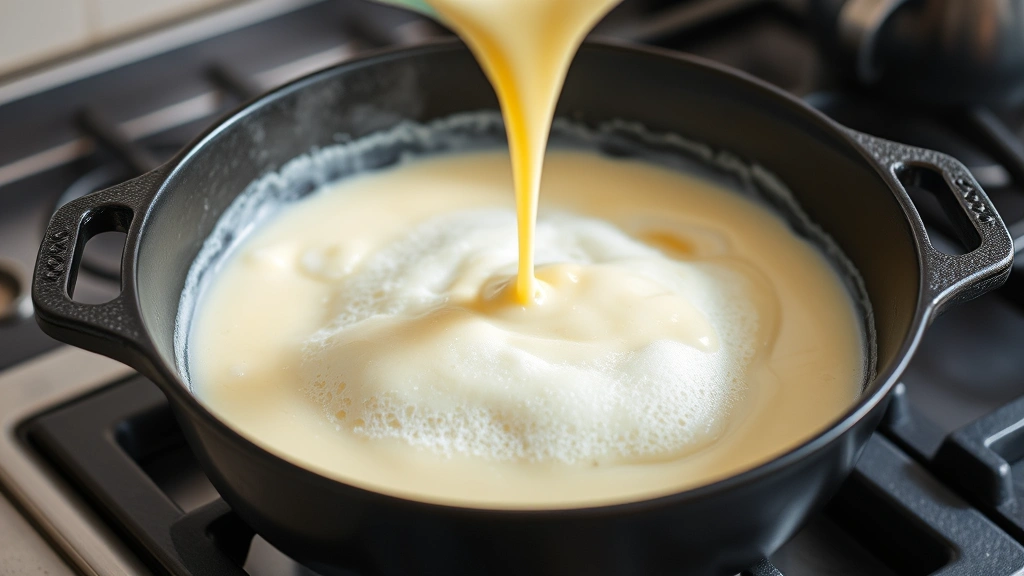
- In a blender or using a whisk and bowl, combine the room temperature eggs, milk, flour, sugar, salt, and vanilla extract. Blend or whisk until the mixture is smooth and completely lump-free. Let the batter rest while your skillet finishes heating.
- Carefully remove the hot skillet from the oven using an oven mitt. Place it on the stovetop over medium-high heat and add the butter, swirling to coat the entire bottom and sides of the skillet.
- When the butter is foaming and just beginning to brown (about 1-2 minutes), immediately pour the batter into the center of the skillet. It will sizzle dramatically—this is exactly what you want.
- Carefully transfer the skillet back to the preheated 425°F oven. Do not open the oven door for at least 15 minutes.
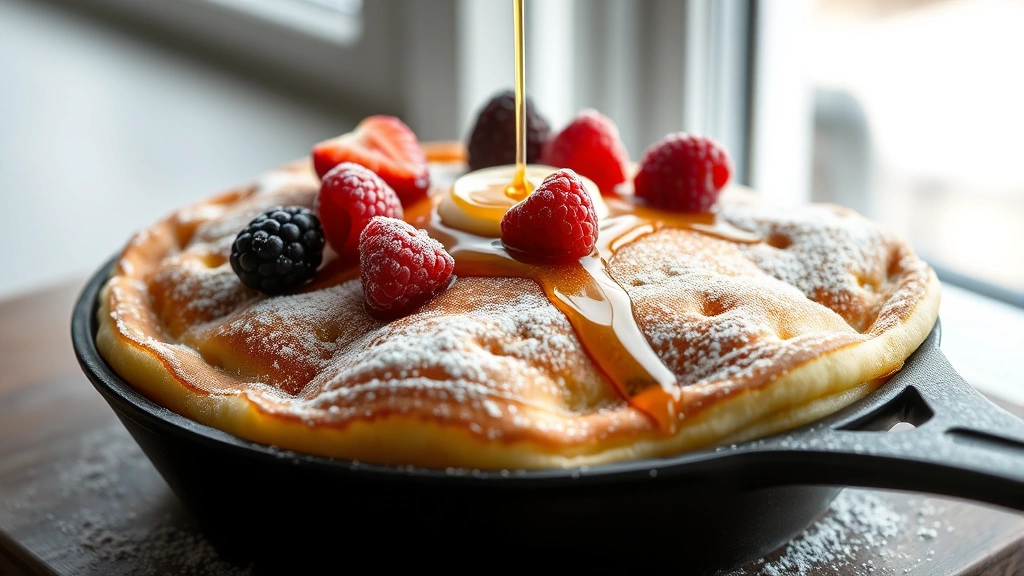
- Bake for 18-20 minutes, until the pancake is puffed up dramatically and the edges are golden brown and crispy. The center will still be slightly soft, which is perfect.
- Remove the skillet from the oven using an oven mitt and place it on a heat-safe surface. The pancake will begin to deflate slightly as it cools, which is completely normal.
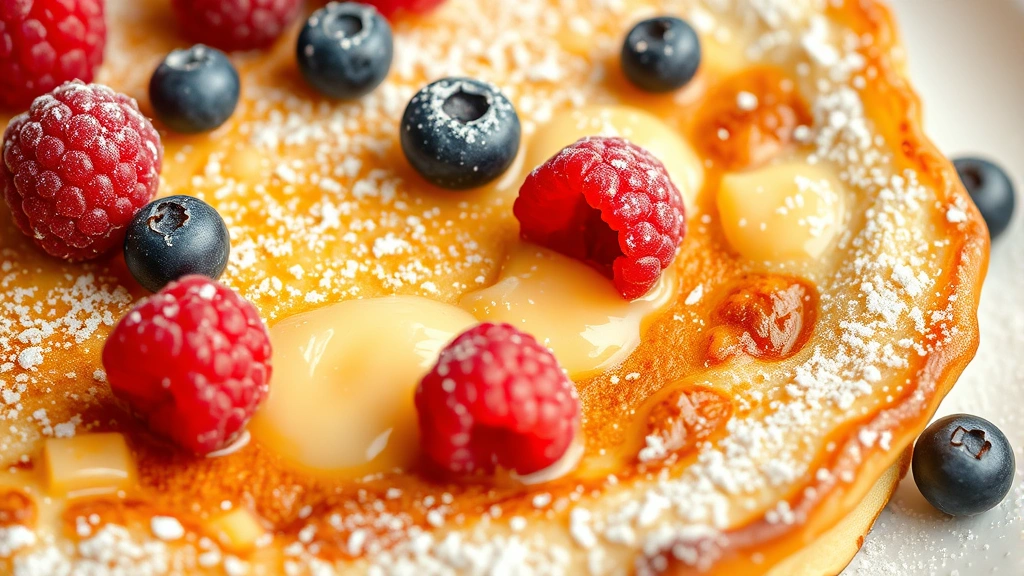
- Transfer the German pancake to a serving plate or serve directly from the skillet. Dust generously with powdered sugar.
- Serve immediately while still warm with your choice of toppings: fresh berries, a squeeze of lemon juice, maple syrup, jam, whipped cream, or any of your favorite accompaniments.
Pro Tips
The cast-iron skillet must be properly preheated. If it’s not hot enough, your pancake won’t puff up as dramatically. You should hear an immediate sizzle when the batter hits the butter.
Do not open the oven door while the pancake is baking. The sudden temperature change can cause it to fall prematurely. Set a timer and wait patiently—I promise it’s worth it.
Your batter can be made up to 4 hours ahead of time and stored in the refrigerator. This makes it perfect for entertaining since you can do all the prep work in advance.
Individual German pancakes can be made in smaller cast-iron skillets. Reduce baking time to 12-15 minutes depending on skillet size. They make a beautiful presentation for brunch guests.
Savory versions work beautifully too. Try topping with sautéed mushrooms, caramelized onions, fresh herbs, cheese, or even a fried egg in the center.
The pancake will deflate somewhat as it cools, and that’s completely normal. This is part of the charm of the dish. Some people prefer to serve it immediately at peak puff, while others don’t mind the slightly deflated version.
If using a regular oven-safe skillet instead of cast-iron, the results will be slightly different but still delicious. Non-stick skillets are not recommended as they don’t get quite as hot and won’t create the same crispy edges.
For a dairy-free version, substitute plant-based milk for regular milk and use dairy-free butter. The results are nearly identical and equally impressive.
Gluten-free flour blends work beautifully in this recipe. Use a 1:1 gluten-free all-purpose blend for the best results.