
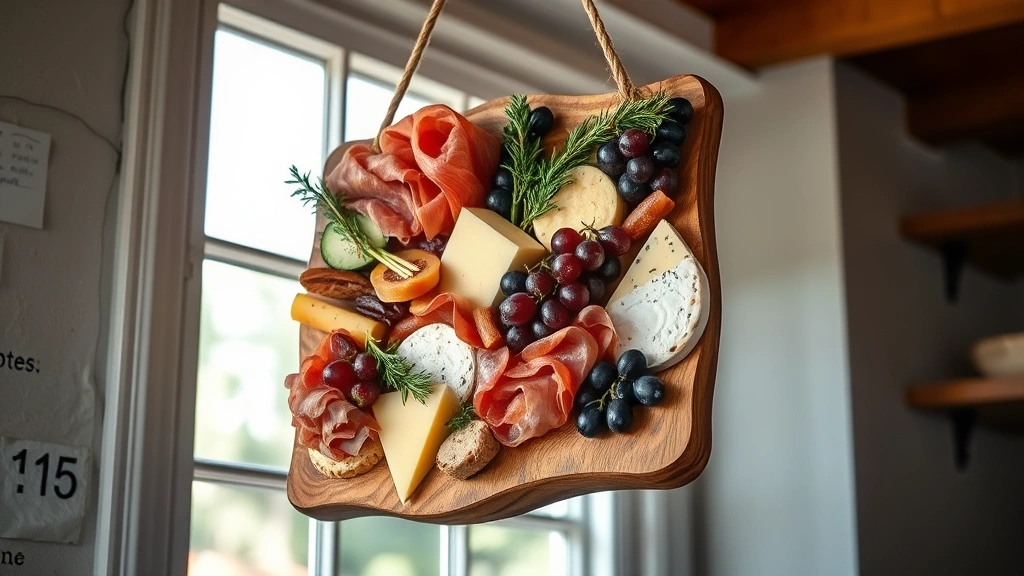
A hanging sign recipe is a delightful charcuterie and appetizer board presentation that doubles as both edible art and functional serving piece. This stunning display features cured meats, aged cheeses, fresh fruits, and artisanal crackers arranged on a suspended wooden plank, creating an Instagram-worthy centerpiece that’s perfect for entertaining.
The beauty of this hanging sign recipe lies in its versatility and visual impact. Whether you’re hosting an elegant dinner party, casual gathering, or holiday celebration, this presentation method transforms ordinary ingredients into an extraordinary experience. The suspended format not only saves precious table space but also draws the eye upward, making it an instant conversation starter.
What makes this hanging sign recipe truly special is how it combines the elegance of a classic charcuterie board with the drama of a suspended installation. You’ll learn to select complementary flavors, arrange ingredients with intention, and create a display that’s as beautiful as it is delicious. This recipe works wonderfully alongside other crowd-pleasers like Quick Tasty Bacon Carbonara or Best Heavy Cream Alfredo Sauce for a complete entertaining experience.
The hanging sign recipe trend has taken the entertaining world by storm, and for good reason. It’s an interactive experience that encourages guests to mingle and graze throughout your event. The suspended presentation creates an element of surprise and delight, as guests discover new flavor combinations and hidden gems within the arrangement. Plus, it’s surprisingly simple to execute once you understand the fundamentals of balance, color, and flavor pairing.
When planning your hanging sign recipe, think about your guest list and occasion. A more formal event might feature premium prosciutto, aged manchego, and champagne grapes, while a casual gathering could showcase pepperoni, cheddar, and apple slices. The Delicious Heavy Cream Pasta Recipe makes an excellent warm accompaniment to serve alongside.
The key to mastering this hanging sign recipe is understanding the principles of composition. You want to create visual interest through height variation, color contrast, and texture diversity. Incorporate elements like fresh herbs, edible flowers, and decorative serving utensils to elevate your presentation. Don’t be afraid to let some ingredients cascade or overlap—this creates a more organic, inviting feel.
Consider adding complementary items like Easy Pickled Red Onions for bright acidity and visual pop, or Best Shishito Peppers for a warm element that guests can enjoy throughout the event. These additions demonstrate thoughtful planning and elevate your hanging sign recipe from simple to sophisticated.
For expert guidance on board composition and ingredient selection, check out Bon Appétit’s Ultimate Charcuterie Board for inspiration. You might also explore Serious Eats’ Charcuterie Guide for technical details about meat and cheese selection.
The hanging sign recipe truly shines when you pay attention to the small details. Use small wooden boards, slate tiles, or copper elements to create visual interest. Include serving utensils that match your aesthetic—vintage spreaders, modern picks, or even small forks add functionality and style. The way you hang your board matters too; consider rope, chain, or decorative clips that complement your overall event design.
For those looking to expand their entertaining repertoire, the Best Chickpea Salad Recipe makes an excellent companion dish. Timing is important when executing this hanging sign recipe—assemble it no more than two hours before guests arrive to ensure everything looks fresh and beautiful.
Finally, this hanging sign recipe is wonderfully forgiving and encourages creativity. Use what you love, what’s in season, and what reflects your personal style. Whether you prefer Mediterranean flavors, classic combinations, or adventurous pairings, the hanging sign recipe format accommodates all preferences. For more advanced charcuterie techniques, explore New York Times Cooking’s Charcuterie Insights to deepen your knowledge and elevate your entertaining game to professional levels.
Ingredients
- 1 wooden plank or large board (24-36 inches)
- Heavy-duty rope, chain, or decorative hanging hardware
- 8 oz prosciutto or Italian cured ham, thinly sliced
- 6 oz soppressata or other cured sausage, sliced
- 4 oz pepperoni, thinly sliced
- 8 oz aged cheddar cheese, cut into chunks
- 8 oz brie or camembert cheese, whole or wedged
- 6 oz manchego or gouda cheese, sliced
- 2 cups marcona almonds or candied nuts
- 1.5 cups green and red grapes, in clusters
- 2 fresh pears, sliced thin
- 1 apple, sliced thin with lemon juice
- 1 cup fresh figs or dried apricots
- 1 cup mixed olives, pitted
- 8-12 assorted crackers and breadsticks
- 2 tablespoons fresh rosemary sprigs
- 2 tablespoons fresh thyme sprigs
- 1 tablespoon edible flowers (optional but recommended)
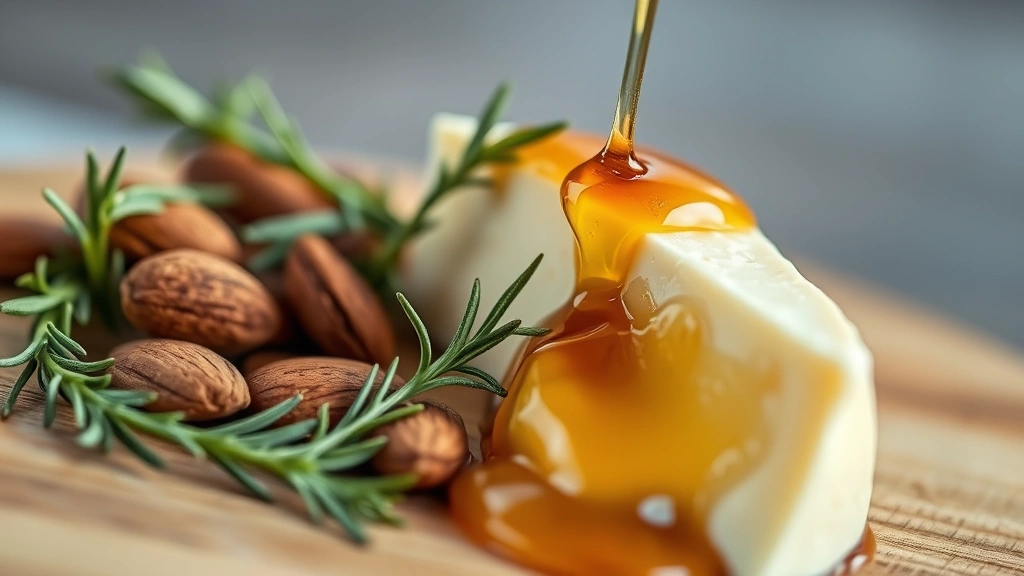
- Honey or jam for drizzling
- 3-4 small serving utensils or spreaders
- Salt and pepper to taste
Instructions
- Begin by preparing your wooden plank—clean thoroughly and inspect for splinters. If using a raw wood plank, lightly sand any rough edges and wipe clean with a damp cloth. Allow to dry completely. This ensures food safety and creates a beautiful presentation surface.
- Install your hanging hardware securely into the plank according to the manufacturer’s instructions. Test the weight capacity and ensure it can safely hold all ingredients plus the board itself. Use sturdy hooks, chains, or rope rated for at least 50 pounds. Never skip this safety step.
- Hang your prepared board in the location where you’ll be serving. Ensure it’s at a comfortable height for guests to reach (approximately 48-60 inches from the ground) and positioned away from direct sunlight, heat sources, or moisture that could damage the food or presentation.
- Lay out all your ingredients on a separate work surface, organized by category: cured meats, cheeses, fruits, nuts, and accompaniments. This mise en place approach prevents scrambling during assembly and ensures you’ve selected the right quantities.
- Begin arranging the base of your hanging sign recipe by placing larger cheese blocks and whole fruits as anchor points. Position the brie wedge in the upper third, manchego slices in the middle, and cheddar chunks in the lower section. These create visual scaffolding for the remaining elements.
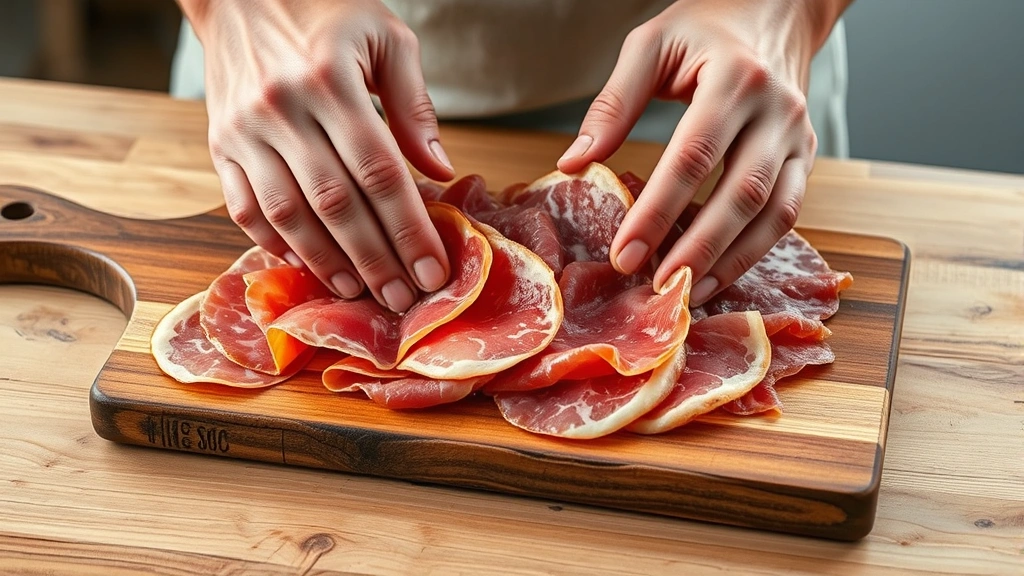
- Arrange the cured meats by folding or rolling them loosely and creating small piles around the board. Distribute different meat types evenly—prosciutto on the left, soppressata on the right, pepperoni in the center. This creates visual balance and ensures variety for each guest.
- Add clusters of grapes in the spaces between cheeses and meats, allowing some to cascade naturally over edges. Position pear slices and apple slices (tossed with lemon juice to prevent browning) around the board, creating lines of color that guide the eye.
- Scatter marcona almonds and candied nuts in small piles throughout the board. These provide texture contrast and fill gaps while adding nutritional value and visual interest. Position nuts in odd numbers for a more natural appearance.
- Add dried figs or apricots, olives, and any other specialty items around the remaining space. Aim for balance—if the right side feels heavy, add lighter elements to the left. Step back frequently to assess the overall composition.
- Tuck fresh rosemary and thyme sprigs throughout the board, positioning them vertically to add height and dimension. These herbs add color, aroma, and elegance. If using edible flowers, place them as the final accent in prominent areas.
- Position your small serving utensils strategically around the board—one near the soft cheese, one near the nuts, and one near the meats. This encourages guests to use utensils rather than fingers and keeps the presentation clean.
- Drizzle honey or place small dollops of jam in two or three strategic locations. These sweet elements provide visual interest and suggest flavor pairings to guests. Use a small spoon to create artful presentations.
- Add your crackers and breadsticks standing upright or fanned in clusters, positioning them around the board’s perimeter. This creates height variation and makes them easily accessible to guests.
- Do a final visual assessment of your hanging sign recipe. Ensure there are no large empty spaces, colors are well-distributed, and the composition flows logically around the board. Make small adjustments as needed.
- Keep the assembled hanging sign recipe in a cool location (below 70°F) until serving time. If preparing more than one hour ahead, cover loosely with plastic wrap to prevent drying while maintaining visibility.
- When ready to serve, remove any plastic covering and do a quick visual refresh—rearrange any items that shifted, add fresh herbs if needed, and ensure all elements look inviting and fresh.
Pro Tips
- **Choosing Your Board**: Select a sturdy wooden plank that’s large enough to accommodate ingredients without crowding. Hardwoods like oak or walnut hold up better than softer woods. Alternatively, use food-safe materials like slate, cork, or even concrete for variety.
- **Meat Selection**: Choose high-quality cured meats from a specialty butcher when possible. The thinner you slice the meats, the more elegantly they drape and fold on the board. Ask your butcher to slice to order for optimal thickness.
- **Cheese Strategy**: Include a variety of textures and ages—a hard cheese, a semi-soft cheese, and a soft cheese. This provides range for guests and creates visual diversity. Keep cheeses at room temperature for 30 minutes before serving for optimal flavor.
- **Fruit Considerations**: Choose fruits in season for best flavor and appearance. Grapes add visual drama in clusters, while sliced fruits should be prepared close to serving time to prevent browning. Toss apple and pear slices in fresh lemon juice immediately after cutting.
- **Color Balance**: Aim for a rainbow effect by distributing colors evenly. If your arrangement feels too brown-heavy, add bright green grapes or fresh herbs. If too monochromatic, introduce contrasting elements like red pepperoni or purple olives.
- **Hanging Hardware Safety**: Invest in quality hanging hardware rated for at least double the expected weight. Test installation on the intended wall or surface before adding food. Consider hiring a professional if you’re uncertain about structural integrity.
- **Prep Timeline**: Prepare your board no more than 2 hours before serving for optimal freshness. If preparing earlier, keep components separate and assemble shortly before guests arrive.
- **Dietary Accommodations**: Always ask guests about dietary restrictions ahead of time. Provide vegetarian options, nut-free alternatives, and clearly label any items containing common allergens.
- **Abundance Principle**: Include slightly more food than you think necessary. Guests enjoy abundance and choice, and leftover quality charcuterie items store well for several days.
- **Temperature Management**: Keep the assembled board in the coolest part of your serving area, away from direct sunlight and heat sources. Bring cheeses to room temperature right before serving for best flavor and texture.
- **Garnish Impact**: Fresh herbs and edible flowers transform a good board into a stunning one. Rosemary, thyme, and microgreens add elegance. Pansies and violas are beautiful, safe edible flowers.
- **Utensil Strategy**: Provide small serving utensils for each category of food. This prevents cross-contamination and encourages neat serving. Include spreaders for soft cheeses and small forks for olives and other bite-sized items.
- **Flavor Pairings**: Group complementary flavors together—place honey near the brie, jam near the cheddar, olives near the cured meats. This guides guests toward delicious combinations.
- **Storage After Service**: Leftover items can be individually wrapped and refrigerated. Cured meats keep 3-5 days, cheeses keep 5-7 days, and most fruits keep 2-3 days depending on type. Don’t reuse the board if it shows food residue.